在 Rocky Linux 9|8 | 上配置 PowerDNS 和 PowerDNS Admin
在今天的指南中,我们将介绍如何在 Rocky Linux 9|8 上配置 PowerDNS 和 PowerDNS Admin。但在深入探讨问题的关键之前,我们需要了解这个工具的用途。
DNS 是域名系统的缩写。这是一项互联网服务,用于将 IP 地址解析为域名,反之亦然。这降低了记忆与网页关联的多个 IP 地址所涉及的复杂性。通常,人们使用 google.com、computingforgeeks.com 等域名通过互联网访问网站。这些域名与这些 IP 地址绑定。 DNS 的工作是转换地址以允许浏览器加载页面。如今,市场上有多种 DNS 解决方案。它们包括 BIND DNS、Knot DNS、NSD、MaraDNS、YADIFA、PowerDNS 等
PowerDNS是一款提供权威服务器和递归DNS产品的工具。 权威 DNS 权威 DNS 会响应有关它所知道的域的所有查询,并忽略那些它不知道的域。另一端的递归 DNS DNS 不了解任何域,而是依赖权威 DNS 来为针对其的查询提供答案。这两种产品由 PowerDNS 单独提供,但通常会结合起来无缝运行。
PowerDNS 于1999首次作为商业产品开发,随后于2002开源。由于以下功能,该工具的受欢迎程度大大提高:
- 高域分辨率性能。
- 非常改进的安全功能。
- 支持多种后端,从简单的区域文件、关系数据库一直到负载平衡/故障转移算法。
- 它在运行过程中提供大量统计数据,有助于确定安装的可扩展性并发现问题。
PowerDNS 管理员提供了管理 Web 界面,您可以在其中创建和管理 PowerDNS DNS 区域。
它提供了许多令人惊奇的功能。他们之中有一些是:
- 多域管理
- 提供有限的 API 用于操作区域和记录
- 用户管理
- 提供域模板
- 支持Google/Github/Azure/OpenID OAuth
- 仪表板和 pdns 服务统计
- 支持DynDNS 2协议
- 支持本地DB/SAML/LDAP/Active Directory用户认证
- 支持双因素身份验证 (TOTP) 协议
现在就让我们一起来感受一下这款产品的魅力吧。
入门
在本指南中,我们将安装和配置:
- PowerDNS 和 PowerDNS 管理员
- MariaDB 数据库服务器
我们还需要启用 EPEL 存储库来提供其他所需的包:
sudo yum install epel-release将 SELinux 设置为宽容模式:
sudo setenforce 0 && sudo sed -i 's/^SELINUX=.*/SELINUX=permissive/g' /etc/selinux/config
cat /etc/selinux/config | grep SELINUX=
#1.在 Rocky Linux 9|8 上安装和配置 MariaDB
PowerDNS 支持多种数据库后端,包括 MySQL、PostgreSQL、Oracle 等。在本指南中,我们将使用 MariaDB 作为后端存储。
使用以下命令在 Rocky Linux 9|8 上安装 MariaDB:
sudo dnf install mariadb-server mariadb启动并启用服务:
sudo systemctl enable --now mariadb强化实例,如图所示
$ sudo mysql_secure_installation
....
Enter current password for root (enter for none): Just press Enter
......
Switch to unix_socket authentication [Y/n] Y
.....
Change the root password? [Y/n] Y
New password:  New-root-password
Re-enter new password: Re-enter New-root-password
....
Remove anonymous users? [Y/n] Y
....
Disallow root login remotely? [Y/n] Y
.....
Remove test database and access to it? [Y/n] Y
......
Reload privilege tables now? [Y/n] Y
...
Thanks for using MariaDB!
登录到外壳:
sudo mysql -u root -p 为 PowerDNS 创建数据库
CREATE DATABASE powerdns;
GRANT ALL ON powerdns.* TO 'powerdns_user'@'%' IDENTIFIED BY 'Strongpassword';
FLUSH PRIVILEGES;
请记住使用不带特殊字符的密码,因为这可能会导致 PowerDNS 上出现错误“拒绝用户‘powerdns_user’@’localhost’访问(使用密码:YES)”。
继续并创建 PowerDNS 表:
use powerdns;使用以下命令添加表:
CREATE TABLE domains (
   id                    INT AUTO_INCREMENT,
   name                  VARCHAR(255) NOT NULL,
   master                VARCHAR(128) DEFAULT NULL,
   last_check            INT DEFAULT NULL,
   type                  VARCHAR(6) NOT NULL,
   notified_serial       INT DEFAULT NULL,
   account               VARCHAR(40) DEFAULT NULL,
   PRIMARY KEY (id)
 ) Engine=InnoDB;

 CREATE UNIQUE INDEX name_index ON domains(name);


 CREATE TABLE records (
   id                    BIGINT AUTO_INCREMENT,
   domain_id             INT DEFAULT NULL,
   name                  VARCHAR(255) DEFAULT NULL,
   type                  VARCHAR(10) DEFAULT NULL,
   content               VARCHAR(64000) DEFAULT NULL,
  ttl                   INT DEFAULT NULL,
   prio                  INT DEFAULT NULL,
   change_date           INT DEFAULT NULL,
   disabled              TINYINT(1) DEFAULT 0,
   ordername             VARCHAR(255) BINARY DEFAULT NULL,
   auth                  TINYINT(1) DEFAULT 1,
   PRIMARY KEY (id)
 ) Engine=InnoDB;

 CREATE INDEX nametype_index ON records(name,type);
 CREATE INDEX domain_id ON records(domain_id);
 CREATE INDEX recordorder ON records (domain_id, ordername);


 CREATE TABLE supermasters (
   ip                    VARCHAR(64) NOT NULL,
   nameserver            VARCHAR(255) NOT NULL,
   account               VARCHAR(40) NOT NULL,
   PRIMARY KEY (ip, nameserver)
 ) Engine=InnoDB;


 CREATE TABLE comments (
   id                    INT AUTO_INCREMENT,
   domain_id             INT NOT NULL,
   name                  VARCHAR(255) NOT NULL,
   type                  VARCHAR(10) NOT NULL,
   modified_at           INT NOT NULL,
   account               VARCHAR(40) NOT NULL,
   comment               VARCHAR(64000) NOT NULL,
   PRIMARY KEY (id)
 ) Engine=InnoDB;
CREATE INDEX comments_domain_id_idx ON comments (domain_id);
 CREATE INDEX comments_name_type_idx ON comments (name, type);
 CREATE INDEX comments_order_idx ON comments (domain_id, modified_at);


 CREATE TABLE domainmetadata (
   id                    INT AUTO_INCREMENT,
   domain_id             INT NOT NULL,
   kind                  VARCHAR(32),
   content               TEXT,
   PRIMARY KEY (id)
 ) Engine=InnoDB;

 CREATE INDEX domainmetadata_idx ON domainmetadata (domain_id, kind);


 CREATE TABLE cryptokeys (
 id                    INT AUTO_INCREMENT,
   domain_id             INT NOT NULL,
   flags                 INT NOT NULL,
   active                BOOL,
   content               TEXT,
   PRIMARY KEY(id)
 ) Engine=InnoDB;

 CREATE INDEX domainidindex ON cryptokeys(domain_id);


 CREATE TABLE tsigkeys (
   id                    INT AUTO_INCREMENT,
   name                  VARCHAR(255),
   algorithm             VARCHAR(50),
   secret                VARCHAR(255),
   PRIMARY KEY (id)
 ) Engine=InnoDB;

 CREATE UNIQUE INDEX namealgoindex ON tsigkeys(name, algorithm);
验证表是否存在:
MariaDB [powerdns]> show tables;
+--------------------+
| Tables_in_powerdns |
+--------------------+
| comments           |
| cryptokeys         |
| domainmetadata     |
| domains            |
| records            |
| supermasters       |
| tsigkeys           |
+--------------------+
7 rows in set (0.000 sec)

MariaDB [powerdns]> quit;
#2.在 Rocky Linux 9|8 上安装 PowerDNS
在 Rocky Linux 8 上,您需要禁用在端口 53 上运行的 systemd-resolved 服务,因为这与 PowerDNS 使用的端口相同。
sudo systemctl stop systemd-resolved
sudo systemctl disable systemd-resolved
删除文件的符号链接:
$ ls -lh /etc/resolv.conf
-rw-r--r--. 1 root root 55 Aug 24 06:46 /etc/resolv.conf
$ sudo unlink /etc/resolv.conf
现在创建一个新的符号链接:
echo "nameserver 8.8.8.8" | sudo tee /etc/resolv.conf您还需要停止并禁用 dnsmasq:
sudo systemctl disable dnsmasq
sudo systemctl stop dnsmasq
重新启动网络管理器:
sudo service NetworkManager restart终止所有 dnsmasq 服务:
sudo killall dnsmasq由于 PowerDNS 存在于 EPEL 存储库中,我们可以使用以下命令安装它:
sudo dnf -y install pdns pdns-backend-mysql bind-utils#3。配置 PowerDNS 数据库
由于我们已经在 MariaDB 上创建了一个数据库,我们只需编辑配置文件以允许 PowerDNS 使用该数据库:
sudo vim /etc/pdns/pdns.conf对文件进行以下更改,确保 launch=bind 被注释掉。
# launch=bind
launch=gmysql
# gmysql parameters
gmysql-host=127.0.0.1
gmysql-port=3306
gmysql-dbname=powerdns
gmysql-user=powerdns_user
gmysql-password=Strongpassword
保存更改并验证与数据库的连接:
sudo systemctl stop pdns.service
sudo pdns_server --daemon=no --guardian=no --loglevel=9
示例输出:
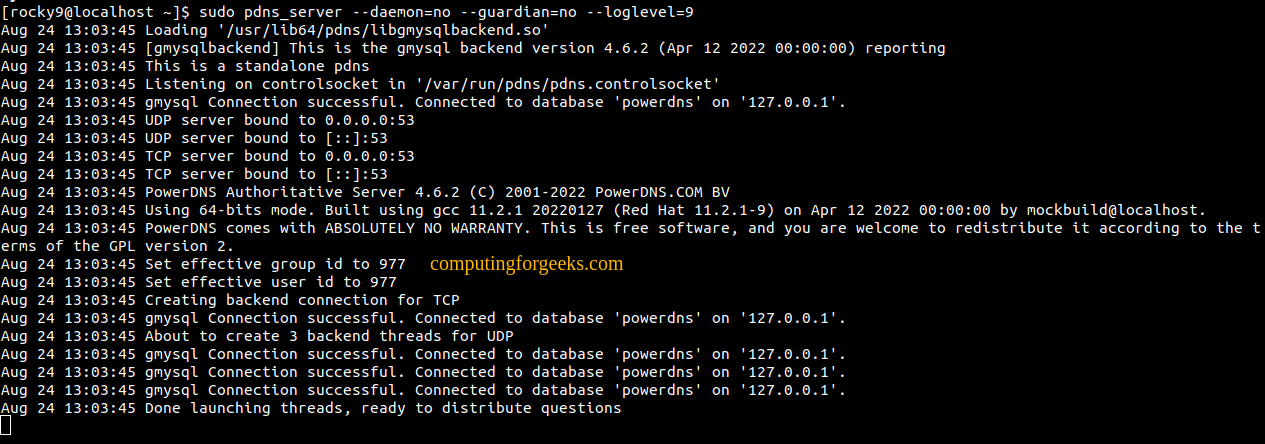
启动并启用 PowerDNS:
sudo killall -9 pdns_server
sudo systemctl start pdns
sudo systemctl enable pdns
验证服务是否正在运行:
$ sudo ss -alnp4 | grep pdns
udp   UNCONN 0      0            0.0.0.0:53         0.0.0.0:*    users:(("pdns_server",pid=33244,fd=5))
tcp   LISTEN 0      128          0.0.0.0:53         0.0.0.0:*    users:(("pdns_server",pid=33244,fd=7))
允许 DNS 服务通过防火墙:
sudo firewall-cmd --add-service=dns --permanent
sudo firewall-cmd --reload
还要验证 PowerDNS 是否响应请求:
$ dig @127.0.0.1

; <<>> DiG 9.16.23-RH <<>> @127.0.0.1
; (1 server found)
;; global options: +cmd
;; Got answer:
;; ->>HEADER<<- opcode: QUERY, status: REFUSED, id: 18968
;; flags: qr rd; QUERY: 1, ANSWER: 0, AUTHORITY: 0, ADDITIONAL: 1
;; WARNING: recursion requested but not available

;; OPT PSEUDOSECTION:
; EDNS: version: 0, flags:; udp: 1232
;; QUESTION SECTION:
;.				IN	NS

;; Query time: 0 msec
;; SERVER: 127.0.0.1#53(127.0.0.1)
;; WHEN: Wed Aug 24 13:15:24 CEST 2022
;; MSG SIZE  rcvd: 28
#4。在 Rocky Linux 9|8 上安装 PowerDNS Admin
现在我们可以安装 PowerDNS Admin,这是一个 Web 管理界面,可以轻松管理 PowerDNS 服务器。现在,我们将安装所需的构建工具。添加 REMI 存储库并启用 PowerTools
##On Rocky Linux 8
sudo dnf -y install http://rpms.remirepo.net/enterprise/remi-release-8.rpm
sudo dnf config-manager --set-enabled powertools

##On Rocky Linux 9
sudo dnf -y install http://rpms.remirepo.net/enterprise/remi-release-9.rpm
sudo dnf config-manager --set-enabled crb
安装Python开发包和其他包。
sudo yum install python3-devel gcc python3-pip git mariadb-connector-c-devel xmlsec1 openldap-devel xmlsec1-openssl-devel postgresql-devel libxslt-devel libffi-devel cyrus-sasl-devel libtool-ltdl-devel使用 PIP,安装 Flask 和 virtualenv
sudo pip3 install virtualenv flask同时在 Rocky Linux 9|8 上安装 Node.js
curl -sL https://rpm.nodesource.com/setup_18.x | sudo -E bash -
sudo yum install -y nodejs
还要安装 Yarn 包:
curl -sL https://dl.yarnpkg.com/rpm/yarn.repo | sudo tee /etc/yum.repos.d/yarn.repo
sudo yum install yarn
现在将 PowerDNS 管理源代码克隆到 /var/www/html/pdns
sudo su -
git clone https://github.com/ngoduykhanh/PowerDNS-Admin.git /var/www/html/pdns
切换到目录并创建虚拟环境:
cd /var/www/html/pdns/
virtualenv -p python3 flask
激活虚拟环境并安装所需的软件包。
source ./flask/bin/activate
pip install --upgrade pip
pip install -r requirements.txt
完成后,停用环境:
deactivate编辑以下文件以允许 PowerDNS 管理员连接到数据库;
vim /var/www/html/pdns/powerdnsadmin/default_config.py进行以下调整:
### DATABASE CONFIG
SQLA_DB_USER = 'powerdns_user'
SQLA_DB_PASSWORD = 'Strongpassword'
SQLA_DB_HOST = '127.0.0.1'
SQLA_DB_NAME = 'powerdns'
SQLALCHEMY_TRACK_MODIFICATIONS = True
创建数据库模式:
cd /var/www/html/pdns/
source ./flask/bin/activate
export FLASK_APP=powerdnsadmin/__init__.py
flask db upgrade
示例输出:
INFO  [alembic.runtime.migration] Context impl MySQLImpl.
INFO  [alembic.runtime.migration] Will assume non-transactional DDL.
INFO  [alembic.runtime.migration] Running upgrade  -> 787bdba9e147, Init DB
INFO  [alembic.runtime.migration] Running upgrade 787bdba9e147 -> 59729e468045, Add view column to setting table
INFO  [alembic.runtime.migration] Running upgrade 59729e468045 -> 1274ed462010, Change setting.value data type
INFO  [alembic.runtime.migration] Running upgrade 1274ed462010 -> 4a666113c7bb, Adding Operator Role
INFO  [alembic.runtime.migration] Running upgrade 4a666113c7bb -> 31a4ed468b18, Remove all setting in the DB
INFO  [alembic.runtime.migration] Running upgrade 31a4ed468b18 -> 654298797277, Upgrade DB Schema
INFO  [alembic.runtime.migration] Running upgrade 654298797277 -> 0fb6d23a4863, Remove user avatar
INFO  [alembic.runtime.migration] Running upgrade 0fb6d23a4863 -> 856bb94b7040, Add comment column in domain template record table
INFO  [alembic.runtime.migration] Running upgrade 856bb94b7040 -> b0fea72a3f20, Update domain serial columns type
INFO  [alembic.runtime.migration] Running upgrade b0fea72a3f20 -> 3f76448bb6de, Add user.confirmed column
INFO  [alembic.runtime.migration] Running upgrade 3f76448bb6de -> 0d3d93f1c2e0, Add domain_id to history table
INFO  [alembic.runtime.migration] Running upgrade 0d3d93f1c2e0 -> 0967658d9c0d, add apikey account mapping table
INFO  [alembic.runtime.migration] Running upgrade 0967658d9c0d -> fbc7cf864b24, update history detail quotes
INFO  [alembic.runtime.migration] Running upgrade fbc7cf864b24 -> 6ea7dc05f496, Fix typo in history detail
现在使用 Yarn 生成资产文件:
yarn install --pure-lockfile
flask assets build
停用环境:
deactivate#5。在 Rocky Linux 9|8 上启用 PowerDNS API 访问
要启用 PowerDNS API 访问,我们需要编辑以下文件;
sudo vim /etc/pdns/pdns.conf对文件进行以下更改:
# api   Enable/disable the REST API (including HTTP listener)
#
# api=no
api=yes

#################################
# api-key       Static pre-shared authentication key for access to the REST API
#
# api-key=
api-key=3ce1af6c-981d-4190-a559-1e691d89b90e #You can generate one from https://codepen.io/corenominal/pen/rxOmMJ
保存文件并重新启动服务:
sudo systemctl restart pdns#6。为 Powerdns 安装和配置 Nginx
为了能够加载 PowerDNS Web 界面,我们需要安装和配置 Nginx。
sudo yum install nginx安装后,为 PowerDNS 管理员创建一个虚拟主机文件。
vim /etc/nginx/conf.d/powerdns-admin.conf添加以下行并根据需要进行更改:
server {
  listen	*:80;
  server_name               pdnsadmin.computingforgeeks.com;

  index                     index.html index.htm index.php;
  root                      /var/www/html/pdns;
  access_log                /var/log/nginx/pdnsadmin_access.log combined;
  error_log                 /var/log/nginx/pdnsadmin_error.log;

  client_max_body_size              10m;
  client_body_buffer_size           128k;
  proxy_redirect                    off;
  proxy_connect_timeout             90;
  proxy_send_timeout                90;
  proxy_read_timeout                90;
  proxy_buffers                     32 4k;
  proxy_buffer_size                 8k;
  proxy_set_header                  Host $host;
  proxy_set_header                  X-Real-IP $remote_addr;
  proxy_set_header                  X-Forwarded-For $proxy_add_x_forwarded_for;
  proxy_headers_hash_bucket_size    64;

  location ~ ^/static/  {
    include  /etc/nginx/mime.types;
    root /var/www/html/pdns/powerdnsadmin;

    location ~*  \.(jpg|jpeg|png|gif)$ {
      expires 365d;
    }

    location ~* ^.+.(css|js)$ {
      expires 7d;
    }
  }

  location / {
    proxy_pass            http://unix:/run/pdnsadmin/socket;
    proxy_read_timeout    120;
    proxy_connect_timeout 120;
    proxy_redirect        off;
  }

}
设置路径的正确所有权:
chown -R nginx: /var/www/html/pdns重新启动 Nginx:
systemctl restart nginx允许服务通过防火墙:
sudo firewall-cmd --add-port=80/tcp --permanent
sudo firewall-cmd --reload
#7.为 PowerDNS 管理员创建服务文件
为了能够管理 PowerDNS Admin 服务,我们需要创建一个 systemd 服务文件;
vim /etc/systemd/system/pdnsadmin.service该文件将包含以下行:
[Unit]
Description=PowerDNS-Admin
Requires=pdnsadmin.socket
After=network.target

[Service]
PIDFile=/run/pdnsadmin/pid
User=pdns
Group=pdns
WorkingDirectory=/var/www/html/pdns
ExecStart=/var/www/html/pdns/flask/bin/gunicorn --pid /run/pdnsadmin/pid --bind unix:/run/pdnsadmin/socket 'powerdnsadmin:create_app()'
ExecReload=/bin/kill -s HUP $MAINPID
ExecStop=/bin/kill -s TERM $MAINPID
PrivateTmp=true

[Install]
WantedBy=multi-user.target
为 PowerDNS 管理员创建套接字文件;
sudo vim /etc/systemd/system/pdnsadmin.socket将以下行添加到文件中;
[Unit]
Description=PowerDNS-Admin socket

[Socket]
ListenStream=/run/pdnsadmin/socket

[Install]
WantedBy=sockets.target
最后创建环境文件
mkdir /run/pdnsadmin/
echo "d /run/pdnsadmin 0755 pdns pdns -" >> /etc/tmpfiles.d/pdnsadmin.conf
设置文件的正确所有权:
chown -R pdns: /run/pdnsadmin/
chown -R pdns: /var/www/html/pdns/powerdnsadmin/
重新加载系统守护进程;
systemctl daemon-reload在 Rocky Linux 9|8 上启动并启用 PowerDNS Admin
systemctl enable --now pdnsadmin.service pdnsadmin.socket验证服务是否正在运行:
$ systemctl status pdnsadmin.service pdnsadmin.socket
 pdnsadmin.service - PowerDNS-Admin
     Loaded: loaded (/etc/systemd/system/pdnsadmin.service; enabled; vendor preset: disabled)
     Active: active (running) since Wed 2022-08-24 14:42:36 CEST; 9s ago
TriggeredBy: ● pdnsadmin.socket
   Main PID: 92303 (gunicorn)
      Tasks: 2 (limit: 23441)
     Memory: 69.4M
        CPU: 690ms
     CGroup: /system.slice/pdnsadmin.service
             ├─92303 /var/www/html/pdns/flask/bin/python /var/www/html/pdns/flask/bin/gunicorn --pid /run/pdnsadmin/pid --bind unix:/run/pd>
             └─92304 /var/www/html/pdns/flask/bin/python /var/www/html/pdns/flask/bin/gunicorn --pid /run/pdnsadmin/pid --bind unix:/run/pd>

Aug 24 14:42:36 localhost.localdomain systemd[1]: Started PowerDNS-Admin.
Aug 24 14:42:36 localhost.localdomain gunicorn[92303]: [2022-08-24 14:42:36 +0200] [92303] [INFO] Starting gunicorn 20.0.4
Aug 24 14:42:36 localhost.localdomain gunicorn[92303]: [2022-08-24 14:42:36 +0200] [92303] [INFO] Listening at: unix:/run/pdnsadmin/socket >
Aug 24 14:42:36 localhost.localdomain gunicorn[92303]: [2022-08-24 14:42:36 +0200] [92303] [INFO] Using worker: sync
Aug 24 14:42:36 localhost.localdomain gunicorn[92304]: [2022-08-24 14:42:36 +0200] [92304] [INFO] Booting worker with pid: 92304

● pdnsadmin.socket - PowerDNS-Admin socket
     Loaded: loaded (/etc/systemd/system/pdnsadmin.socket; enabled; vendor preset: disabled)
     Active: active (running) since Wed 2022-08-24 14:42:36 CEST; 9s ago
      Until: Wed 2022-08-24 14:42:36 CEST; 9s ago
   Triggers: ● pdnsadmin.service
     Listen: /run/pdnsadmin/socket (Stream)
     CGroup: /system.slice/pdnsadmin.socket

Aug 24 14:42:36 localhost.localdomain systemd[1]: Listening on PowerDNS-Admin socket.
#8。访问 PowerDNS 管理 UI
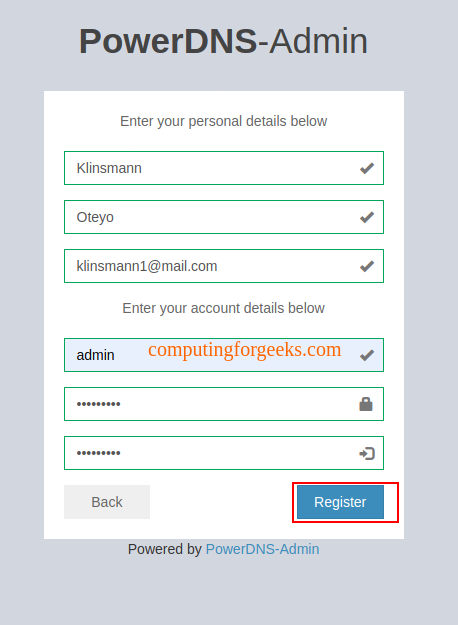
完成上述配置后,您可以使用 URL http://domain_name 或 http://IP_address 访问 PowerDNS Web UI。
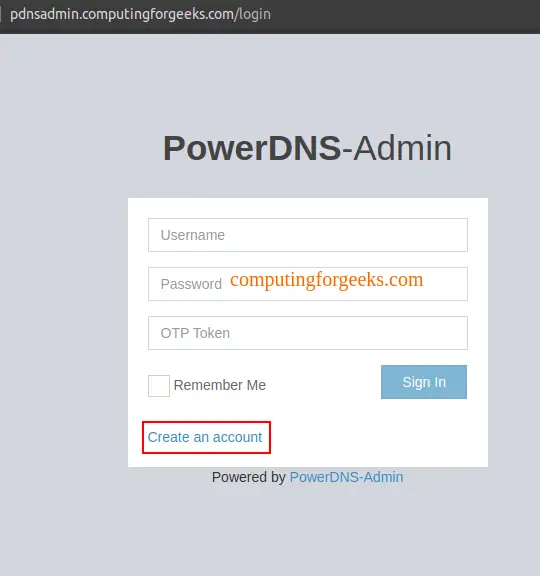
创建一个用户帐户。
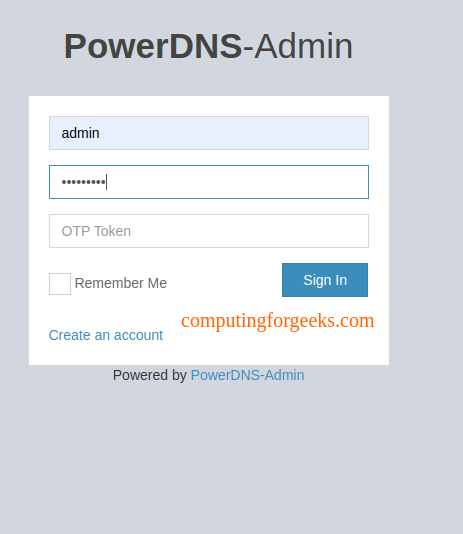
创建后,使用用户凭据登录 PowerDNS Admin。
您将看到仪表板。现在,通过提供 PowerDNS 配置文件 (/etc/powerdns/pdns.conf) 中定义的 API 密钥和 URL (http://127.0.0.1:8081)如图:
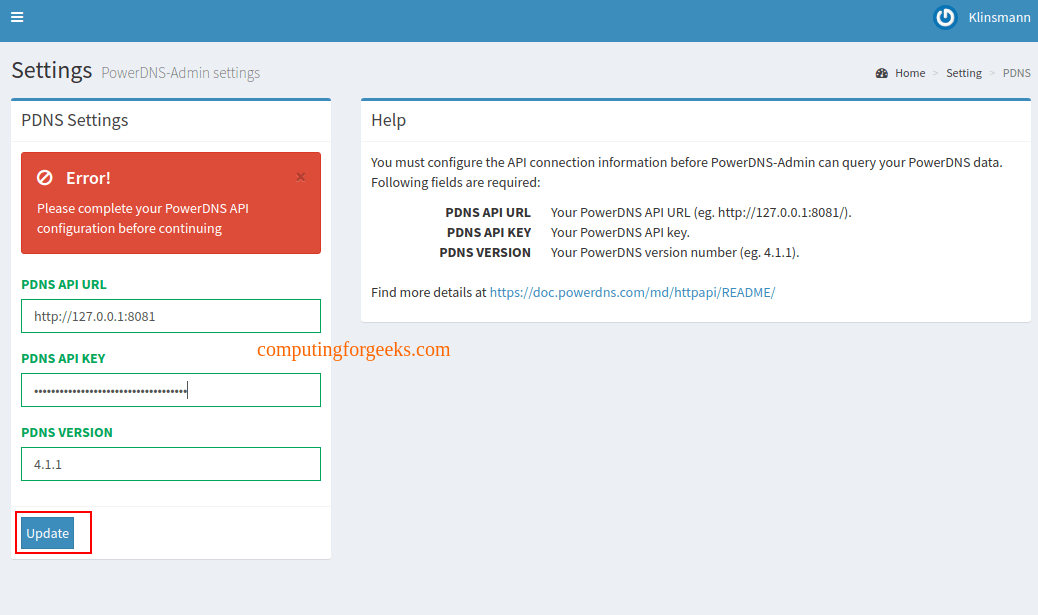
提供后,单击更新,错误就会消失。您现在可以管理 PowerDNS 服务器。
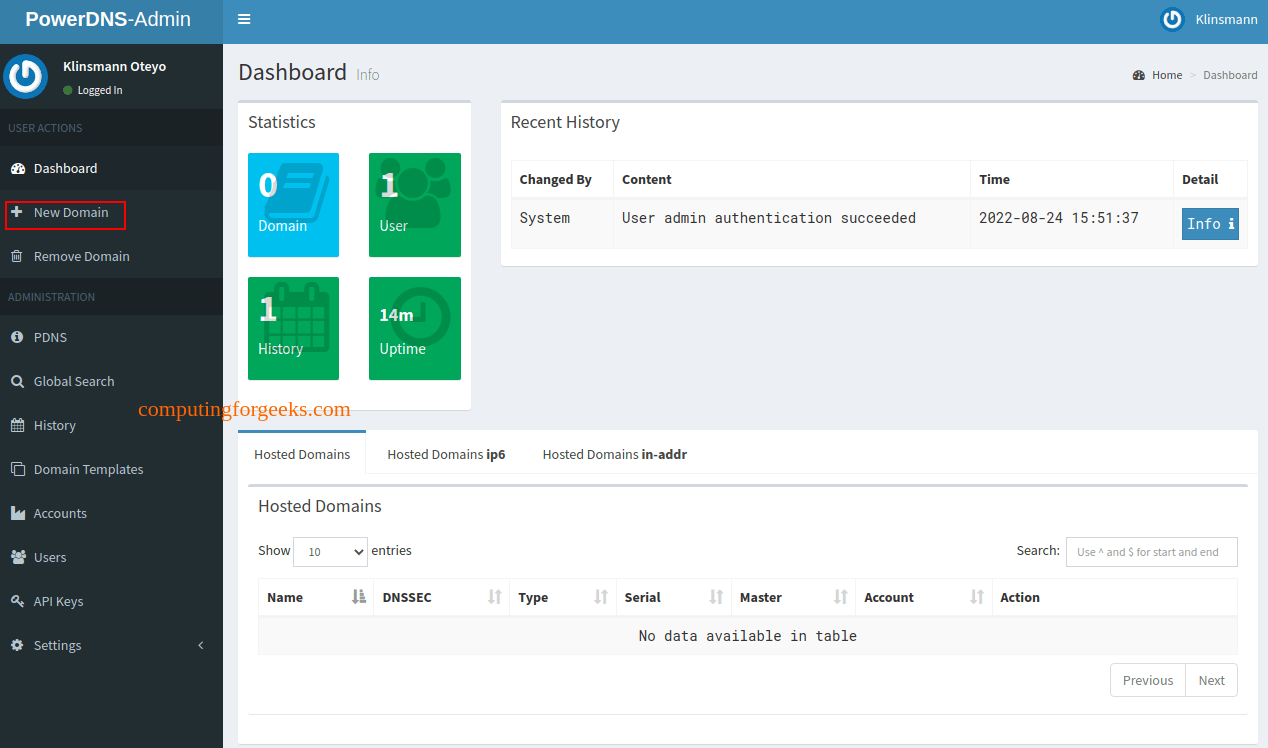
要创建新域,请单击+新域选项卡
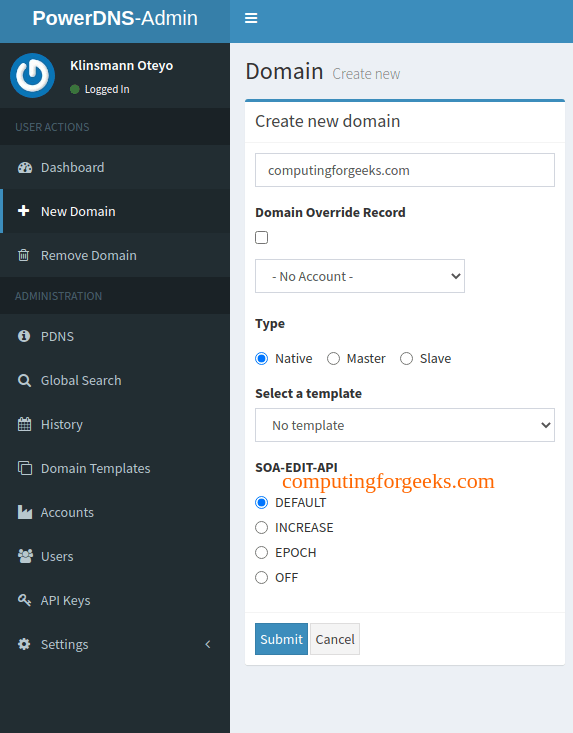
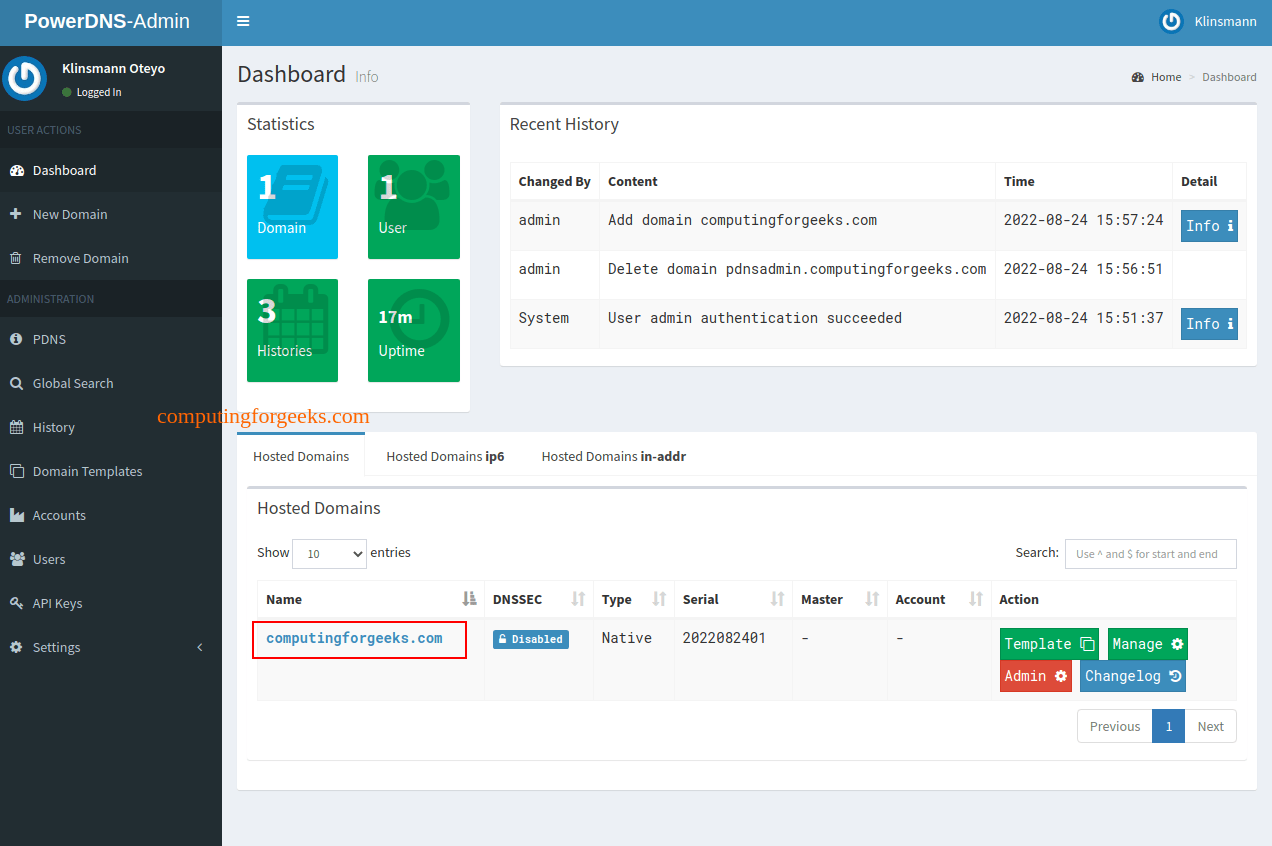
提供域名,从模板列表中选择要使用的模板,然后提交。添加的域名将如图所示;
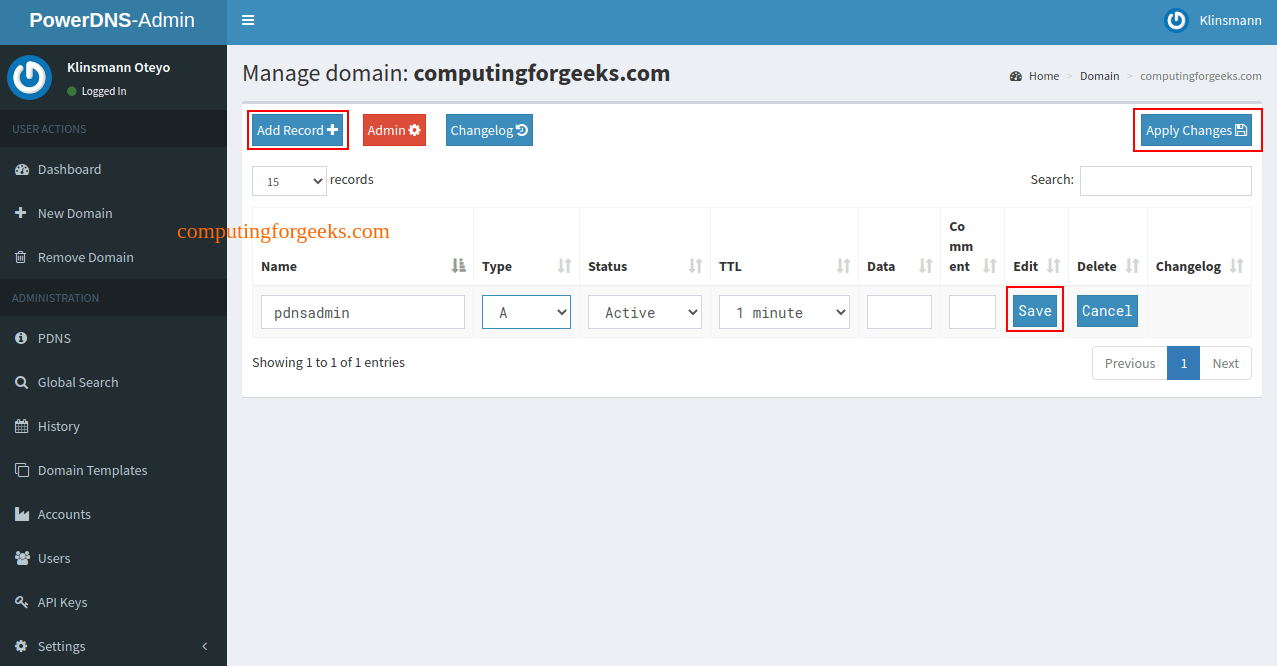
现在可以通过单击记录并提供记录名称将记录添加到域中。添加后,保存并应用更改:
这是关于如何开始使用 PowerDNS 和 PowerDNS 管理的简短演示。我希望这对您来说很重要。您可以从 PowerDNS 管理 UI 进行许多其他配置,例如编辑域模板、删除域、管理用户帐户等。我希望这对您来说很重要。
查看更多:
- Bind、dnsmasq、PowerDNS、Unbound
- 在 Docker 容器中运行 PowerDNS 和 PowerDNS Admin
- 在 Debian 上安装 PowerDNS 和 PowerDNS Admin