在 Ubuntu 22.04|20.04|18.04 | 上配置 Varnish Cache 7
Varnish Cache 是一款强大的开源 HTTP 和反向代理引擎,专为高负载动态网站和 API 设计。 Varnish Cache 与 Squid 等其他 Web 加速器不同,它最初是作为客户端缓存。它的发展主要关注 HTTP,不像其他代理服务器增加了对 SMTP、FTP 等的支持。
通常,Varnish Cache 位于 Web 服务器后面,可将网站速度提高大约 300-1000 倍。这是通过将请求的网站缓存在内存中并在请求时提供服务而无需构建相同的信息来实现的。更重要的是,Varnish Cache 在运行多个服务器时可以充当负载平衡器。
Varnish 缓存具有以下特点:
- DNS、随机、散列和基于客户端 IP 的控制器
- HTTP 流传递和获取
- Varnish 模块/VMOD 的插件支持
- 支持 Edge Side Includes,包括将压缩的 ESI 片段拼接在一起
- 支持Gzip压缩和解压缩
- 支持持久存储,无需 LRU 驱逐
- Varnish 私有 CDN
- Varnish API 和 Web 加速
本指南为您提供了如何在 Ubuntu 22.04|20.04|18.04 上为 Apache/Nginx 配置 Varnish Cache 7 所需的步骤。
第 1 步 – 更新系统
对于本指南,您将需要以下内容:
- Ubuntu 22.04|20.04|18.04 安装在您的系统上。
- 具有 sudo 访问权限的用户。
将您的系统软件包更新到最新的可用版本。
sudo apt update && sudo apt -y full-upgrade如果需要,请执行重新启动:
[ -f /var/run/reboot-required ] && sudo reboot -f步骤 2 – 注册 Varnish Cache 7 存储库
我们将从注册 Varnish Cache 7 存储库开始,否则可能无法安装正确的软件包。
安装所需的包依赖项。
sudo apt install debian-archive-keyring curl gnupg apt-transport-https -y现在导入 GPG 密钥签名。
curl -fsSL https://packagecloud.io/varnishcache/varnish70/gpgkey|sudo gpg --dearmor -o /etc/apt/trusted.gpg.d/varnish.gpg现在在您的 Ubuntu 22.04|20.04|18.04 上添加 Varnish Cache 7 存储库。
Ubuntu 20.04/18.04:
. /etc/os-release
sudo tee /etc/apt/sources.list.d/varnishcache_varnish70.list > /dev/null <<-EOF
deb https://packagecloud.io/varnishcache/varnish70/$ID/ $VERSION_CODENAME main
deb-src https://packagecloud.io/varnishcache/varnish70/$ID/ $VERSION_CODENAME main
EOF
Ubuntu 22.04:
在 Ubuntu 22.04 的官方存储库发布之前,您必须使用 20.04 存储库:
sudo tee /etc/apt/sources.list.d/varnishcache_varnish70.list > /dev/null <<-EOF
deb https://packagecloud.io/varnishcache/varnish70/ubuntu/ focal main
deb-src https://packagecloud.io/varnishcache/varnish70/ubuntu/ focal main
EOF
添加后更新您的包索引。
sudo apt update步骤 3 – 安装 Varnish Cache 7
添加存储库后,使用以下命令安装 Varnish Cache 7。
sudo apt install varnish依赖树:
....
0 upgraded, 30 newly installed, 0 to remove and 73 not upgraded.
Need to get 35.5 MB of archives.
After this operation, 154 MB of additional disk space will be used.
Do you want to continue? [Y/n] y
步骤 4 – 为 Varnish 创建 Systemd 服务文件
为了能够像其他系统服务一样管理 Varnish Cache 7,我们将如下调整 systemd 服务。
sudo cp /lib/systemd/system/varnish.service /etc/systemd/system/
cat /etc/systemd/system/varnish.service
服务文件应如图所示。
[Unit]
Description=Varnish Cache, a high-performance HTTP accelerator
After=network-online.target nss-lookup.target

[Service]
Type=forking
KillMode=process

# Maximum number of open files (for ulimit -n)
LimitNOFILE=131072

# Locked shared memory - should suffice to lock the shared memory log
# (varnishd -l argument)
# Default log size is 80MB vsl + 1M vsm + header -> 82MB
# unit is bytes
LimitMEMLOCK=85983232

# Enable this to avoid "fork failed" on reload.
TasksMax=infinity

# Maximum size of the corefile.
LimitCORE=infinity

ExecStart=/usr/sbin/varnishd \
	  -a :6081 \
	  -a localhost:8443,PROXY \
	  -p feature=+http2 \
	  -f /etc/varnish/default.vcl \
	  -s malloc,256m
ExecReload=/usr/sbin/varnishreload

[Install]
WantedBy=multi-user.target
步骤 5 – 配置监听端口和缓存大小
从服务文件中,默认监听端口设置为6081,因此我们需要将此端口更改为端口80,并将缓存大小更改为2GB。
在 /etc/systemd/system/varnish.service 中,编辑以下部分并添加所需的详细信息。
$ sudo vim /etc/systemd/system/varnish.service
ExecStart=/usr/sbin/varnishd \
	  -a :80 \
	  -a localhost:8443,PROXY \
	  -p feature=+http2 \
	  -f /etc/varnish/default.vcl \
	  -s malloc,1g
重新加载系统守护进程。
sudo systemctl daemon-reload启动并启用 Varnish 缓存。
sudo systemctl start varnish检查服务的状态。
$ systemctl status varnish
● varnish.service - Varnish Cache, a high-performance HTTP accelerator
     Loaded: loaded (/etc/systemd/system/varnish.service; enabled; vendor preset: enabled)
     Active: active (running) since Thu 2023-08-24 13:08:10 UTC; 3min 28s ago
   Main PID: 7353 (varnishd)
      Tasks: 217
     Memory: 95.9M
        CPU: 645ms
     CGroup: /system.slice/varnish.service
             ├─7353 /usr/sbin/varnishd -a :6081 -a localhost:8443,PROXY -p feature=+http2 -f /etc/varnish/default.vcl -s malloc,256m
             └─7367 /usr/sbin/varnishd -a :6081 -a localhost:8443,PROXY -p feature=+http2 -f /etc/varnish/default.vcl -s malloc,256m

Aug 24 13:08:09 jammy systemd[1]: Starting Varnish Cache, a high-performance HTTP accelerator...
Aug 24 13:08:10 jammy varnishd[7353]: Version: varnish-7.0.3 revision 6a4c6a5c7e66a664b140278c209f0b18c544cab8
Aug 24 13:08:10 jammy varnishd[7353]: Platform: Linux,5.15.0-79-generic,x86_64,-junix,-smalloc,-sdefault,-hcritbit
Aug 24 13:08:10 jammy varnishd[7353]: Child (7367) Started
Aug 24 13:08:10 jammy varnishd[7353]: Child (7367) said Child starts
Aug 24 13:08:10 jammy systemd[1]: Started Varnish Cache, a high-performance HTTP accelerator.
第 6 步 – 配置 Web 服务器以使用 Varnish
将 Varnish 缓存设置为侦听端口 80 后,我们必须将 Web 服务器设置为侦听另一个端口(例如 8080)。对所需的 Web 服务器进行配置。
1.Nginx
确保已安装 Nginx Web 服务器。
sudo apt install nginx现在编辑虚拟主机并使用以下命令将端口 80 替换为 8080:
sudo find /etc/nginx/sites-enabled -name '*.conf' -exec sed -r -i 's/\blisten ([^:]+:)?80\b([^;]*);/listen \18080\2;/g' {} ';'上面的脚本将编辑路径 /etc/nginx/sites-enabled 中的任何配置。您可能还需要更改默认的 Nginx 站点以侦听端口 8080。
$ sudo vim /etc/nginx/sites-enabled/default
......
server {
        listen 8080 default_server;
        #listen [::]:80 default_server;

        # SSL configuration
        #
更改后重启nginx服务:
sudo systemctl restart nginx2.阿帕奇
安装了 Apache Web 服务器。
sudo apt install apache2同样在这里,您需要编辑虚拟主机文件并将监听端口更改为8080。
sudo find /etc/apache2 -name '*.conf' -exec sed -r -i 's/\bListen 80\b/Listen 8080/g; s/<VirtualHost ([^:]+):80>/<VirtualHost \1:8080>/g' {} ';'更改后重新启动 Apache Web 服务器:
sudo systemctl restart apache2步骤 7 – 配置 VCL 后端
上述更改需要反映在 VLC 后端中。默认情况下,VLC 后端配置为指向设置的端口 8080。此文件位于 /etc/varnish/default.vcl 下。
$ sudo vim /etc/varnish/default.vcl
......
# Default backend definition. Set this to point to your content server.
backend default {
    .host = "127.0.0.1";
    .port = "8080";
}
......
现在重新启动服务。
##For Nginx
sudo systemctl restart nginx varnish

##For Apache
sudo systemctl restart apache2 varnish
步骤 8 – 验证 Varnish Cache 7 服务器
为了验证 ig 服务器是否正常工作,我们将使用下面的 cURL 命令。
curl -I server-ip例如。
curl -I 192.168.205.11输出 :
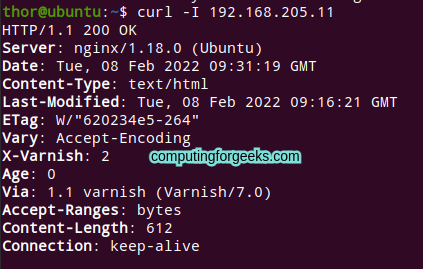
从输出中,您应该看到 Web 服务器正在与 Vanish Cache 一起使用。
结论
至此,我们可以放心地得出结论,本关于如何在 Ubuntu 22.04|20.04|18.04 上为 Apache/Nginx 配置 Varnish Cache 7 的指南是成功的。现在您应该能够使用 Varnish Cache 提高网页访问速度。
查看更多:
- 在 CentOS 7 上安装 Apache/Nginx 的 Varnish 缓存
- 在 CentOS 8/RHEL 8 上安装 Apache/Nginx 的 Varnish 缓存
- 使用 LDAP 身份验证保护 Apache 网页