如何在 CentOS 8/RHEL 8 上安装 Icinga Web 2 |
在上一篇文章中,我们介绍了在 CentOS 8/RHEL 8 Linux 计算机上安装 Icinga 2。这是一个继续指南,讨论如何在 CentOS 8/RHEL 8 上安装 Icinga Web 2。Icinga Web 2 是一个强大的 Web 应用程序 PHP 框架,采用简洁的设计。它快速、响应灵敏、可访问且易于通过模块进行扩展。
我们将从官方 Icinga2 软件包存储库上提供的软件包安装 Icinga Web 2。安装后,可在设置向导的帮助下通过 Web 界面完成设置和配置。
步骤 1:在 CentOS 8/RHEL 8 上安装 Icinga 2
您必须使用下面的指南开始安装 Icinga 2。
- 在 CentOS/RHEL 8 上安装 Icinga 2
安装 Icinga 2 服务器后,继续在 CentOS 8/RHEL 8 Linux 系统上安装 Icinga Web 2。
步骤 2:在 CentOS 8/RHEL 8 Linux 上安装 Icinga Web 2
启用 PowerTools 存储库和 EPEL。
sudo dnf install -y 'dnf-command(config-manager)'
sudo dnf -y install https://dl.fedoraproject.org/pub/epel/epel-release-latest-8.noarch.rpm
sudo dnf config-manager --set-enabled powertools如果您正在运行RHEL 8,请考虑启用其他存储库。
sudo dnf -y install https://dl.fedoraproject.org/pub/epel/epel-release-latest-8.noarch.rpm
sudo subscription-manager repos --enable=rhel-8-server-optional-rpms --enable=rhel-8-server-extras-rpms
然后将 Icinga Web 2 的存储库内容添加到我们的系统中。
sudo dnf -y install https://packages.icinga.com/epel/icinga-rpm-release-8-latest.noarch.rpm这是我的安装输出:
Last metadata expiration check: 0:02:42 ago on Sat 28 Dec 2019 09:03:06 AM EAT.
icinga-rpm-release-8-4.el8.icinga.noarch.rpm                                                                            8.3 kB/s | 9.5 kB     00:01
Dependencies resolved.
========================================================================================================================================================
 Package                                  Arch                         Version                                 Repository                          Size
========================================================================================================================================================
Installing:
 icinga-rpm-release                       noarch                       8-4.el8.icinga                          @commandline                       9.5 k

Transaction Summary
========================================================================================================================================================
Install  1 Package

Total size: 9.5 k
Installed size: 2.6 k
Is this ok [y/N]: y
Downloading Packages:
Running transaction check
Transaction check succeeded.
Running transaction test
Transaction test succeeded.
Running transaction
  Preparing        :                                                                                                                                1/1
  Installing       : icinga-rpm-release-8-4.el8.icinga.noarch                                                                                       1/1
  Verifying        : icinga-rpm-release-8-4.el8.icinga.noarch                                                                                       1/1

Installed:
  icinga-rpm-release-8-4.el8.icinga.noarch

Complete!
更新包索引:
sudo dnf makecache使用以下命令在 CentOS 8/RHEL 8 Linux 上安装 Apache Web 服务器和 Icinga Web 2:
sudo dnf install httpd icingacli icingaweb2 nagios-plugins-allPHP 和其他扩展等依赖包将从 AppStream 存储库安装。
还执行 PHP 和所需模块的安装:
sudo dnf module reset php -y
sudo dnf -y install https://dl.fedoraproject.org/pub/epel/epel-release-latest-8.noarch.rpm
sudo dnf -y install https://rpms.remirepo.net/enterprise/remi-release-8.rpm
sudo dnf module install php:remi-8.0
sudo dnf -y install php-cli php-pdo php-common php-mysql php-curl php-json php-zip php-gd php-xml php-mbstring php-pecl-mailparse php-imap php-ldap php-imagick
我们需要启动httpd、服务并配置firewalld。
sudo systemctl enable --now httpd
sudo firewall-cmd --add-service={http,https} --permanent
sudo firewall-cmd --reload
同时启动 PHP-FPM 服务。
sudo systemctl enable --now php-fpm.serviceIcinga Web 2 配置文件为:/etc/httpd/conf.d/icingaweb2.conf
将 SELinux 置于宽容模式
为了方便设置,请考虑禁用 SELinux 或将其置于宽松模式。
sudo setenforce 0
sudo sed -i 's/^SELINUX=.*/SELINUX=permissive/g' /etc/selinux/config
cat /etc/selinux/config | grep SELINUX=
在执行后续步骤之前,请确认 httpd 和 php-fpm 服务处于运行状态:
$ systemctl status php-fpm httpd
● php-fpm.service - The PHP FastCGI Process Manager
   Loaded: loaded (/usr/lib/systemd/system/php-fpm.service; enabled; vendor preset: disabled)
   Active: active (running) since Sat 2019-12-28 09:14:58 EAT; 9min ago
 Main PID: 12132 (php-fpm)
   Status: "Processes active: 0, idle: 5, Requests: 0, slow: 0, Traffic: 0req/sec"
    Tasks: 6 (limit: 11512)
   Memory: 27.6M
   CGroup: /system.slice/php-fpm.service
           ├─12132 php-fpm: master process (/etc/php-fpm.conf)
           ├─12270 php-fpm: pool www
           ├─12271 php-fpm: pool www
           ├─12272 php-fpm: pool www
           ├─12273 php-fpm: pool www
           └─12274 php-fpm: pool www

Dec 28 09:14:58 centos8.novalocal systemd[1]: Starting The PHP FastCGI Process Manager...
Dec 28 09:14:58 centos8.novalocal systemd[1]: Started The PHP FastCGI Process Manager.

● httpd.service - The Apache HTTP Server
   Loaded: loaded (/usr/lib/systemd/system/httpd.service; enabled; vendor preset: disabled)
  Drop-In: /usr/lib/systemd/system/httpd.service.d
           └─php-fpm.conf
   Active: active (running) since Sat 2019-12-28 09:14:58 EAT; 9min ago
     Docs: man:httpd.service(8)
 Main PID: 12131 (httpd)
   Status: "Running, listening on: port 80"
    Tasks: 213 (limit: 11512)
   Memory: 25.1M
   CGroup: /system.slice/httpd.service
           ├─12131 /usr/sbin/httpd -DFOREGROUND
           ├─12133 /usr/sbin/httpd -DFOREGROUND
           ├─12134 /usr/sbin/httpd -DFOREGROUND
           ├─12135 /usr/sbin/httpd -DFOREGROUND
           └─12136 /usr/sbin/httpd -DFOREGROUND

Dec 28 09:14:58 centos8.novalocal systemd[1]: Starting The Apache HTTP Server...
Dec 28 09:14:58 centos8.novalocal httpd[12131]: Server configured, listening on: port 80
Dec 28 09:14:58 centos8.novalocal systemd[1]: Started The Apache HTTP Server.
步骤 2:在 CentOS 8/RHEL 8 上配置 Icinga Web 2
在CLI上运行命令开始配置:
sudo icingacli setup config webserver apache生成 Web 设置所需的身份验证令牌。为了生成令牌,请使用以下命令:
$ sudo icingacli setup token create
The newly generated setup token is: 89f98cfcccbbeef4
开始网络设置
最后在浏览器中访问 Icinga Web 2 以访问安装向导并完成安装:/icingaweb2/setup。
http://[serverip_or_hostname]/icingaweb2/setup您将看到一个欢迎页面,如下所示:
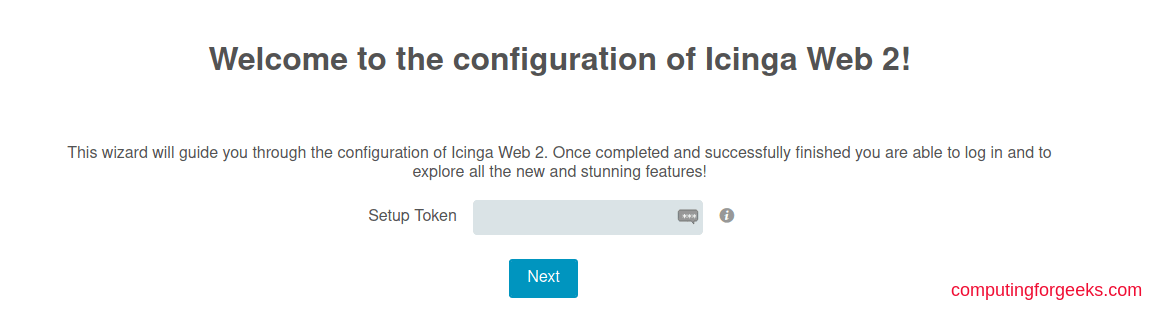
粘贴之前生成的令牌,然后单击下一步。如果您不记得该令牌,您可以使用icingacli显示它:
$ sudo icingacli setup token show
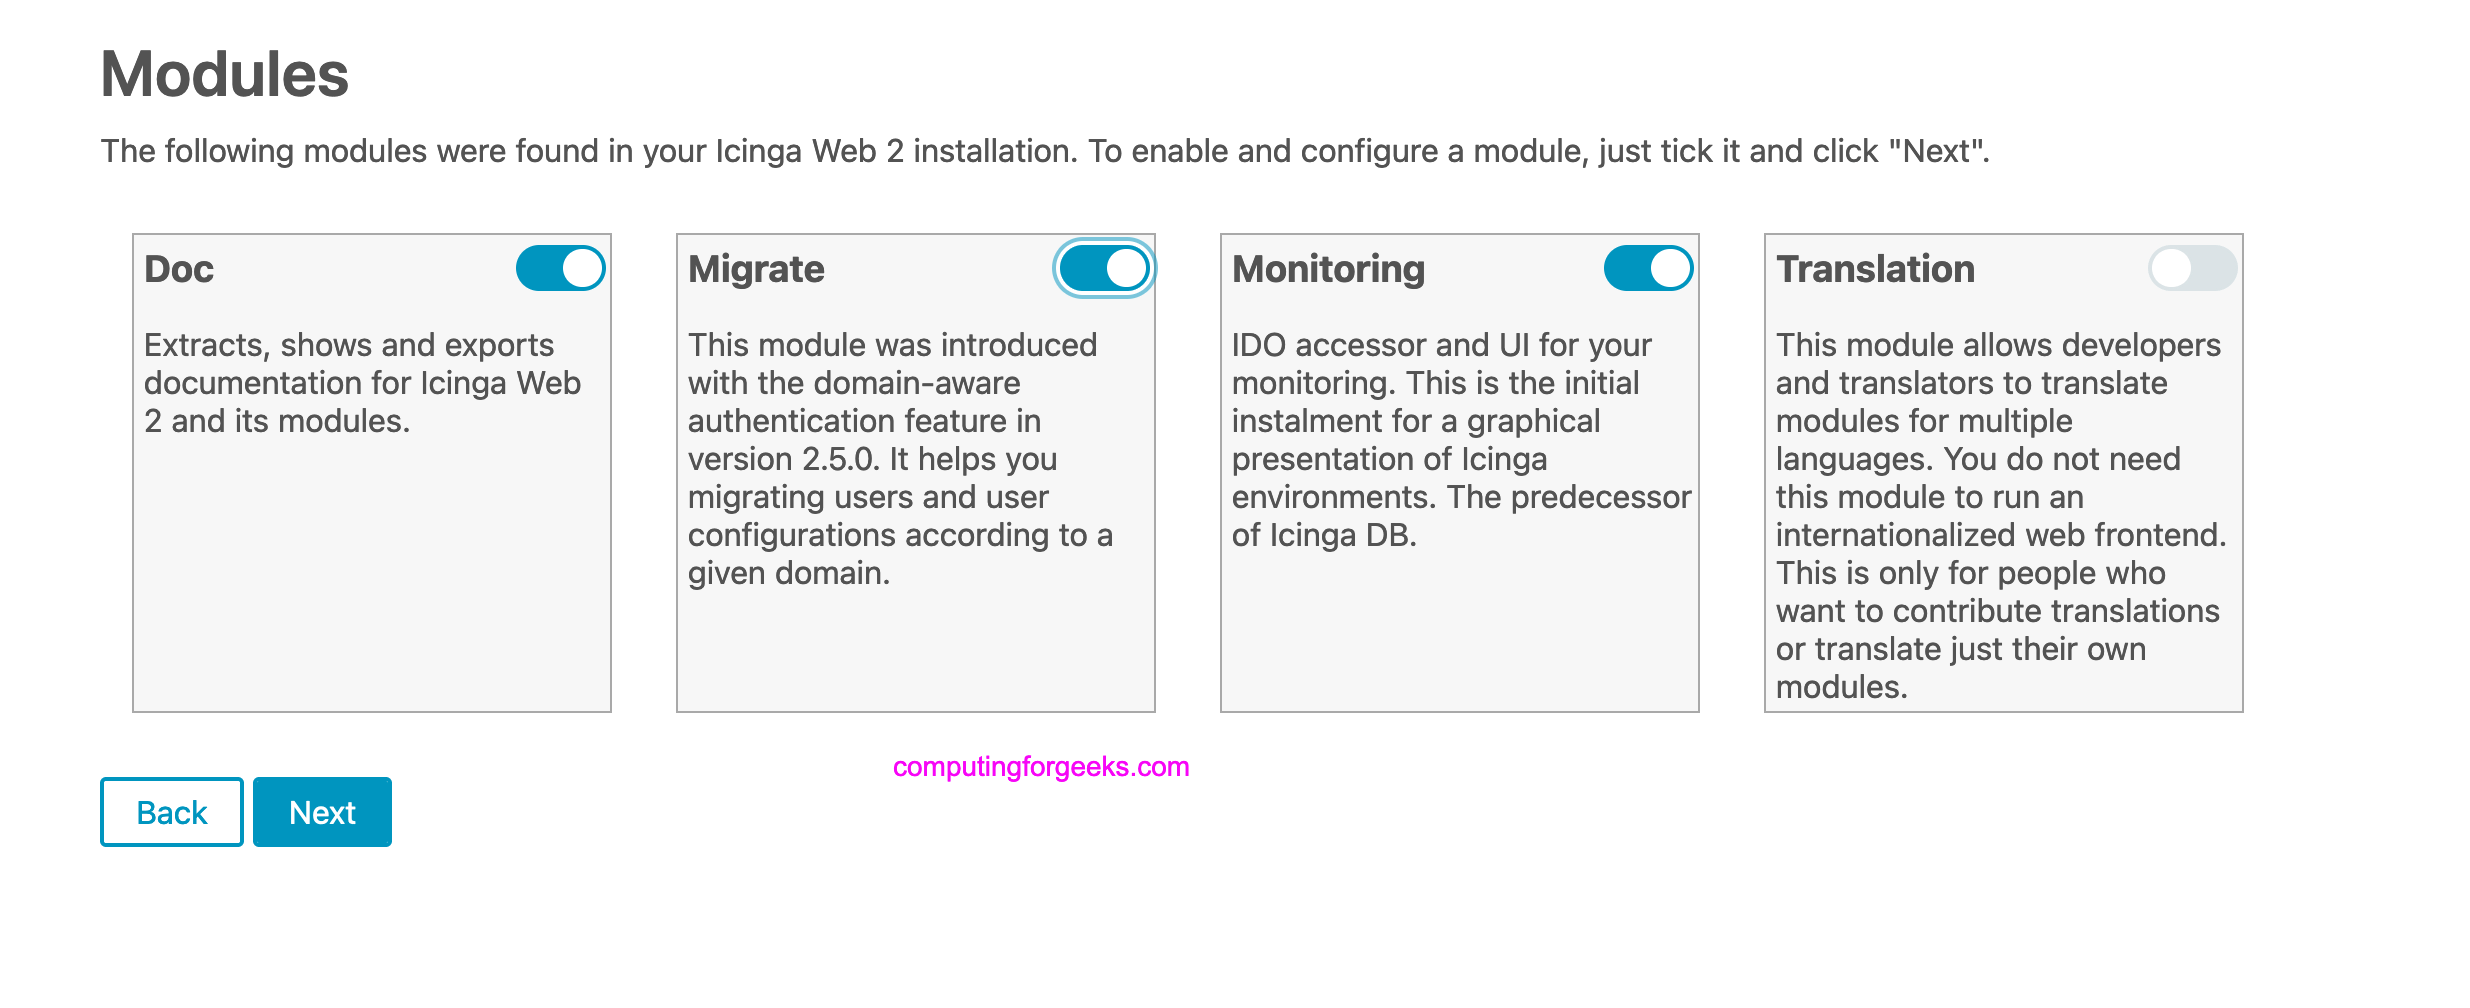
The current setup token is: 89f98cfcccbbeef4在下一页上,选择要启用的模块:
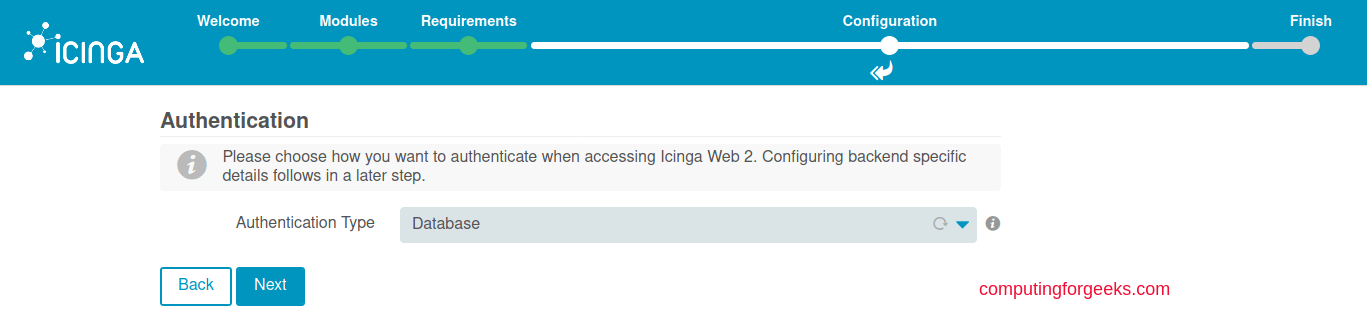
确认要求然后继续设置数据库。
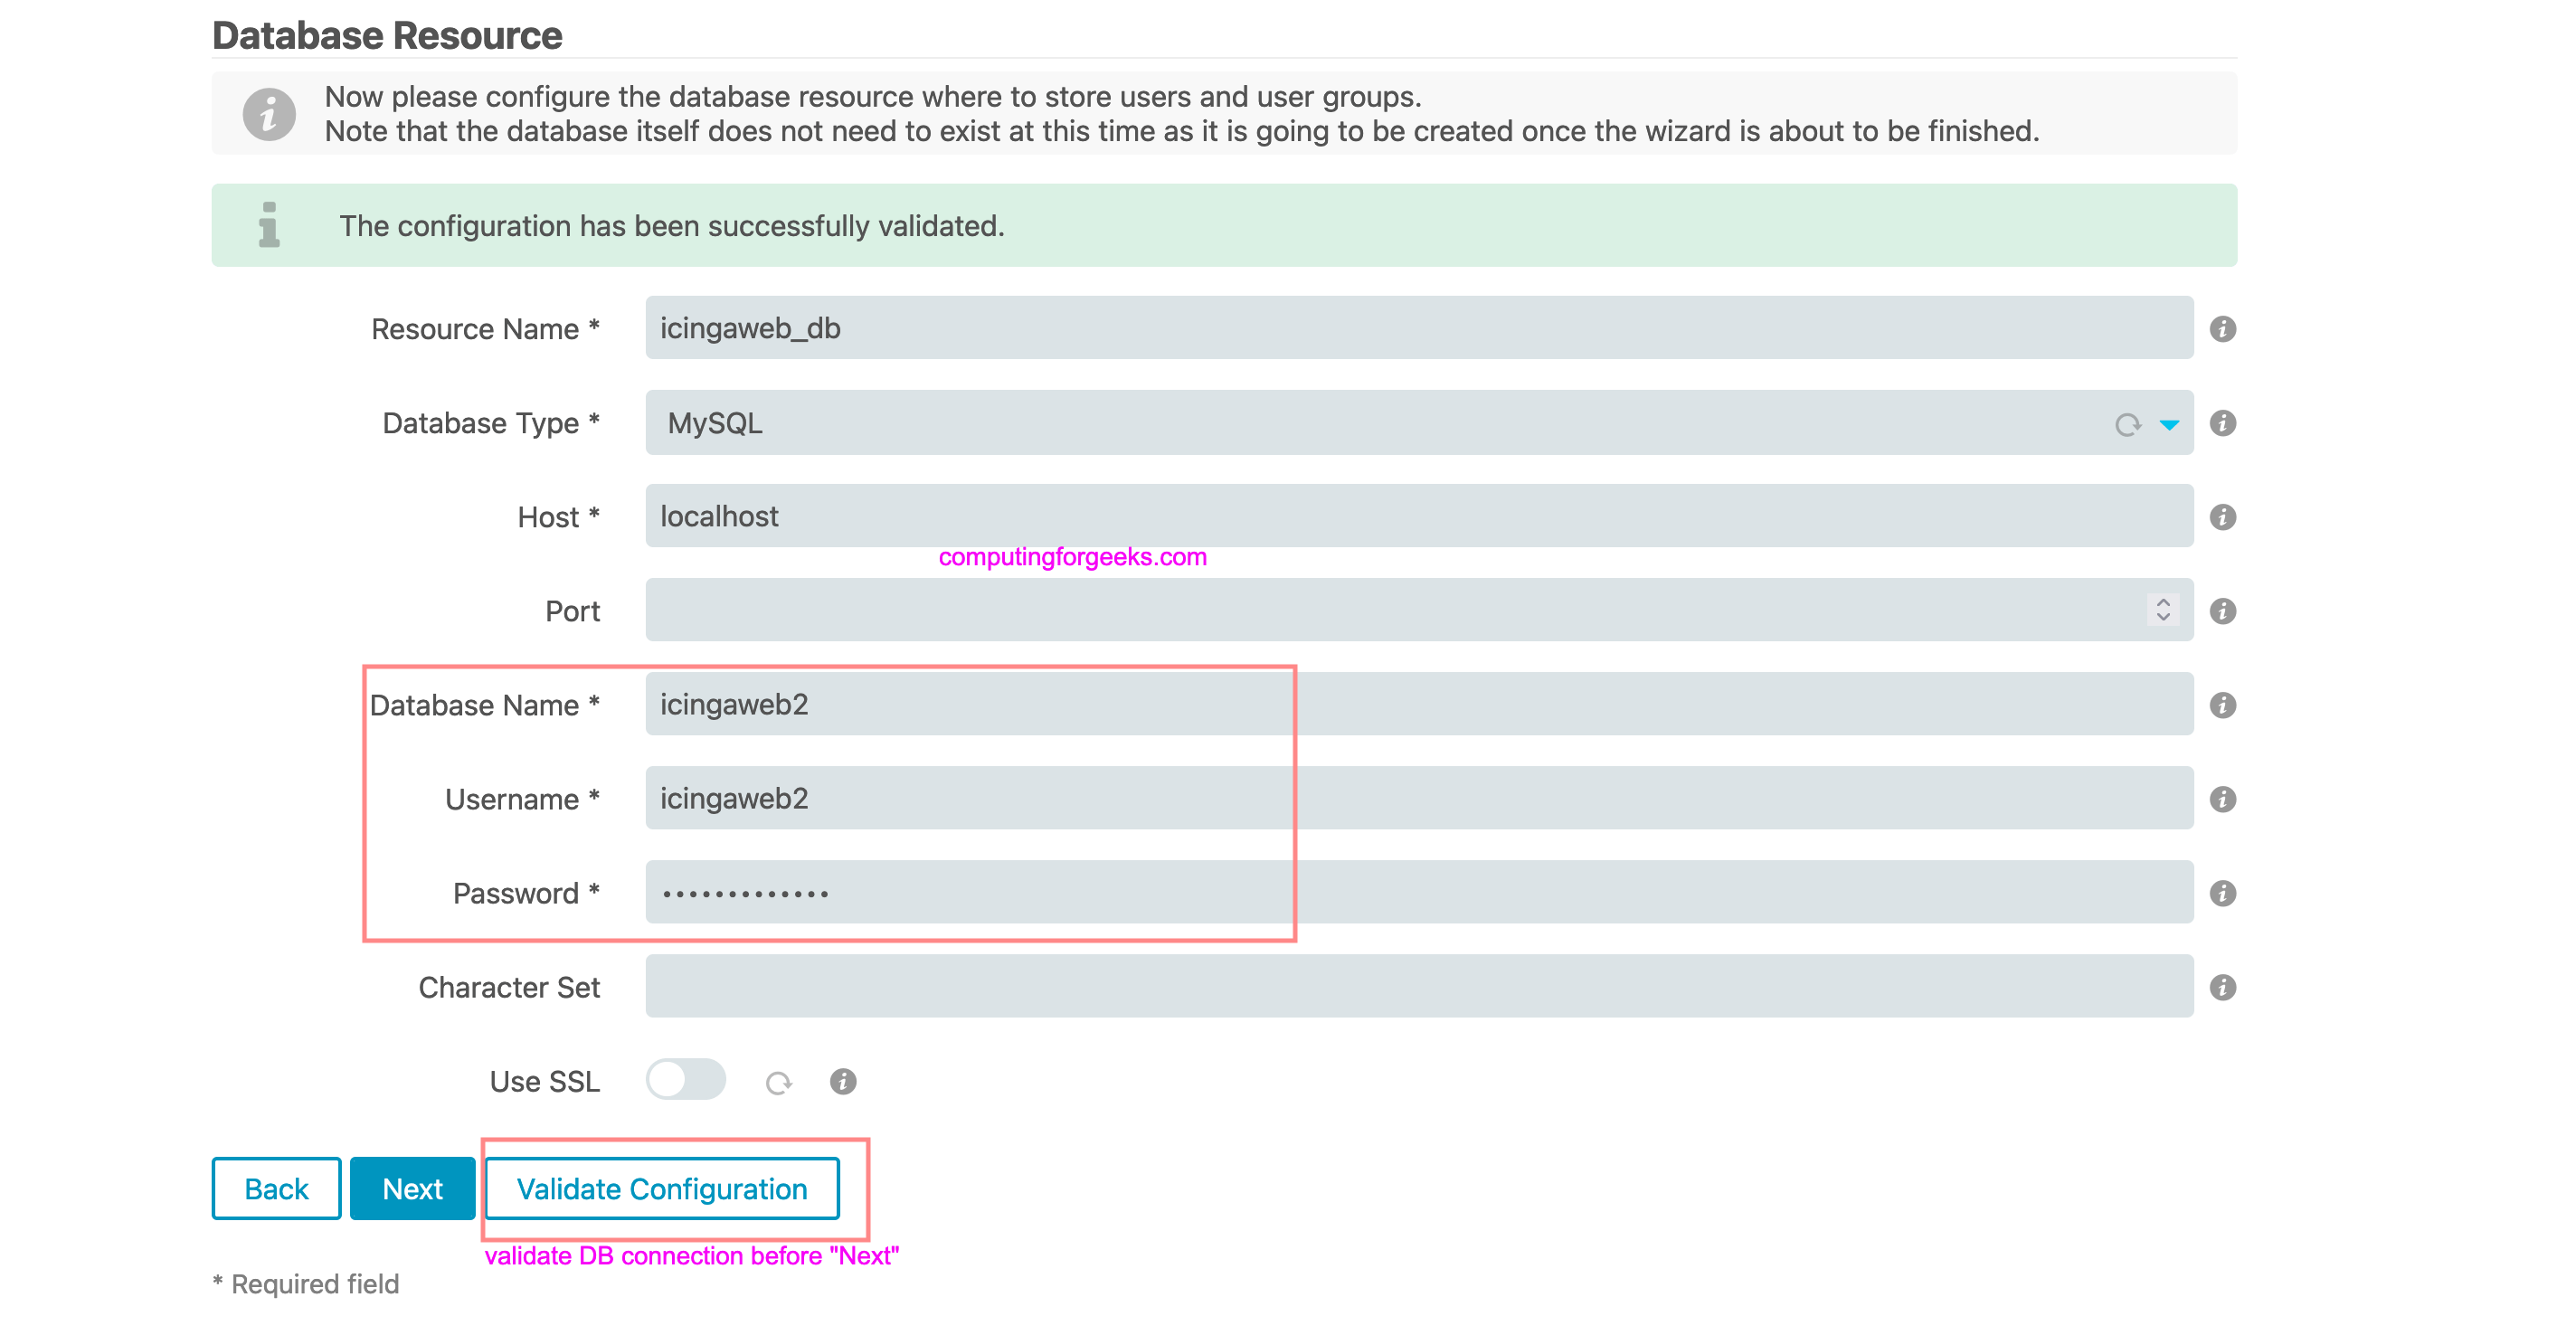
填写并验证数据库配置。
- MariaDB数据库安装指南:在CentOS/RHEL 8上安装MariaDB
- PostgreSQL数据库安装:在CentOS 8上安装PostgreSQL | RHEL 8
在 MariaDB 数据库服务器上为 Icinga2 创建数据库的示例:
$ mysql -u root -p
CREATE DATABASE icingaweb2;
GRANT ALL PRIVILEGES ON icingaweb2.* TO 'icingaweb2'@'localhost' IDENTIFIED BY 'StroNgP@ssw0d';
FLUSH PRIVILEGES;
EXIT;输入数据库连接详细信息,然后单击“验证配置”,然后单击“下一步”按钮
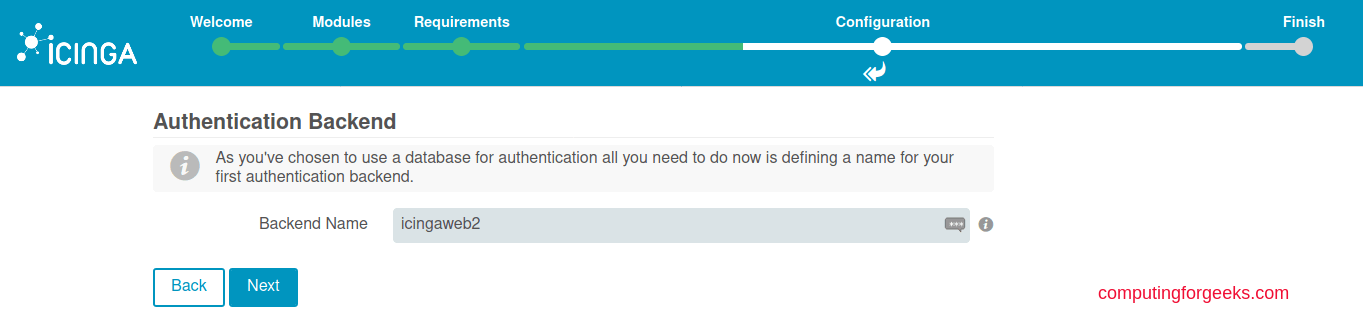
配置后端名称。
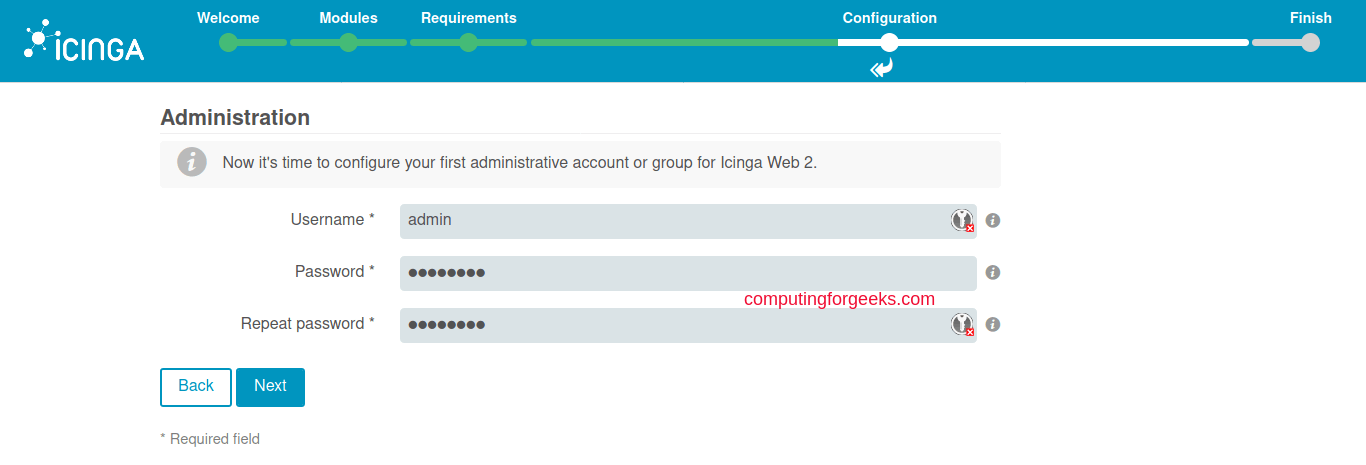
创建第一个管理员用户:
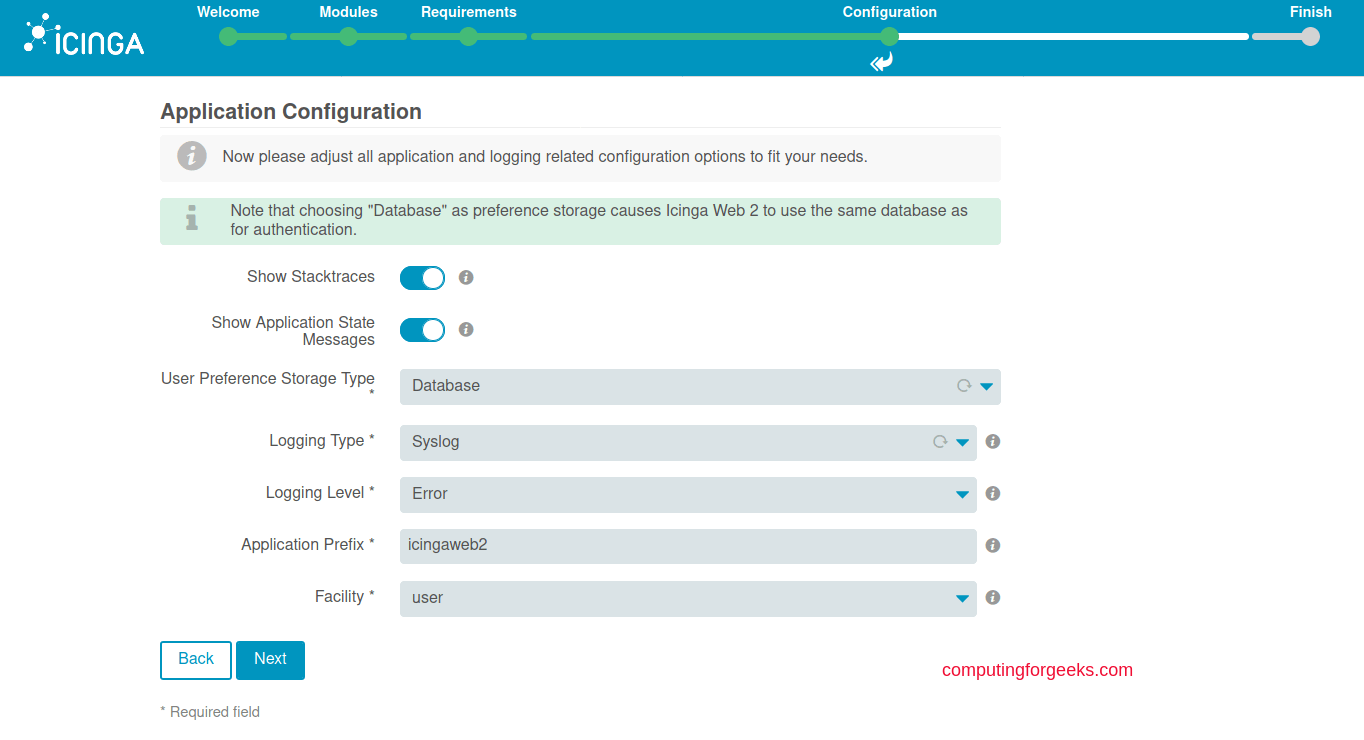
配置日志记录:
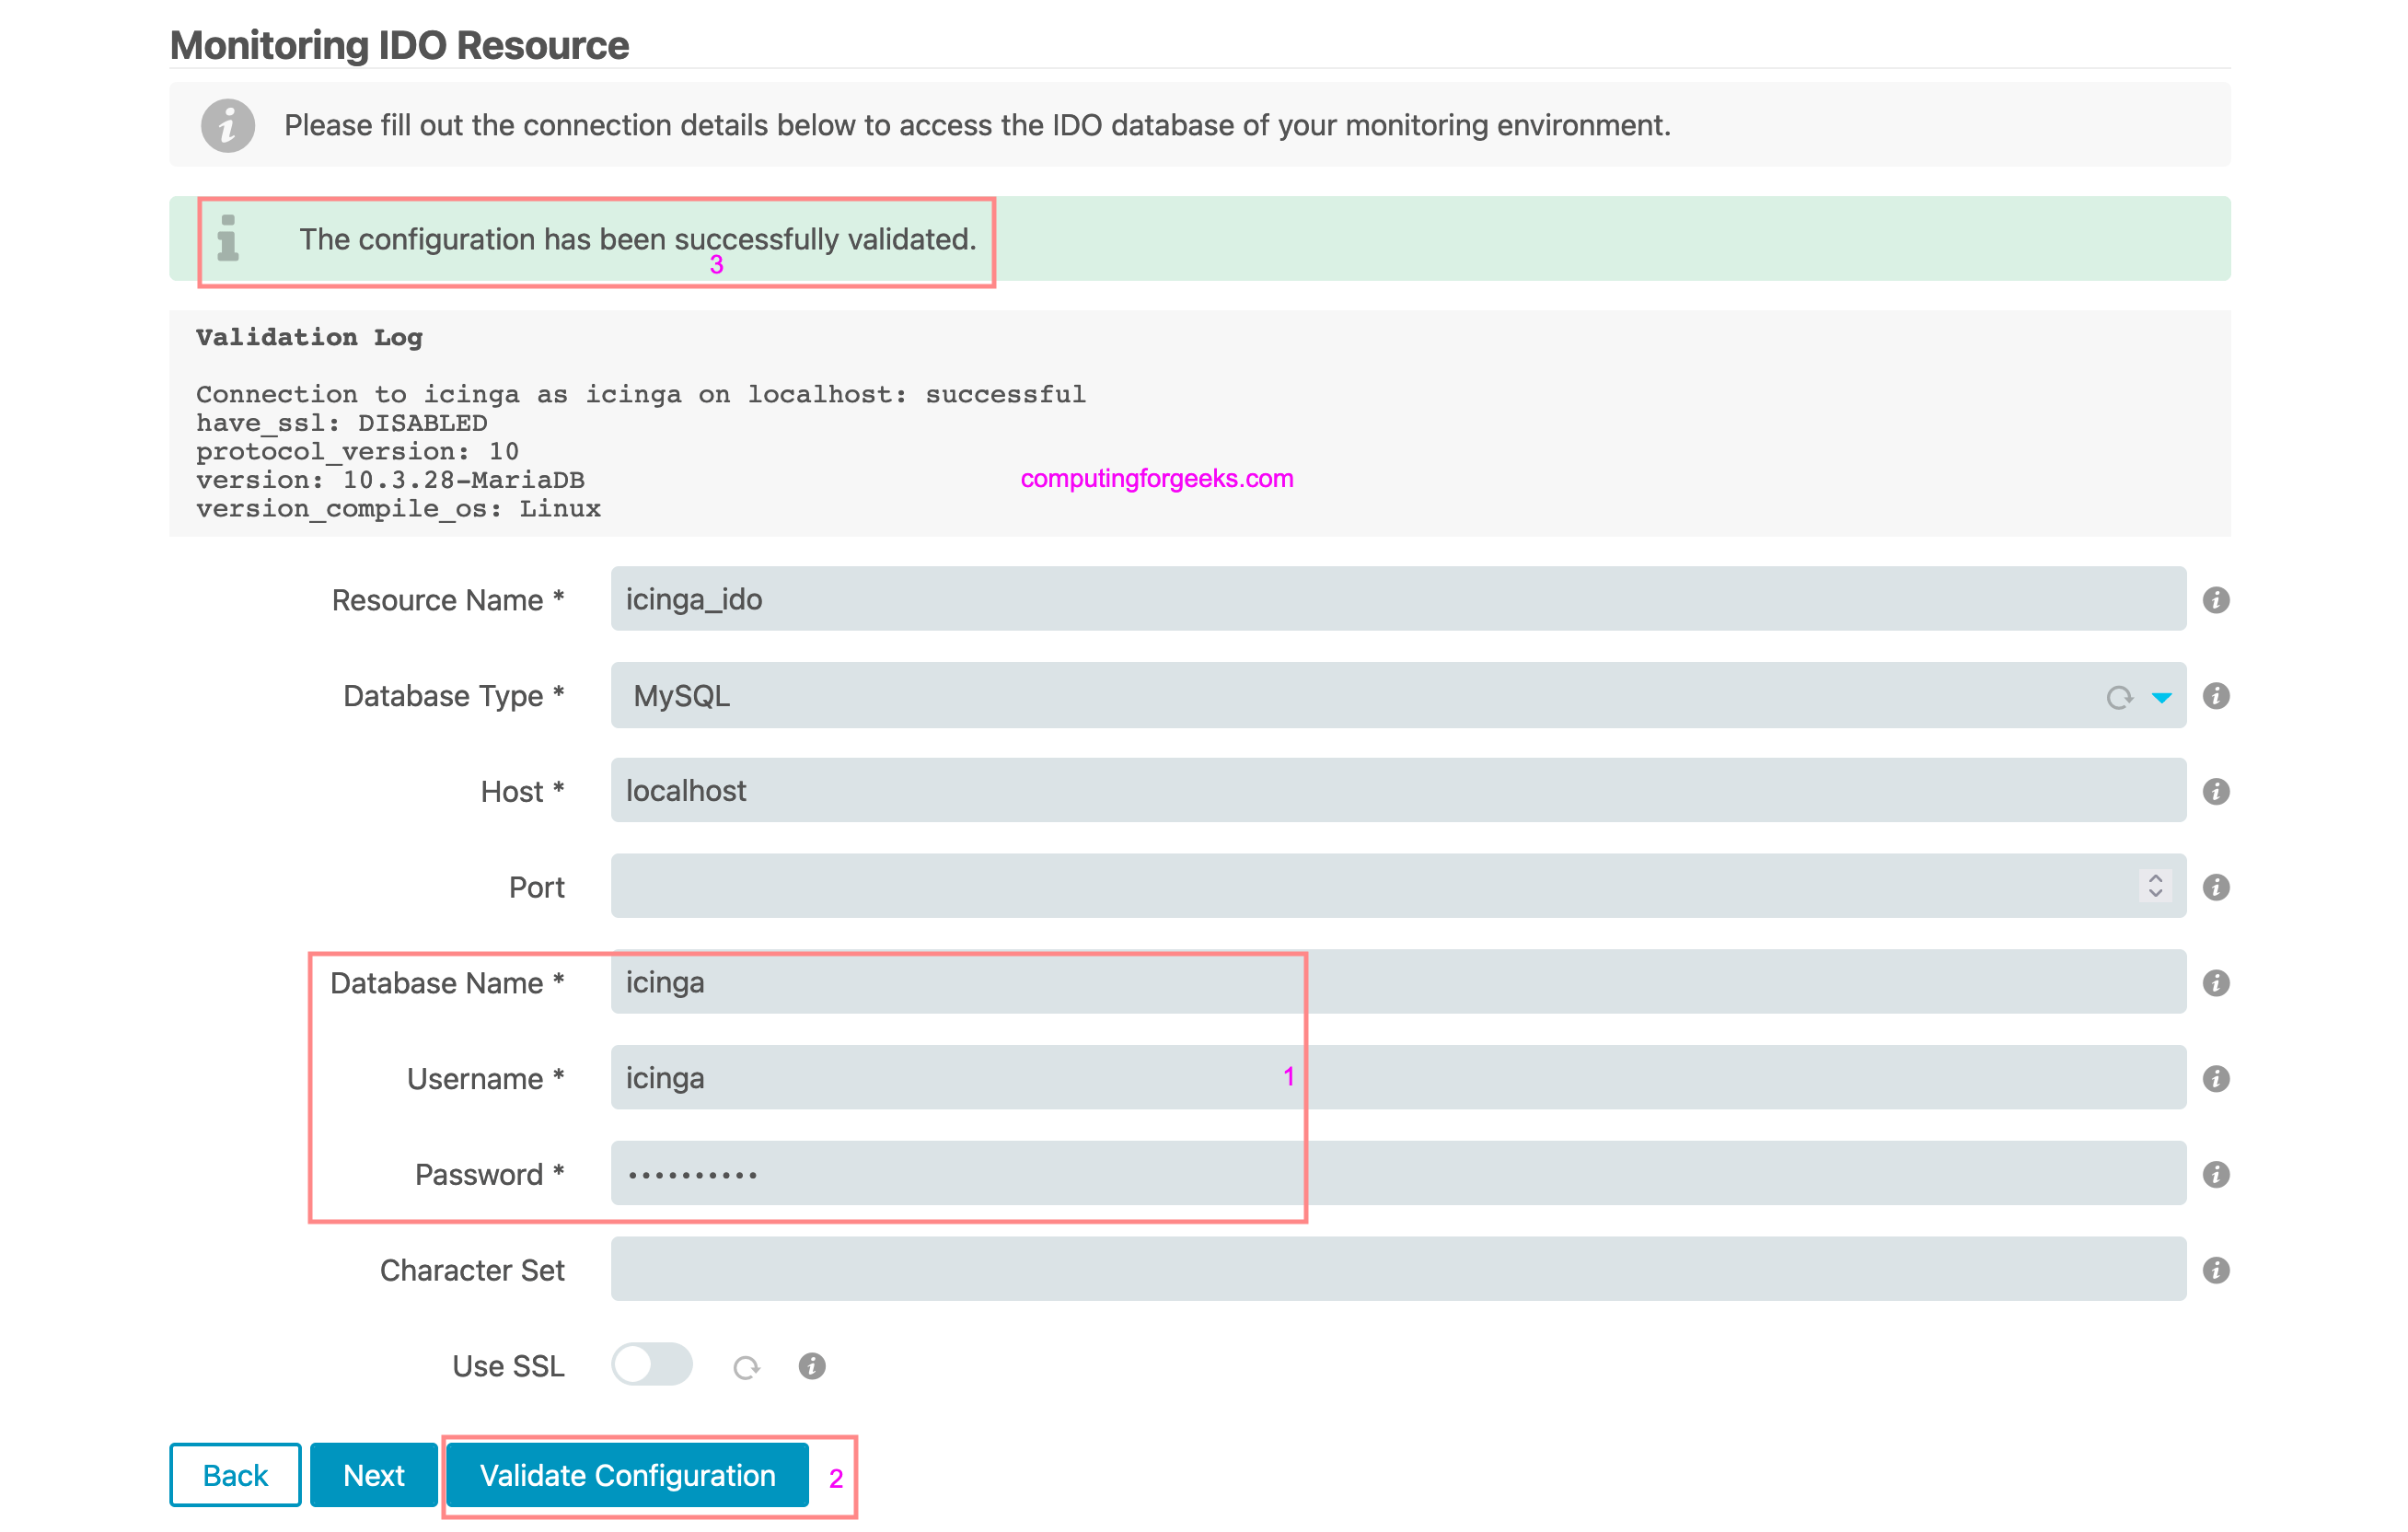
配置监控 IDO 资源
监控 IDO 资源数据库是在指南中创建的,可以在 Icinga2 服务器中的以下文件中进行检查。
$ sudo cat /etc/icinga2/features-available/ido-mysql.conf
/**
 * The IdoMysqlConnection type implements MySQL support
 * for DB IDO.
 */

object IdoMysqlConnection "ido-mysql" {
  user = "icinga"
  password = "StroNgP@ss"
  host = "localhost"
  database = "icinga"
}
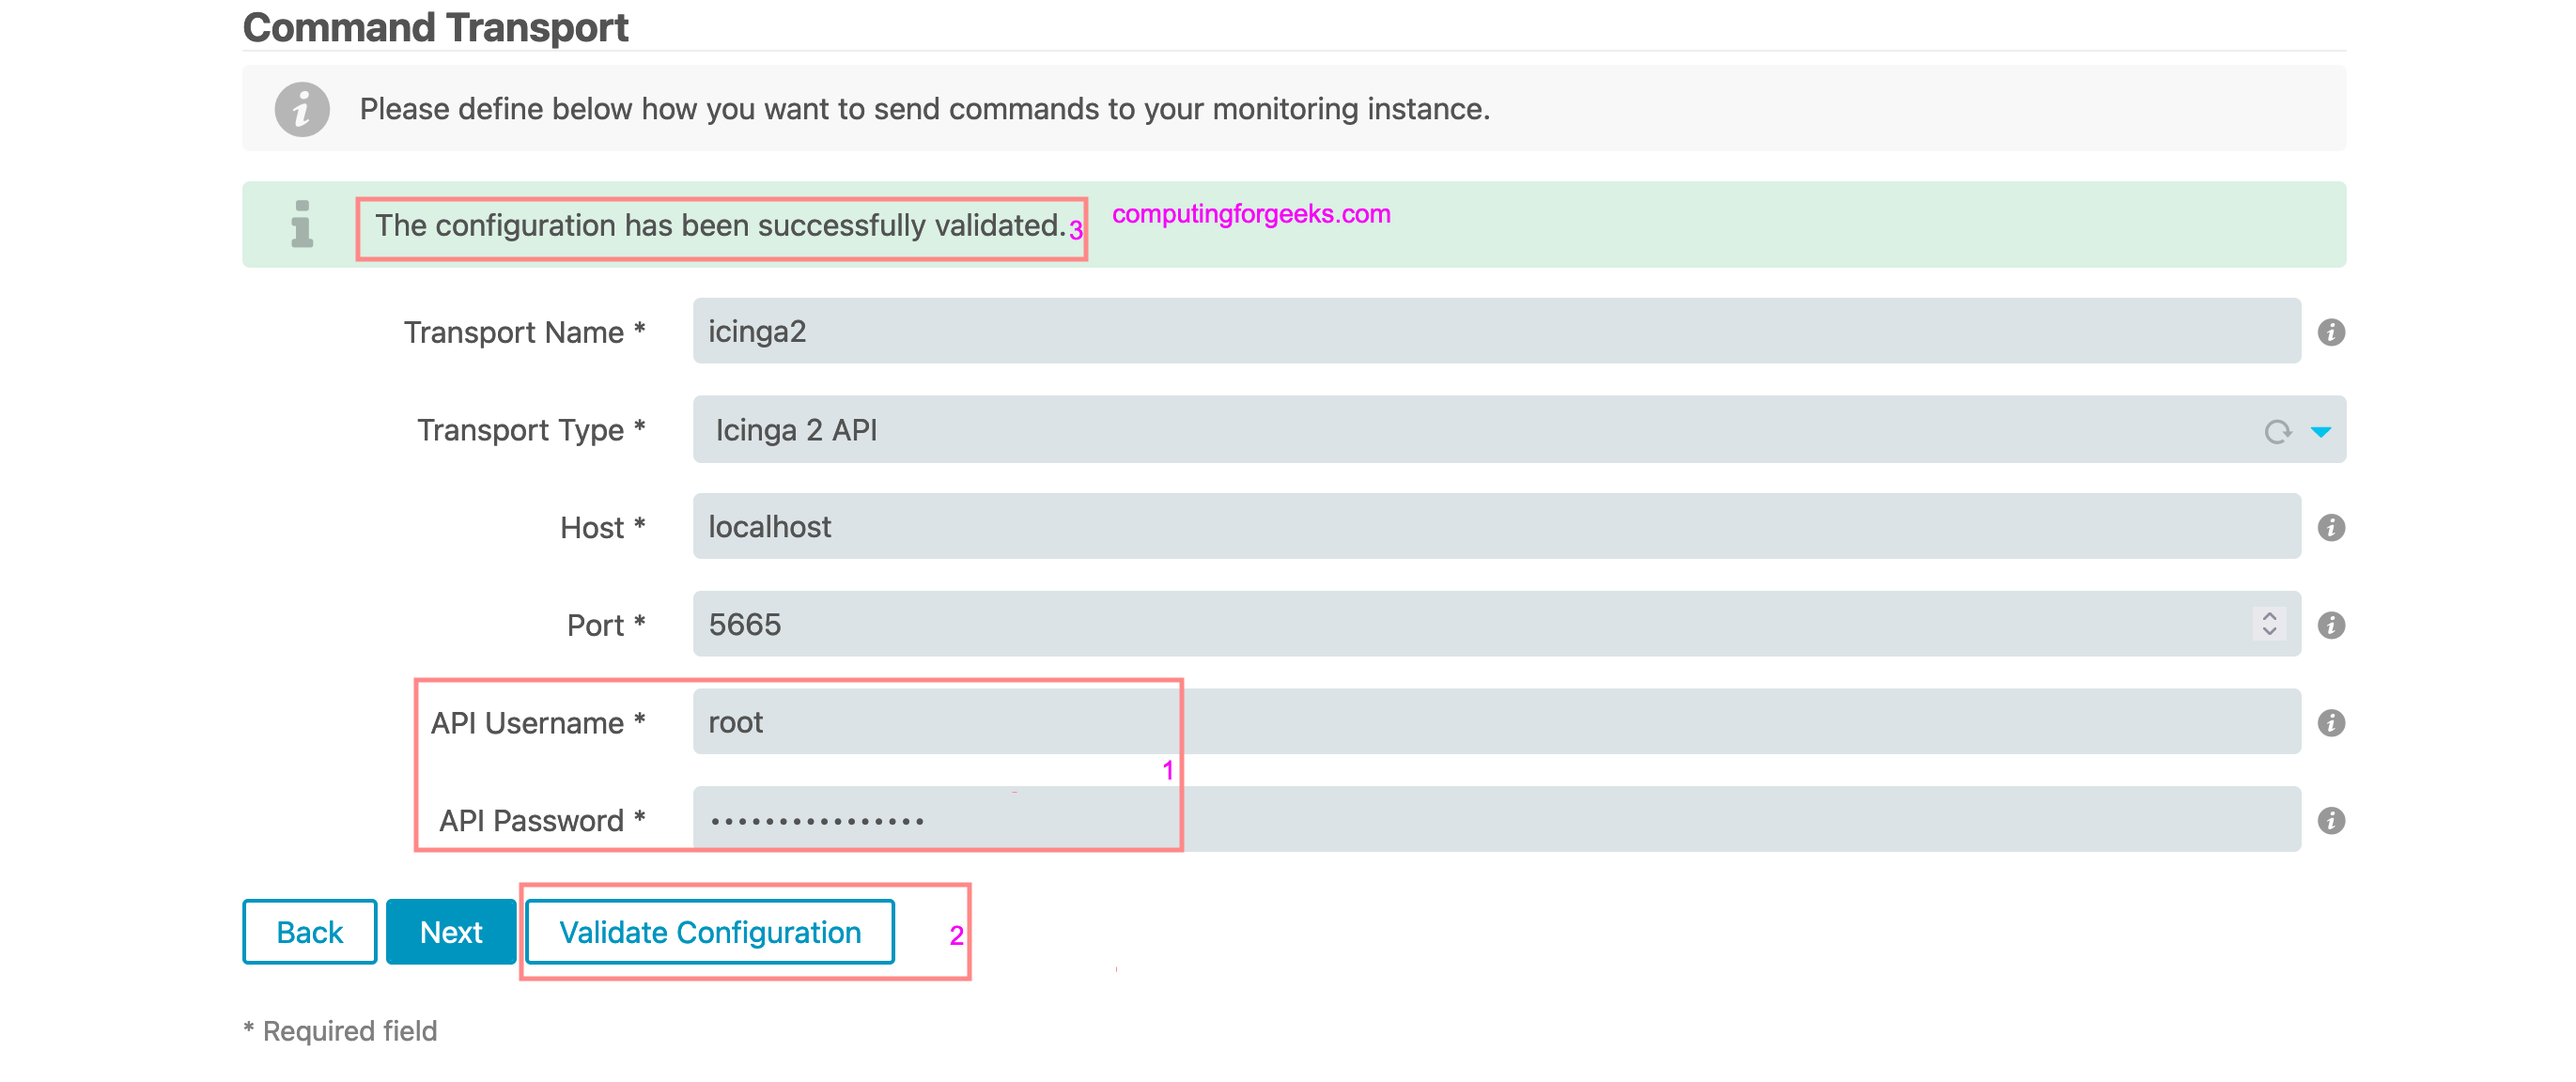
填写并验证是否连接成功
命令传输
您可以在此处定义如何向监控实例(Icinga2 服务器)发送命令
您必须在要将命令发送到的 Icinga 2 主机 上运行api 设置:
$ sudo icinga2 api setup
information/cli: Generating new CA.
information/base: Writing private key to '/var/lib/icinga2/ca//ca.key'.
information/base: Writing X509 certificate to '/var/lib/icinga2/ca//ca.crt'.
information/cli: Generating new CSR in '/var/lib/icinga2/certs//frankubuntu20.novalocal.csr'.
information/base: Writing private key to '/var/lib/icinga2/certs//frankubuntu20.novalocal.key'.
information/base: Writing certificate signing request to '/var/lib/icinga2/certs//frankubuntu20.novalocal.csr'.
information/cli: Signing CSR with CA and writing certificate to '/var/lib/icinga2/certs//frankubuntu20.novalocal.crt'.
information/pki: Writing certificate to file '/var/lib/icinga2/certs//frankubuntu20.novalocal.crt'.
information/cli: Copying CA certificate to '/var/lib/icinga2/certs//ca.crt'.
information/cli: Adding new ApiUser 'root' in '/etc/icinga2/conf.d/api-users.conf'.
information/cli: Reading '/etc/icinga2/icinga2.conf'.
information/cli: Enabling the 'api' feature.
Enabling feature api. Make sure to restart Icinga 2 for these changes to take effect.
information/cli: Updating 'NodeName' constant in '/etc/icinga2/constants.conf'.
information/cli: Created backup file '/etc/icinga2/constants.conf.orig'.
information/cli: Updating 'ZoneName' constant in '/etc/icinga2/constants.conf'.
information/cli: Backup file '/etc/icinga2/constants.conf.orig' already exists. Skipping backup.
Done.
现在重新启动 Icinga 2 守护程序以完成安装:
sudo systemctl restart icinga2用于针对 Icinga 2 API 进行身份验证的默认生成的 ApiUser 对象位于以下文件中:
$ sudo cat /etc/icinga2/conf.d/api-users.conf
/**
 * The ApiUser objects are used for authentication against the API.
 */
object ApiUser "root" {
  password = "733313f70d81ed81"
  // client_cn = ""

  permissions = [ "*" ]
}
您可以修改然后重新启动 icinga2 服务或按提供的方式使用:
在 CentOS 8/RHEL 8 Linux 系统上完成 Icinga Web 2 的安装,然后使用成功页面中提供的链接登录。
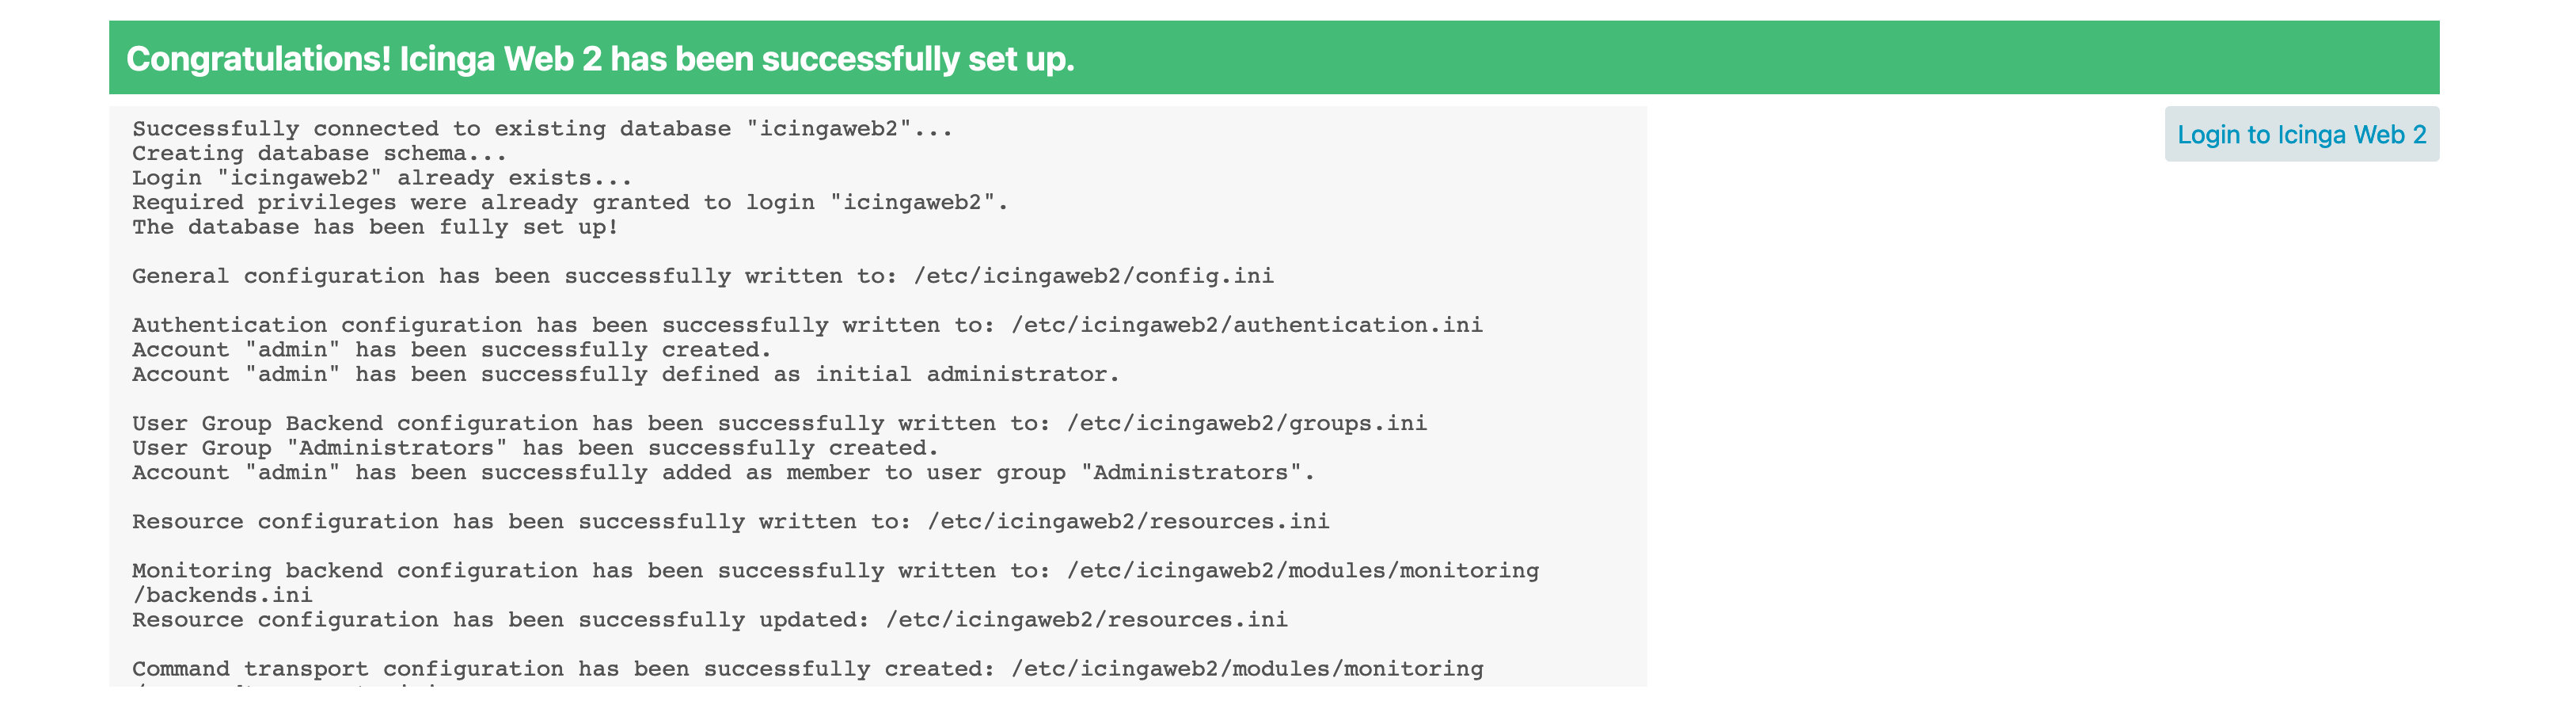
关于如何在 CentOS 8/RHEL 8 Linux 系统上安装和配置 Icinga Web 2 的指南到此结束。我们希望这篇文章对您有很大帮助。如果您在设置时遇到任何问题或错误,请联系我们,我们将很乐意为您提供帮助。