在 Ubuntu 22.04|20.04|18.04 上安装 Asterisk 16 LTS
好心人你好!在本文中,我们将介绍在 Ubuntu 22.04|20.04|18.04 上安装 Asterisk 16 LTS 的步骤。 Asterisk 是一个开源的完整 PBX 系统,具有大多数商用 PBX 系统的功能。它支持电话会议、直接拨入系统访问、呼叫驻留、呼叫队列和许多其他功能。
在 Ubuntu 22.04|20.04|18.04 上安装 Asterisk 16
以下是在 Ubuntu 22.04|20.04|18.04 上安装 Asterisk 16 的步骤。
第1步:更新系统
通过更新系统开始在 Ubuntu 上安装 Asterisk 16 以避免任何依赖性问题:
sudo apt update && sudo apt -y upgrade
sudo reboot
步骤 2:安装 Asterisk 16 LTS 依赖项
系统启动并更新后,安装所有必需的 Asterisk 依赖包:
sudo apt -y install git curl wget libnewt-dev libssl-dev libncurses5-dev subversion libsqlite3-dev build-essential libjansson-dev libxml2-dev uuid-dev如果您在 Ubuntu 上遇到 subversion 软件包错误,如下所示:
E: Package 'subversion' has no installation candidate然后添加 Universe 存储库并从中安装 Subversion:
sudo add-apt-repository universe
sudo apt update && sudo apt -y install subversion
第 3 步:下载 Asterisk 16 LTS tarball
由于 Debian 和 Ubuntu 上游存储库均无法提供 Asterisk 16,因此将从源代码完成安装。从源代码构建使您能够轻松构建所需的所有 PBX 功能并拥有自定义 VoIP 系统。
$ sudo apt policy asterisk
asterisk:
  Installed: (none)
  Candidate: 1:13.14.1~dfsg-2+deb9u3
  Version table:
     1:13.14.1~dfsg-2+deb9u3 500
...

$ sudo apt policy asterisk
asterisk:
  Installed: (none)
  Candidate: 1:13.18.3~dfsg-1ubuntu4
将最新版本的 Asterisk 16 LTS 下载到本地系统进行安装。
cd /usr/src/
sudo curl -O http://downloads.asterisk.org/pub/telephony/asterisk/asterisk-16-current.tar.gz
然后提取文件:
sudo tar xvf asterisk-16-current.tar.gz
cd asterisk-16*/
运行以下命令将 mp3 解码器库下载到源代码树中。
$ sudo contrib/scripts/get_mp3_source.sh
A addons/mp3/decode_ntom.c
A addons/mp3/interface.c
A addons/mp3/MPGLIB_README
A addons/mp3/common.c
A addons/mp3/huffman.h
A addons/mp3/tabinit.c
A addons/mp3/Makefile
A addons/mp3/README
A addons/mp3/decode_i386.c
A addons/mp3/dct64_i386.c
A addons/mp3/MPGLIB_TODO
A addons/mp3/mpg123.h
A addons/mp3/layer3.c
A addons/mp3/mpglib.h
Exported revision 202.
确保所有依赖项均已解决:
sudo contrib/scripts/install_prereq install最后您应该会收到一条成功消息:
#############################################
## install completed successfully
#############################################
步骤 4:在 Ubuntu 22.04|20.04|18.04 上构建并安装 Asterisk 16
下载 Asterisk 16 tarball 并安装所需的依赖项后,您应该准备好构建 Asterisk。
运行configure脚本以满足构建依赖关系。
sudo ./configure成功应该有如下输出:
..................
configure: Menuselect build configuration successfully completed

               .$$$$$$$$=..
            .$7$7..          .7$7:.
          .$:.                 ,$7.7
        .$7.     7$$           .$77
     ..$.       $$$            .$$7
    ..7$   .?.   $$$   .?.       7$$.
   $.$.   .$$7. $$7 .7$$.      .$$.
 .777.   .$$$77$$77$$$7.      $$,
 $$~      .7$$$$$$$7.       .$$.
.$7          .7$$$$7:          ?$$.
$$          ?7$$$$$I        .$$7
$$       .7$$$$$$$$      :$$.
$$       $$$7$$$$$$    .$$.
$$        $$   7$$7  .$$    .$$.
$$             $$7         .$$.
7$$7            7$$        7$$
 $$$                        $$
  $$7.                       $  (TM)
   $$$$.           .7$$$  $
     $$$$$$7$$$$$.$$$
       $$$$$$$$.

configure: Package configured for:
configure: OS type  : linux-gnu
configure: Host CPU : x86_64
configure: build-cpu:vendor:os: x86_64 : pc : linux-gnu :
configure: host-cpu:vendor:os: x86_64 : pc : linux-gnu :
通过运行以下命令设置菜单选项:
sudo make menuselect使用箭头键进行导航,然后使用Enter键进行选择。
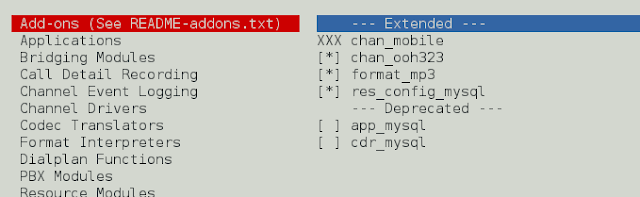
在附加组件上选择 chan_ooh323 和 format_mp3,如下所示
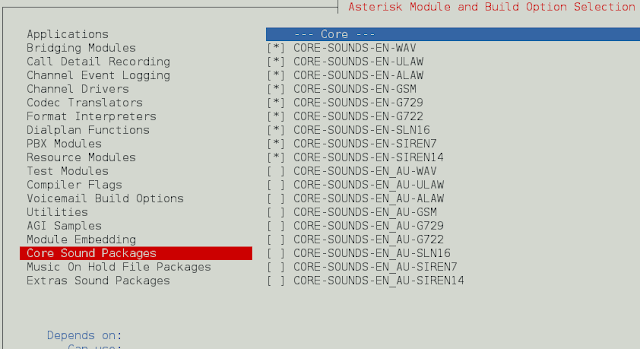
在 Core Sound Packages 上,选择音频数据包的格式,如下所示
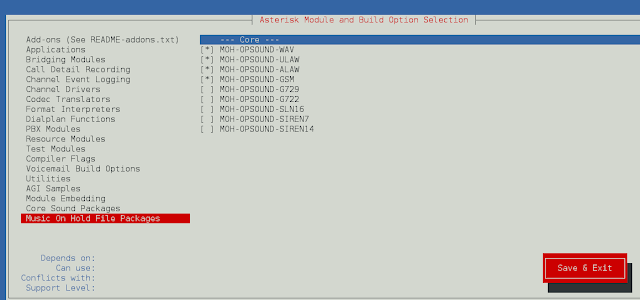
对于音乐保留,选择以下最小模块
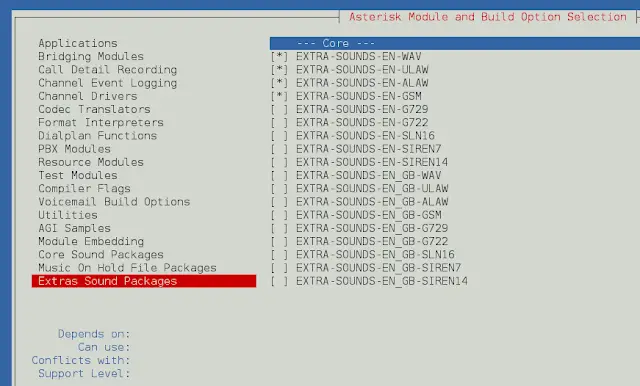
在额外声音包上选择如下所示:
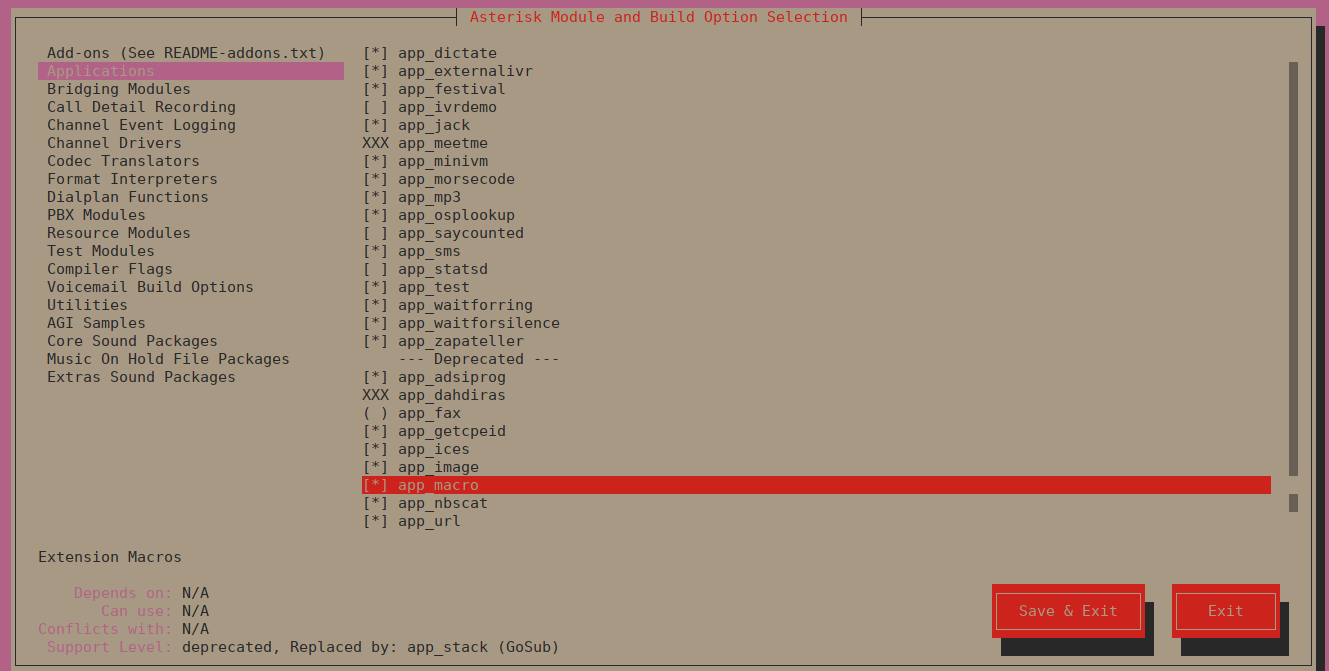
在应用程序菜单下启用app_macro。
您可以更改您认为合适的其他配置。完成后,保存并退出,然后使用选定的模块安装 Asterisk。
然后通过运行以下命令构建 Asterisk:
sudo make示例输出:
Building Documentation For: third-party channels pbx apps codecs formats cdr cel bridges funcs tests main res addons
 +--------- Asterisk Build Complete ---------+
 + Asterisk has successfully been built, and +
 + can be installed by running:              +
 +                                           +
 +                make install               +
完成后,通过运行以下命令安装 Asterisk:
sudo make install示例输出:
 +---- Asterisk Installation Complete -------+
 +                                           +
 +    YOU MUST READ THE SECURITY DOCUMENT    +
 +                                           +
 + Asterisk has successfully been installed. +
 + If you would like to install the sample   +
 + configuration files (overwriting any      +
 + existing config files), run:              +
 +                                           +
 + For generic reference documentation:      +
 +    make samples                           +
 +                                           +
 + For a sample basic PBX:                   +
 +    make basic-pbx                         +
 +                                           +
 +                                           +
 +-----------------  or ---------------------+
 +                                           +
 + You can go ahead and install the asterisk +
 + program documentation now or later run:   +
 +                                           +
 +               make progdocs               +
 +                                           +
 + **Note** This requires that you have      +
 + doxygen installed on your local system    +
 +-------------------------------------------+
您可以选择安装文档:
sudo make progdocs最后,安装配置和示例。
sudo make samples
sudo make config
sudo ldconfig
将创建 asterisk 的 systemd 服务单元文件。
创建星号用户
创建单独的用户和组来运行星号服务,并分配正确的权限:
sudo groupadd asterisk
sudo useradd -r -d /var/lib/asterisk -g asterisk asterisk
sudo usermod -aG audio,dialout asterisk
sudo chown -R asterisk.asterisk /etc/asterisk
sudo chown -R asterisk.asterisk /var/{lib,log,spool}/asterisk
sudo chown -R asterisk.asterisk /usr/lib/asterisk
将 Asterisk 默认用户设置为星号:
$ sudo vim /etc/default/asterisk
AST_USER="asterisk"
AST_GROUP="asterisk"

$ sudo vim /etc/asterisk/asterisk.conf
runuser = asterisk ; The user to run as.
rungroup = asterisk ; The group to run as.
更改后重新启动 asterisk 服务:
sudo systemctl restart asterisk启用星号服务以在系统启动时启动:
sudo systemctl enable asterisk服务应该运行且没有错误:
$ systemctl status asterisk
● asterisk.service - LSB: Asterisk PBX
     Loaded: loaded (/etc/init.d/asterisk; generated)
     Active: active (running) since Sun 2020-05-03 12:18:29 UTC; 1min 19s ago
       Docs: man:systemd-sysv-generator(8)
      Tasks: 69 (limit: 2344)
     Memory: 112.0M
     CGroup: /system.slice/asterisk.service
             └─88786 /usr/sbin/asterisk -U asterisk -G asterisk

May 03 12:18:29 ubuntu20 systemd[1]: Starting LSB: Asterisk PBX...
May 03 12:18:29 ubuntu20 asterisk[88756]:  * Starting Asterisk PBX: asterisk
May 03 12:18:29 ubuntu20 asterisk[88756]:    ...done.
May 03 12:18:29 ubuntu20 systemd[1]: Started LSB: Asterisk PBX.
测试是否可以连接到 Asterisk CLI:
$ sudo asterisk -rvv
Asterisk 16.10.0, Copyright (C) 1999 - 2018, Digium, Inc. and others.
Created by Mark Spencer <[email >
Asterisk comes with ABSOLUTELY NO WARRANTY; type 'core show warranty' for details.
This is free software, with components licensed under the GNU General Public
License version 2 and other licenses; you are welcome to redistribute it under
certain conditions. Type 'core show license' for details.
=========================================================================
Running as user 'asterisk'
Running under group 'asterisk'
Connected to Asterisk 16.10.0 currently running on ubuntu20 (pid = 88786)
ubuntu-01*CLI> core  show channels
Channel              Location             State   Application(Data)
0 active channels
0 active calls
0 calls processed
ubuntu-01*CLI> exit
Asterisk cleanly ending (0).
Executing last minute cleanups
如果您有活动的 ufw 防火墙,请打开 http 端口和端口 5060,5061:
sudo ufw allow proto tcp from any to any port 5060,5061就是这样!。您现在已经在 Ubuntu 22.04|20.04|18.04 服务器上安装了 Asterisk 16 LTS。
下一篇要阅读的文章是:如何在 Ubuntu/Debian 上安装 FreePBX 15
我强烈建议您阅读如何保护 Asterisk 和 FreePBX 免受 VoIP 欺诈和暴力攻击