如何使用 Nginx 在 Ubuntu 18.04 LTS 上安装 PrestaShop
在本指南中,我将向您展示如何使用 Nginx 作为 Web 服务器在 Ubuntu 18.04 LTS 上安装 PrestaShop。 PrestaShop 是一个完全可扩展的开源电子商务解决方案,可通过为商家和客户提供最佳的购物车体验来帮助您在线销售产品。
PrestaShop 采用 PHP 编写,具有高度可定制性并支持所有主要支付服务。它配备了大量模板,您可以轻松选择适合您品牌的正确店面。
以下是在 Ubuntu 18.04 LTS 上使用 Nginx 安装 PrestaShop 的标准步骤。
第1步:安装Nginx和PHP
PrestaShop 需要 PHP 和 Web 服务器。我们选择的 Web 服务器是 Nginx,但也可以使用 Apache。
sudo apt update
sudo apt -y install nginx php-cli php-intl php-fpm php-mysql php-zip php-gd php-mbstring php-curl php-xml php-pear php-bcmath
nginx 和 php-fpm 服务都应该正在运行:
$ systemctl status nginx php7.2-fpm.service
* nginx.service - A high performance web server and a reverse proxy server
   Loaded: loaded (/lib/systemd/system/nginx.service; enabled; vendor preset: enabled)
   Active: active (running) since Sun 2018-11-04 12:13:11 PST; 21s ago
     Docs: man:nginx(8)
  Process: 23848 ExecStart=/usr/sbin/nginx -g daemon on; master_process on; (code=exited, status=0/SUCCESS)
  Process: 23837 ExecStartPre=/usr/sbin/nginx -t -q -g daemon on; master_process on; (code=exited, status=0/SUCCESS)
 Main PID: 23852 (nginx)
    Tasks: 3 (limit: 1111)
   CGroup: /system.slice/nginx.service
           |-23852 nginx: master process /usr/sbin/nginx -g daemon on; master_process on;
           |-23853 nginx: worker process
           `-23854 nginx: worker process

Nov 04 12:13:11 ubuntu-01 systemd[1]: Starting A high performance web server and a reverse proxy server...
Nov 04 12:13:11 ubuntu-01 systemd[1]: Started A high performance web server and a reverse proxy server.

* php7.2-fpm.service - The PHP 7.2 FastCGI Process Manager
   Loaded: loaded (/lib/systemd/system/php7.2-fpm.service; enabled; vendor preset: enabled)
   Active: active (running) since Sun 2018-11-04 05:57:11 PST; 6h ago
     Docs: man:php-fpm7.2(8)
 Main PID: 17354 (php-fpm7.2)
   Status: "Processes active: 0, idle: 2, Requests: 0, slow: 0, Traffic: 0req/sec"
    Tasks: 3 (limit: 1111)
   CGroup: /system.slice/php7.2-fpm.service
           |-17354 php-fpm: master process (/etc/php/7.2/fpm/php-fpm.conf)
           |-17369 php-fpm: pool www
           `-17370 php-fpm: pool www

Nov 04 05:57:11 ubuntu-01 systemd[1]: Starting The PHP 7.2 FastCGI Process Manager...
Nov 04 05:57:11 ubuntu-01 systemd[1]: Started The PHP 7.2 FastCGI Process Manage
第2步:安装并配置MariaDB数据库服务器
PrestaShop 需要一个数据库服务器来存储其数据。 MariaDB 是一个功能强大的开源关系数据库系统。您可以按照以下指南在 Ubuntu 18.04 服务器上安装 MariaDB:
在 Ubuntu 18.04 和 CentOS 7 上安装 MariaDB 10.x
如果您想使用 MySQL,请检查:
如何在 Ubuntu 18.04/16.04 上安装 MySQL 8.0
登录 MariaDB shell:
$ mysql -u root -p为 PrestaShop 创建数据库和用户:
CREATE USER 'prestashop'@'localhost' IDENTIFIED BY 'StrongPassword';
CREATE DATABASE prestashop;
GRANT ALL PRIVILEGES ON prestashop.* TO 'prestashop'@'localhost';
FLUSH PRIVILEGES;
QUIT
检查您是否可以以 prestashop 用户身份登录数据库 shell:
$ mysql -u prestashop -p
Enter password:
Welcome to the MariaDB monitor.  Commands end with ; or \g.
Your MariaDB connection id is 42
Server version: 10.3.34-MariaDB-0ubuntu0.18.04.1 Ubuntu 18.04

Copyright (c) 2000, 2018, Oracle, MariaDB Corporation Ab and others.

Type 'help;' or '\h' for help. Type '\c' to clear the current input statement.

MariaDB [(none)]> SHOW DATABASES;
+--------------------+
| Database           |
+--------------------+
| information_schema |
| prestashop         |
+--------------------+
2 rows in set (0.00 sec)
第 3 步:下载最新的 PrestaShop
下载前请检查是否有最新版本的 PrestaShop。获得版本后,将其导出为变量。
export VER="1.7.4.3"下载最新版本:
wget https://download.prestashop.com/download/releases/prestashop_${VER}.zip解压缩存档文件。
mkdir prestashop
unzip prestashop_${VER}.zip -d prestashop
将 prestashop 移至 /srv/prestashop
sudo mv prestashop /srv为 /srv/prestashop 设置适当的权限
sudo chown -R www-data:www-data /srv/prestashop/
sudo chmod -R 755 /srv/prestashop/
第四步:配置Nginx
如果您在第一步中没有安装 Nginx,请确保它已安装并正在运行
sudo apt install nginx然后为 PrestaShop 创建虚拟主机文件
sudo vim /etc/nginx/conf.d/prestashop.conf将以下数据填充到文件中
server {
    listen 80;
    server_name  example.com;
    root /srv/prestashop;
    index  index.php index.html;

    location / {
    rewrite ^/api/?(.*)$ /webservice/dispatcher.php?url=$1 last;
    rewrite ^/([0-9])(-[_a-zA-Z0-9-]*)?(-[0-9]+)?/.+\.jpg$ /img/p/$1/$1$2.jpg last;
    rewrite ^/([0-9])([0-9])(-[_a-zA-Z0-9-]*)?(-[0-9]+)?/.+\.jpg$ /img/p/$1/$2/$1$2$3.jpg last;
    rewrite ^/([0-9])([0-9])([0-9])(-[_a-zA-Z0-9-]*)?(-[0-9]+)?/.+\.jpg$ /img/p/$1/$2/$3/$1$2$3$4.jpg last;
    rewrite ^/([0-9])([0-9])([0-9])([0-9])(-[_a-zA-Z0-9-]*)?(-[0-9]+)?/.+\.jpg$ /img/p/$1/$2/$3/$4/$1$2$3$4$5.jpg last;
    rewrite ^/([0-9])([0-9])([0-9])([0-9])([0-9])(-[_a-zA-Z0-9-]*)?(-[0-9]+)?/.+\.jpg$ /img/p/$1/$2/$3/$4/$5/$1$2$3$4$5$6.jpg last;
    rewrite ^/([0-9])([0-9])([0-9])([0-9])([0-9])([0-9])(-[_a-zA-Z0-9-]*)?(-[0-9]+)?/.+\.jpg$ /img/p/$1/$2/$3/$4/$5/$6/$1$2$3$4$5$6$7.jpg last;
    rewrite ^/([0-9])([0-9])([0-9])([0-9])([0-9])([0-9])([0-9])(-[_a-zA-Z0-9-]*)?(-[0-9]+)?/.+\.jpg$ /img/p/$1/$2/$3/$4/$5/$6/$7/$1$2$3$4$5$6$7$8.jpg last;
    rewrite ^/([0-9])([0-9])([0-9])([0-9])([0-9])([0-9])([0-9])([0-9])(-[_a-zA-Z0-9-]*)?(-[0-9]+)?/.+\.jpg$ /img/p/$1/$2/$3/$4/$5/$6/$7/$8/$1$2$3$4$5$6$7$8$9.jpg last;
    rewrite ^/c/([0-9]+)(-[_a-zA-Z0-9-]*)(-[0-9]+)?/.+\.jpg$ /img/c/$1$2.jpg last;
    rewrite ^/c/([a-zA-Z-]+)(-[0-9]+)?/.+\.jpg$ /img/c/$1.jpg last;
    rewrite ^/([0-9]+)(-[_a-zA-Z0-9-]*)(-[0-9]+)?/.+\.jpg$ /img/c/$1$2.jpg last;
    try_files $uri $uri/ /index.php?$args;
    }

    location ~ \.php$ {
        include snippets/fastcgi-php.conf;
        fastcgi_pass unix:/var/run/php/php7.2-fpm.sock;
        fastcgi_param SCRIPT_FILENAME $document_root$fastcgi_script_name;
        include /etc/nginx/fastcgi_params;
    }
   gzip on;
   gzip_comp_level 1;
   gzip_buffers 16 8k;
   gzip_types application/json text/css application/javascript;
}
重新启动 nginx 之前应确认文件语法正确。
# nginx -t
nginx: the configuration file /etc/nginx/nginx.conf syntax is ok
nginx: configuration file /etc/nginx/nginx.conf test is successful
重启nginx服务以加载新文件
sudo systemctl restart nginx启动 PrestaShop 安装向导以完成 http://example.com 上的安装
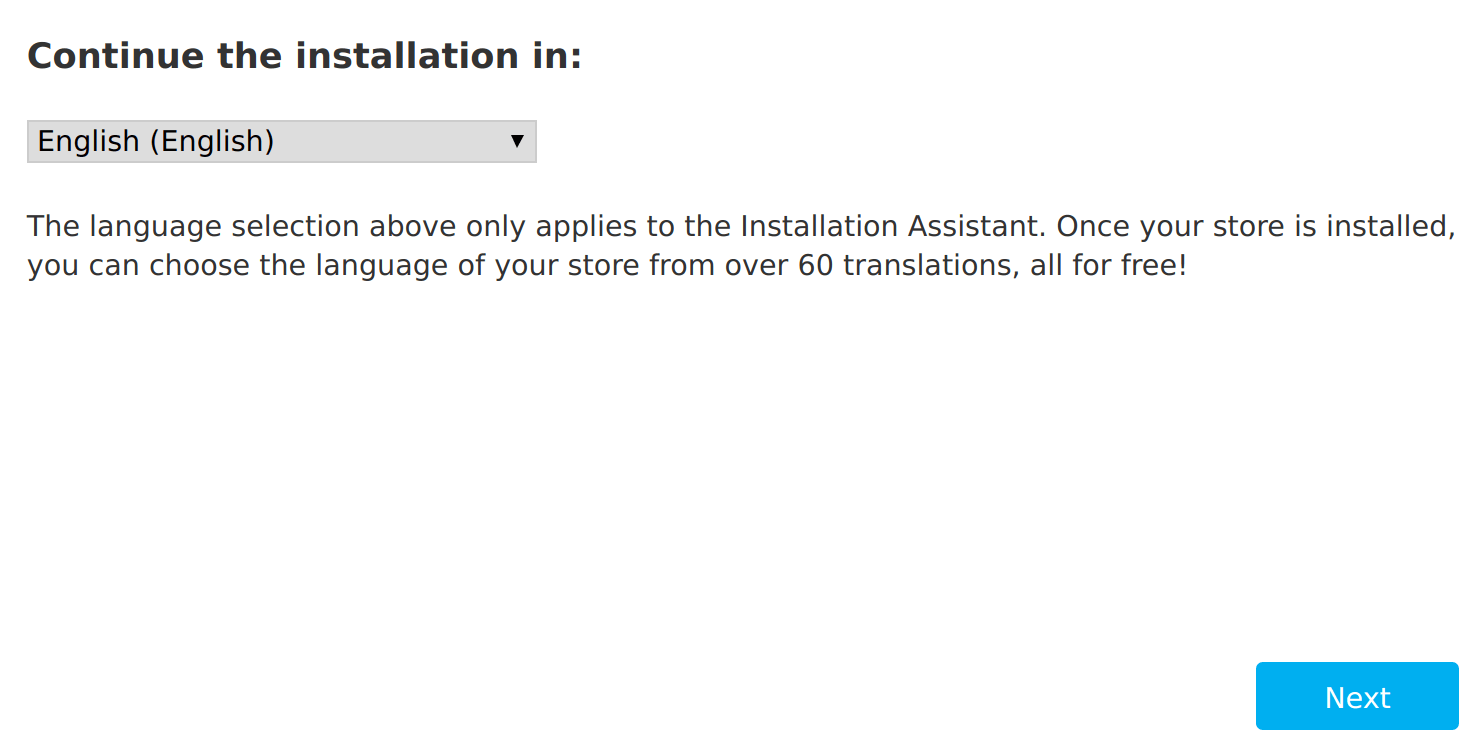
1. 选择安装语言并点击“下一步”
2. 同意软件条款和条件,然后点击“下一步”

3. 确认 PrestaShop 兼容性验证成功,然后单击下一步
4. 选择商店名称、主要活动并创建您的帐户
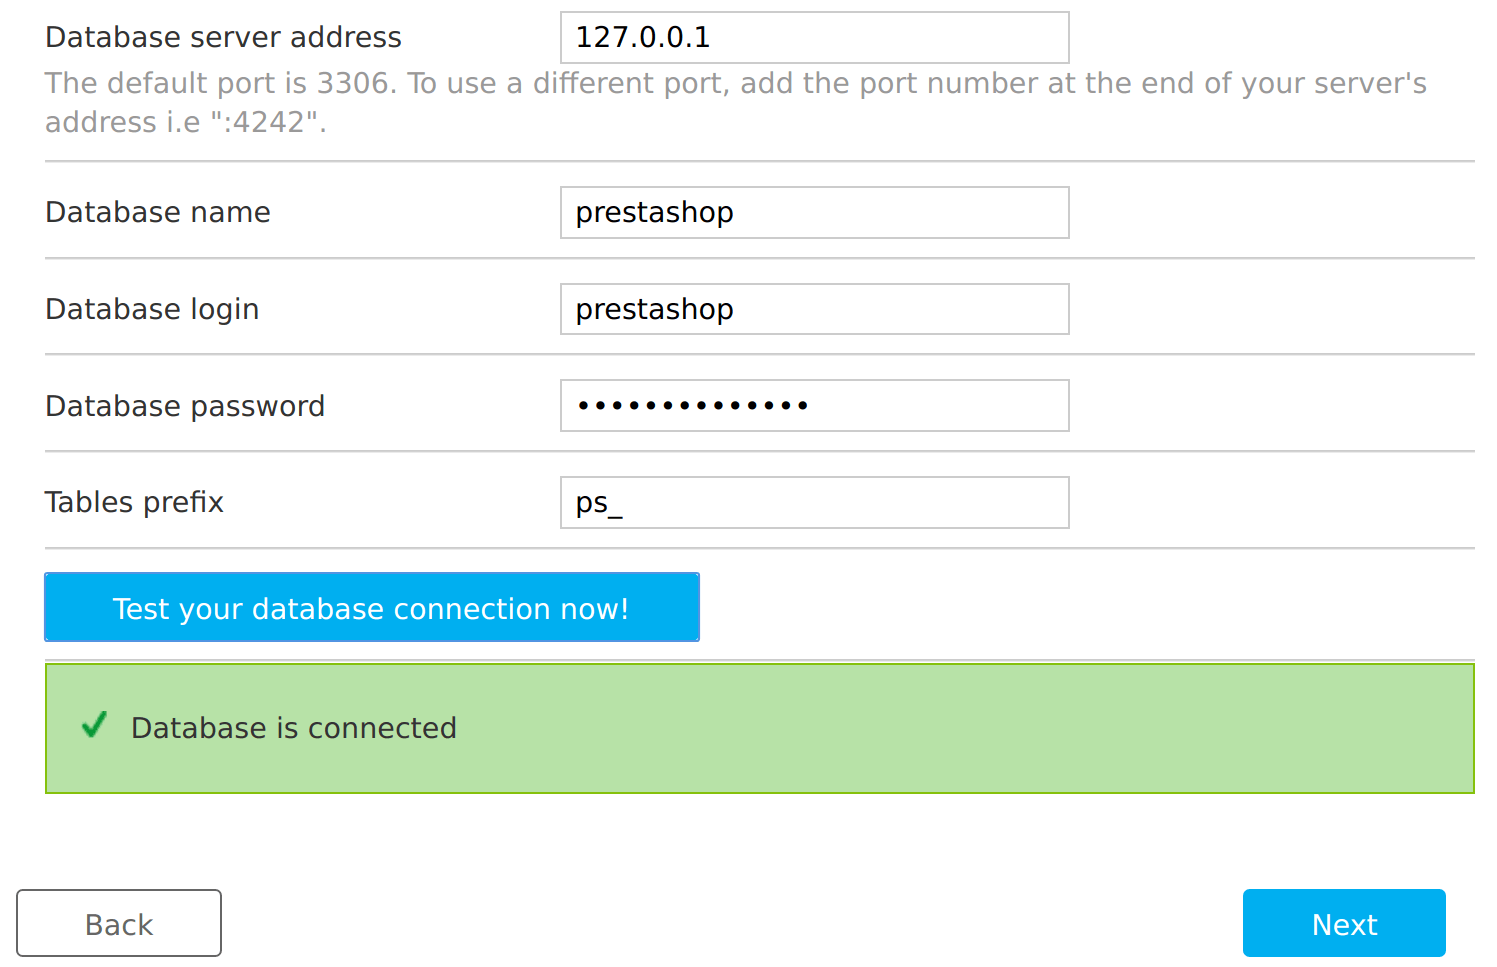
5. 使用之前创建的凭据配置您的数据库连接,然后点击“立即测试您的数据库连接!”。
等待安装完成,使用4中创建的用户登录。
出于安全目的,您必须删除“install”文件夹。
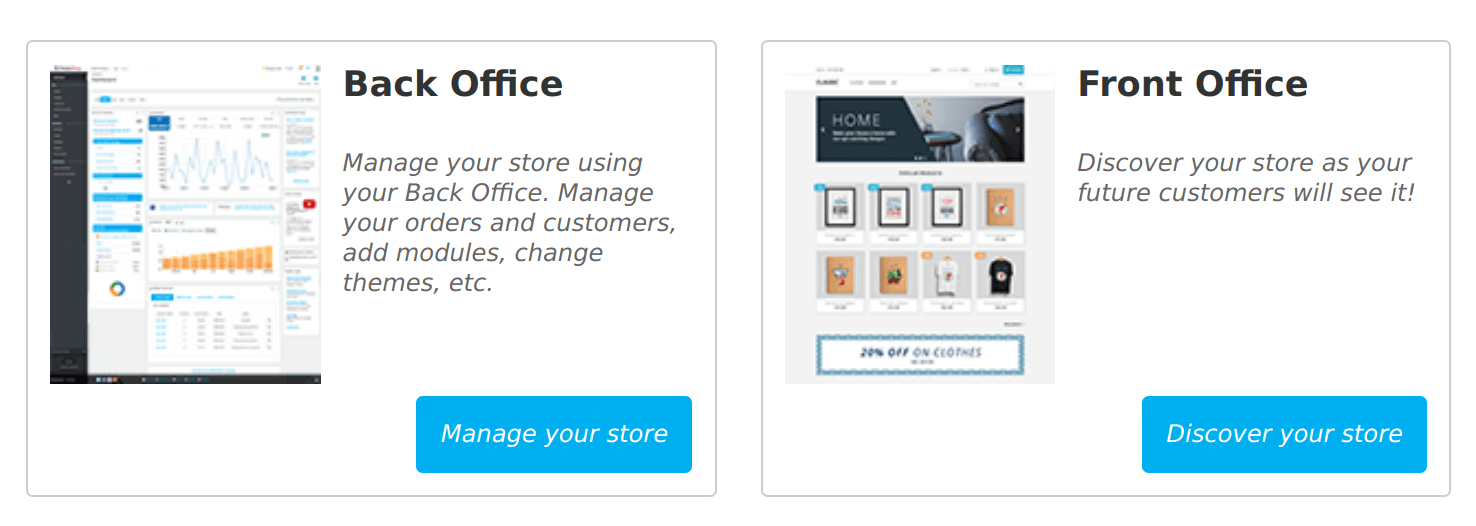
sudo rm -rf /srv/prestashop/install/选择是访问后台还是前台。
您已在 Ubuntu 18.04 LTS 上成功安装 PrestaShop。访问 PrestaShop 文档页面,了解有关添加产品、自定义模板、设置价格等的更多信息。