如何在 CentOS 7 中安装 Varnish Cache 4.0
Varnish Cache 是一种 Web 应用程序加速器,也称为缓存 HTTP 反向代理。您可以将其安装在任何使用 HTTP 的服务器前面,并将其配置为缓存内容。 Varnish Cache 真的非常非常快。它通常可以将交付速度提高 300 至 1000 倍,具体取决于您的架构。在此网页所附的视频中可以看到 Varnish 功能的高级概述。
在 CentOS 上安装 Varnish 的步骤
- 我的 Centos 服务器:CentOS Linux 版本 7.1.1503(核心)
- IP:192.168.136.131
1.执行以下命令为 Centos 7 的 varnish 存储库
vi /etc/yum.repos.d/varnish.repo[varnish-4.0]
name=Varnish 4.0 for Enterprise Linux
baseurl=https://repo.varnish-cache.org/redhat/varnish-4.0/el7/$basearch
enabled=1
gpgcheck=0
gpgkey=file:///etc/pki/rpm-gpg/RPM-GPG-KEY-VARNISH
[root@localhost varnish]#2.安装适用于 CentOS 7 的 EPEL 存储库
- http://www.unixmen.com/install-epel-repository-centos-rhel-7/
3.然后使用yum命令安装varnish
yum update[root@localhost ~]# yum install varnish
Loaded plugins: fastestmirror, langpacks
Loading mirror speeds from cached hostfile
* base: mirror.denit.net
* epel: ftp.fau.de
* extras: centos.mirror.transip.nl
* updates: mirrors.supportex.net
Resolving Dependencies
--> Running transaction check
---> Package varnish.x86_64 0:4.0.3-3.el7 will be installed
--> Processing Dependency: varnish-libs(x86-64) = 4.0.3-3.el7 for package: varnish-4.0.3-3.el7.x86_64
--> Processing Dependency: libvarnishapi.so.1(LIBVARNISHAPI_1.3)(64bit) for package: varnish-4.0.3-3.el7.x86_64
--> Processing Dependency: libvarnishapi.so.1(LIBVARNISHAPI_1.2)(64bit) for package: varnish-4.0.3-3.el7.x86_64
--> Processing Dependency: libvarnishapi.so.1(LIBVARNISHAPI_1.1)(64bit) for package: varnish-4.0.3-3.el7.x86_64
--> Processing Dependency: libvarnishapi.so.1(LIBVARNISHAPI_1.0)(64bit) for package: varnish-4.0.3-3.el7.x86_64
--> Processing Dependency: jemalloc for package: varnish-4.0.3-3.el7.x86_64
--> Processing Dependency: libvgz.so()(64bit) for package: varnish-4.0.3-3.el7.x86_64
--> Processing Dependency: libvcc.so()(64bit) for package: varnish-4.0.3-3.el7.x86_64
--> Processing Dependency: libvarnishcompat.so()(64bit) for package: varnish-4.0.3-3.el7.x86_64
--> Processing Dependency: libvarnishapi.so.1()(64bit) for package: varnish-4.0.3-3.el7.x86_64
--> Processing Dependency: libvarnish.so()(64bit) for package: varnish-4.0.3-3.el7.x86_64
--> Processing Dependency: libjemalloc.so.1()(64bit) for package: varnish-4.0.3-3.el7.x86_64
--> Running transaction check
---> Package jemalloc.x86_64 0:3.6.0-1.el7 will be installed
---> Package varnish-libs.x86_64 0:4.0.3-3.el7 will be installed
--> Finished Dependency Resolution
Dependencies Resolved
=======================================================================================================================
Package Arch Version
=======================================================================================================================
Installing:
varnish x86_64 4.0.3-3.el7
Installing for dependencies:
jemalloc x86_64 3.6.0-1.el7
varnish-libs x86_64 4.0.3-3.el7
Transaction Summary
=======================================================================================================================
Install 1 Package (+2 Dependent packages)4.编辑 /etc/varnish 下的 Varnish 配置
编辑清漆
vi varnish.paramsDefault address and port to bind to. Blank address means all IPv4
and IPv6 interfaces, otherwise specify a host name, an IPv4 dotted
quad, or an IPv6 address in brackets.
VARNISH_LISTEN_ADDRESS=192.168.1.5
VARNISH_LISTEN_PORT=80
Admin interface listen address and port
VARNISH_ADMIN_LISTEN_ADDRESS=192.168.136.131
VARNISH_ADMIN_LISTEN_PORT=6082并编辑default.vcl
Default backend definition. Set this to point to your content server.
backend default {
    .host = "192.168.136.131";
    .port = "8080";
}
编辑 apache 配置并将监听端口更改为 8080
vi /etc/httpd/conf/httpd.confListen 80805.编辑防火墙以允许http服务
[root@localhost varnish]# systemctl stop firewalld[root@localhost varnish]# systemctl status firewalld
firewalld.service - firewalld - dynamic firewall daemon
Loaded: loaded (/usr/lib/systemd/system/firewalld.service; enabled)
Active: inactive (dead) since Mon 2015-06-01 15:32:19 PDT; 53min ago
Main PID: 758 (code=exited, status=0/SUCCESS)
CGroup: /system.slice/firewalld.service
Jun 01 13:38:39 localhost.localdomain systemd[1]: Started firewalld - dynamic firewall daemon.
Jun 01 15:32:18 localhost.localdomain systemd[1]: Stopping firewalld - dynamic firewall daemon...
Jun 01 15:32:19 localhost.localdomain systemd[1]: Stopped firewalld - dynamic firewall daemon.
Hint: Some lines were ellipsized, use -l to show in full.
[root@localhost varnish]#如果您想让防火墙保持运行:
firewall-cmd --permanent --zone=internal --add-service=http
success
firewall-cmd --reload
success
6.启用并启动 Varnish 和 Apache 守护进程
systemctl enable varnish
systemctl enable httpd
systemctl start varnish
systemctl start httpd
7.检查apache是否正在运行
http://ip http://hosnmae8.现在检查您的缓存系统是否正常工作
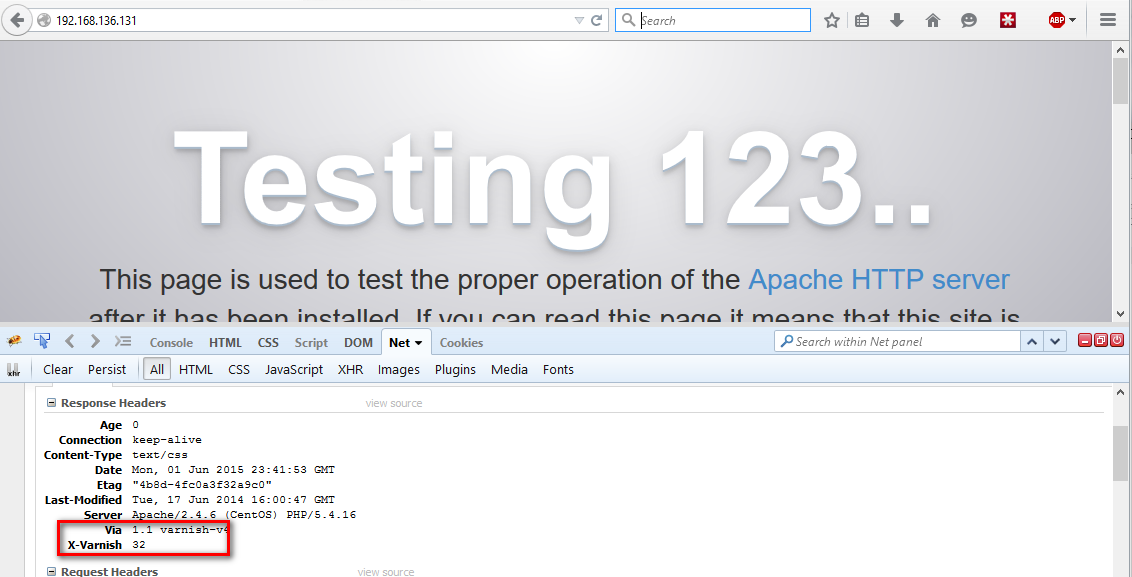
或者从命令行检查,如下所示。
[root@localhost varnish]# curl -I 192.168.136.131
 HTTP/1.1 403 Forbidden
 Date: Mon, 01 Jun 2015 23:03:10 GMT
 Server: Apache/2.4.6 (CentOS) PHP/5.4.16
 Last-Modified: Thu, 16 Oct 2014 13:20:58 GMT
 ETag: "1321-5058a1e728280"
 Accept-Ranges: bytes
 Content-Length: 4897
 Content-Type: text/html; charset=UTF-8
 X-Varnish: 32779
 Age: 0
 Via: 1.1 varnish-v4
 Connection: keep-alive
就是这样。