如何在 Ubuntu 22.04 上安装 OpenProject
OpenProject 是一款用 Ruby on Rails 和 Angular JS 编写的开源任务管理软件。它基于网络,为整个项目生命周期提供经典管理。它提供三个版本:社区版、云版和企业版。企业版提供一些高级功能、支持和托管设施,而社区版可以免费下载并可以托管在任何服务器上。它提供了丰富的功能,包括应用程序管理、发布规划、产品管理、团队协作、任务管理、错误跟踪和预算规划。
本教程将向您展示如何在 Ubuntu 22.04 上安装 OpenProject 项目管理软件。
先决条件
- 运行 Ubuntu 22.04 的服务器。
- 服务器上配置了 root 密码。
安装所需的依赖项
在开始之前,您需要安装安装 OpenProject 所需的一些依赖项。
apt-get install gnupg2 wget apt-transport-https -y接下来,您还需要在服务器上安装 libssl1.1。但是,它不包含在 Ubuntu 默认存储库中。因此,您需要添加 libssl 的存储库。
echo "deb http://security.ubuntu.com/ubuntu impish-security main" | sudo tee /etc/apt/sources.list.d/impish-security.list将存储库添加到 APT 后,使用以下命令更新存储库并安装 libssl1.1:
apt-get update -y
apt-get install libssl1.1 -y
安装 libssl 后,您可以继续下一步。
安装和配置 PostgreSQL
OpenProject 使用 PostgreSQL 作为数据库后端。您可以使用以下命令安装它:
apt install postgresql -y安装 PostgreSQL 后,使用以下命令启动 PostgreSQL 服务:
systemctl start postgresql您还可以使用以下命令检查 PostgreSQL 的状态:
systemctl status postgresql您应该看到以下输出:
? postgresql.service - PostgreSQL RDBMS
     Loaded: loaded (/lib/systemd/system/postgresql.service; enabled; vendor preset: enabled)
     Active: active (exited) since Sun 2022-05-22 08:37:49 UTC; 25s ago
    Process: 21934 ExecStart=/bin/true (code=exited, status=0/SUCCESS)
   Main PID: 21934 (code=exited, status=0/SUCCESS)
        CPU: 1ms

May 22 08:37:49 ubuntu2204 systemd[1]: Starting PostgreSQL RDBMS...
May 22 08:37:49 ubuntu2204 systemd[1]: Finished PostgreSQL RDBMS.
接下来,使用以下命令登录 PostgreSQL shell:
su - postgres
psql
接下来,设置 PostgreSQL 密码并使用以下命令创建数据库:
ALTER USER postgres PASSWORD 'password';
create database openproject
接下来,使用以下命令退出 PostgreSQL shell:
exit
exit
接下来,编辑 PostgreSQL 配置文件并将身份验证方法更改为 md5:
nano /etc/postgresql/14/main/pg_hba.conf更改以下行:
# Database administrative login by Unix domain socket
local   all             postgres                                md5
# TYPE  DATABASE        USER            ADDRESS                 METHOD
# "local" is for Unix domain socket connections only
local   all             all                                     md5
# IPv4 local connections:
host    all             all             127.0.0.1/32            md5
# IPv6 local connections:
host    all             all             ::1/128                 md5
保存并关闭文件,然后重新启动 PostgreSQL 服务以应用更改:
systemctl restart postgresql安装开放项目
默认情况下,OpenProject 不包含在 Ubuntu 22.04 默认存储库中。因此,您需要将 OpenProject 存储库添加到 APT。您可以使用以下命令添加它:
wget -qO- https://dl.packager.io/srv/opf/openproject/key | apt-key add -
wget -O /etc/apt/sources.list.d/openproject.list https://dl.packager.io/srv/opf/openproject/stable/12/installer/ubuntu/20.04.repo
添加存储库后,使用以下命令更新存储库:
apt-get update -y接下来,使用以下命令安装 OpenProject:
apt-get install openproject -y安装 OpenProject 后,您将获得以下输出:
Setting up libpangoft2-1.0-0:amd64 (1.50.6+ds-2) ...
Setting up libpangocairo-1.0-0:amd64 (1.50.6+ds-2) ...
Setting up libgs9:amd64 (9.55.0~dfsg1-0ubuntu5) ...
Setting up libmagickcore-6.q16-6-extra:amd64 (8:6.9.11.60+dfsg-1.3build2) ...
Setting up ghostscript (9.55.0~dfsg1-0ubuntu5) ...
Setting up tesseract-ocr (4.1.1-2.1build1) ...
Setting up imagemagick (8:6.9.11.60+dfsg-1.3build2) ...
Setting up openproject (12.1.4-1652787939.a0fe11cd.focal) ...
==============
The openproject package provides an installer. Please run the following command to finish the installation:
sudo openproject configure
==============
Processing triggers for libc-bin (2.35-0ubuntu3) ...
Processing triggers for man-db (2.10.2-1) ...
Processing triggers for mailcap (3.70+nmu1ubuntu1) ...
配置开放项目
安装 OpenProject 后,您需要配置 OpenProject。您可以使用以下命令来完成此操作:
openproject configure系统将要求您定义 PostgreSQL 数据库,如下所示:
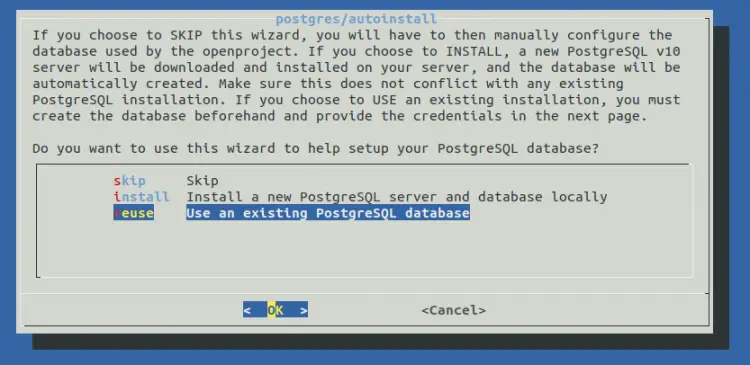
单击使用现有的 PostgreSQL 数据库,然后按Enter键。系统会要求您提供 PostgreSQL 主机:

提供本地主机地址并按Enter键。系统会要求您提供 PostgreSQL 端口:
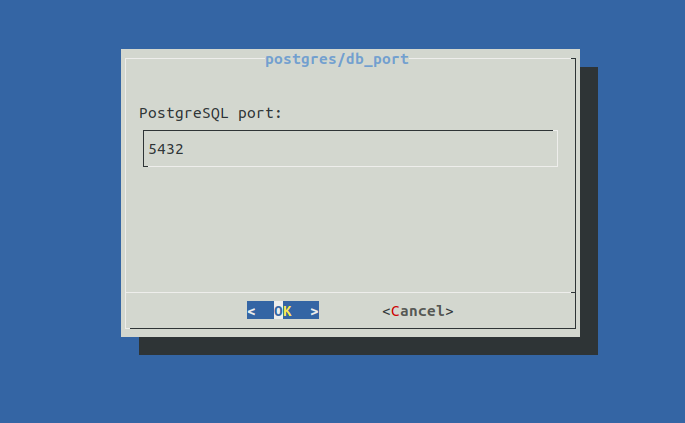
提供 PostgreSQL 侦听端口并按 Enter 键。系统会要求您提供 PostgreSQL 用户名:
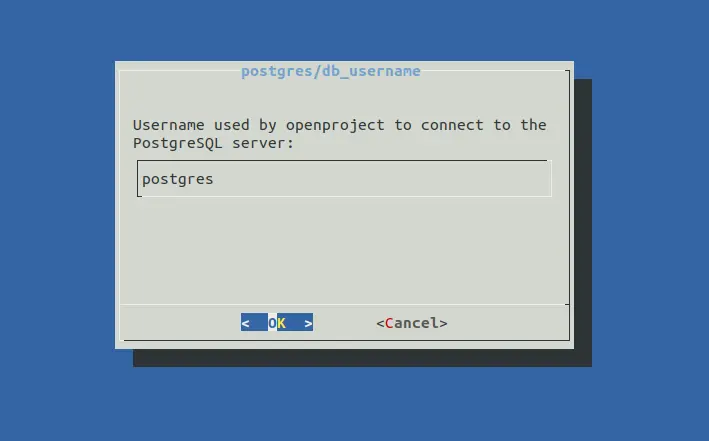
提供您的用户名并按Enter键。系统会要求您提供 PostgreSQL 密码:
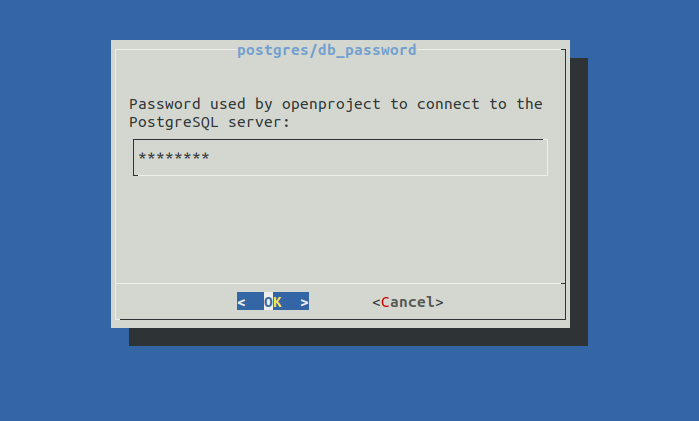
提供您的密码并按Enter键。您将被要求提供 PostgreSQL 数据库:
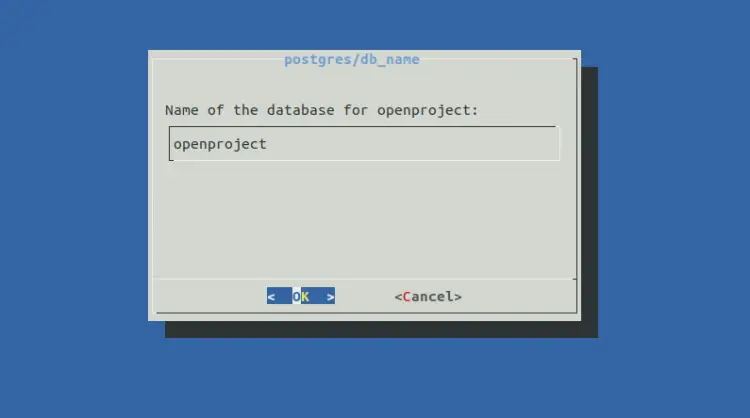
提供您的 PostgreSQL 数据库并按 Enter 键。您将被要求设置一个网络服务器:

选择安装 Apache 服务器并按Enter键。您将被要求提供一个完全合格的域名:
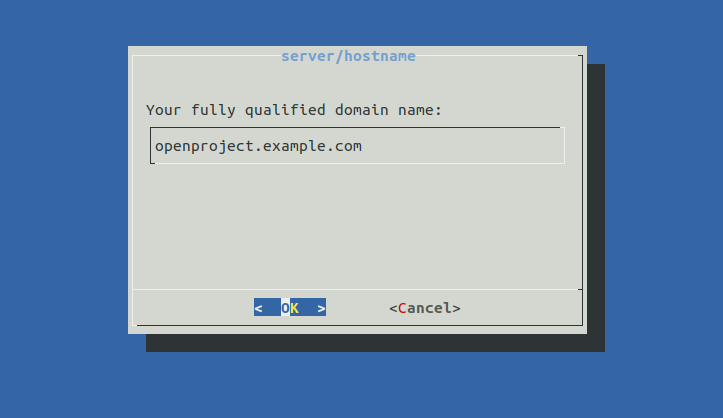
提供您的域名并按Enter键。系统会要求您提供服务器路径:
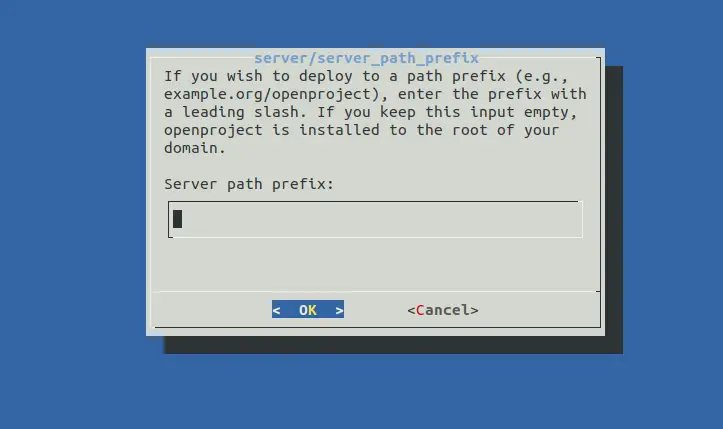
提供您的服务器路径并按Enter键。系统会要求您启用 SSL:

选择否并按Enter键。系统会要求您安装 Subversion:
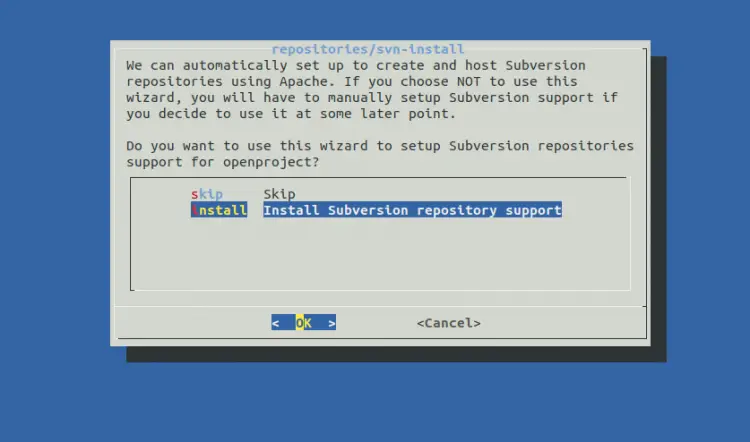
选择安装 Subversion 存储库支持并按Enter键。系统将要求您定义存储库路径:
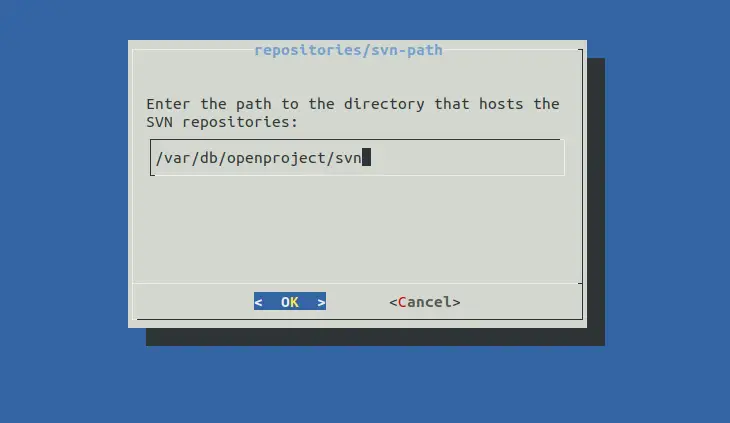
提供您的存储库路径或将其保留为默认值,然后按 Enter 键。系统会要求您安装 Git 存储库:
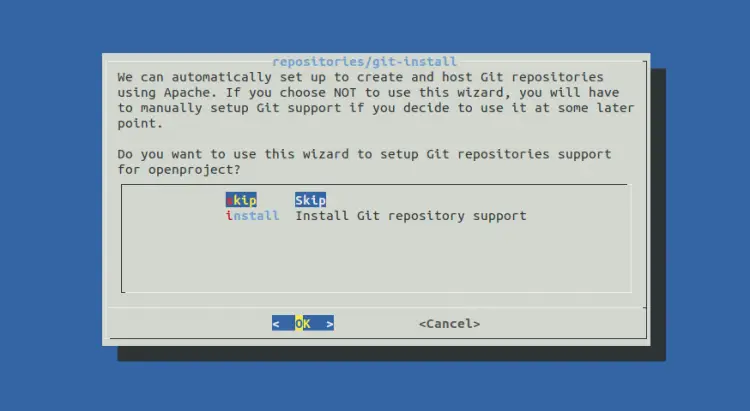
选择跳过并按Enter键。您将被要求使用电子邮件:
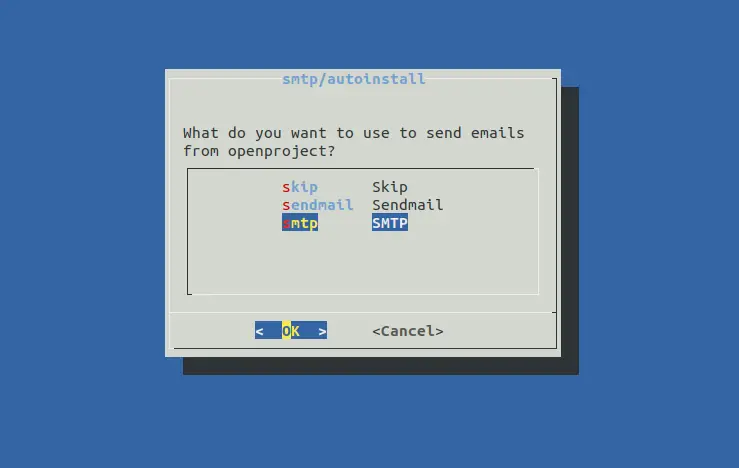
选择SMTP并按Enter键。系统将要求您选择身份验证类型:

选择无并按Enter键。系统会要求您定义 SMTP 主机:

提供您的 SMTP 主机并按 Enter 键。系统会要求您提供 SMTP 端口:

提供您的 SMTP 端口并按 Enter 键。您将被要求提供您的 SMTP 域:
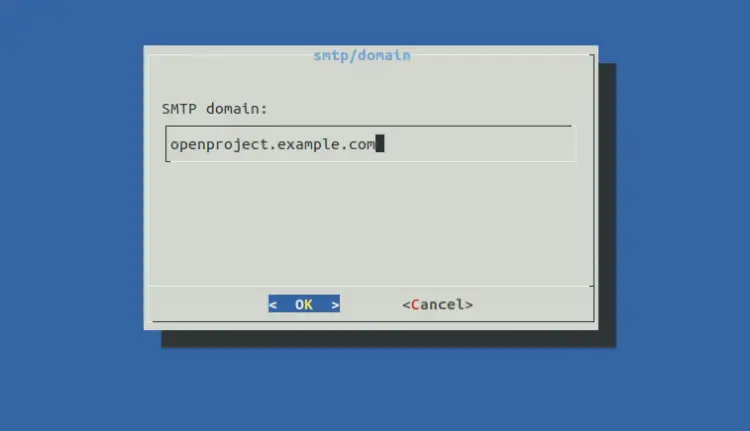
提供您的 SMTP 域并按 Enter 键。您将被要求提供您的电子邮件:
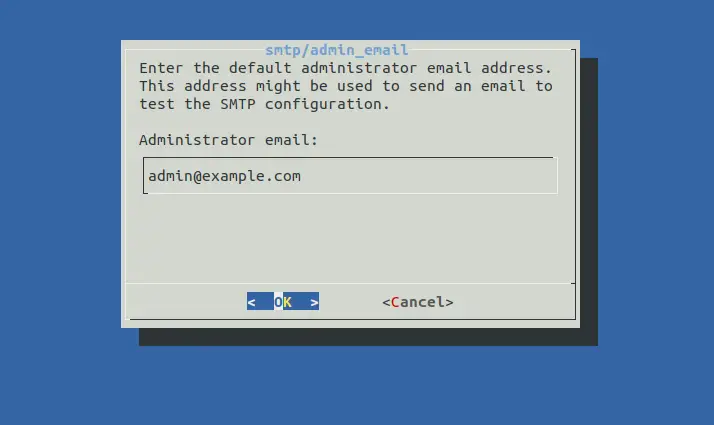
提供您的电子邮件并按Enter键。系统会要求您安装 Memcached 服务器:

选择跳过并按Enter键开始配置。配置 OpenProject 后,使用以下命令验证 Apache 服务:
systemctl status apache2您应该看到以下输出:
? apache2.service - The Apache HTTP Server
     Loaded: loaded (/lib/systemd/system/apache2.service; enabled; vendor preset: enabled)
     Active: active (running) since Sun 2022-05-22 09:13:26 UTC; 51s ago
       Docs: https://httpd.apache.org/docs/2.4/
   Main PID: 38894 (/usr/sbin/apach)
      Tasks: 7 (limit: 2292)
     Memory: 28.2M
        CPU: 345ms
     CGroup: /system.slice/apache2.service
             ??38894 /usr/sbin/apache2 -k start
             ??38988 /usr/sbin/apache2 -k start
             ??39022 /usr/sbin/apache2 -k start
             ??39023 /usr/sbin/apache2 -k start
             ??39024 /usr/sbin/apache2 -k start
             ??39031 /usr/sbin/apache2 -k start
             ??39032 /usr/sbin/apache2 -k start

May 22 09:13:26 ubuntu2204 systemd[1]: Starting The Apache HTTP Server...
May 22 09:13:26 ubuntu2204 apachectl[38893]: AH00558: apache2: Could not reliably determine the server's fully qualified domain name, using 2>
May 22 09:13:26 ubuntu2204 systemd[1]: Started The Apache HTTP Server.
您还可以使用以下命令检查 OpenProject 状态:
systemctl status openproject-web-1.service您应该得到以下输出:
? openproject-web-1.service
     Loaded: loaded (/etc/systemd/system/openproject-web-1.service; enabled; vendor preset: enabled)
     Active: active (running) since Sun 2022-05-22 09:14:06 UTC; 47s ago
   Main PID: 40653 (web)
      Tasks: 25 (limit: 2292)
     Memory: 364.8M
        CPU: 18.618s
     CGroup: /system.slice/openproject-web-1.service
             ??40653 /bin/bash -e ./packaging/scripts/web
             ??40713 "puma 5.6.4 (tcp://127.0.0.1:6000) [openproject]" "" "" "" "" "" "" "" "" "" "" "" "" "" "" "" "" "" "" "" "" "" "" "" ">
             ??40743 "puma: cluster worker 0: 40713 [openproject]" "" "" "" "" "" "" "" "" "" "" "" "" "" "" "" "" "" "" "" "" "" "" "" "" "">
             ??40744 "puma: cluster worker 1: 40713 [openproject]" "" "" "" "" "" "" "" "" "" "" "" "" "" "" "" "" "" "" "" "" "" "" "" "" "">

May 22 09:14:43 ubuntu2204 openproject-web-1.service[40713]: [40713] *  Max threads: 16
May 22 09:14:43 ubuntu2204 openproject-web-1.service[40713]: [40713] *  Environment: production
May 22 09:14:43 ubuntu2204 openproject-web-1.service[40713]: [40713] *   Master PID: 40713
May 22 09:14:43 ubuntu2204 openproject-web-1.service[40713]: [40713] *      Workers: 2
May 22 09:14:43 ubuntu2204 openproject-web-1.service[40713]: [40713] *     Restarts: (?) hot (?) phased
May 22 09:14:43 ubuntu2204 openproject-web-1.service[40713]: [40713] * Preloading application
May 22 09:14:43 ubuntu2204 openproject-web-1.service[40713]: [40713] * Listening on http://127.0.0.1:6000
May 22 09:14:43 ubuntu2204 openproject-web-1.service[40713]: [40713] Use Ctrl-C to stop
May 22 09:14:43 ubuntu2204 openproject-web-1.service[40713]: [40713] - Worker 0 (PID: 40743) booted in 0.02s, phase: 0
May 22 09:14:43 ubuntu2204 openproject-web-1.service[40713]: [40713] - Worker 1 (PID: 40744) booted in 0.02s, phase: 0
访问 OpenProject Web 界面
现在,打开 Web 浏览器并使用 URL http://openproject.example.com/login 访问 OpenProject。您将被重定向到 OpenProject 登录页面:
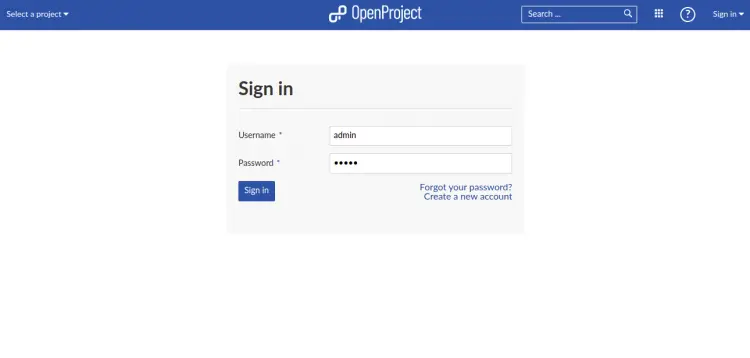
提供默认用户名和密码 admin/admin,然后单击登录按钮。您应该看到密码重置屏幕:
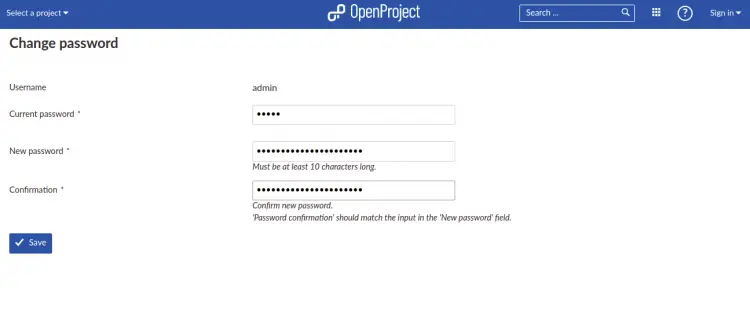
设置新的管理员密码,然后单击保存按钮应用更改。您应该在以下屏幕上看到 OpenProject 仪表板:
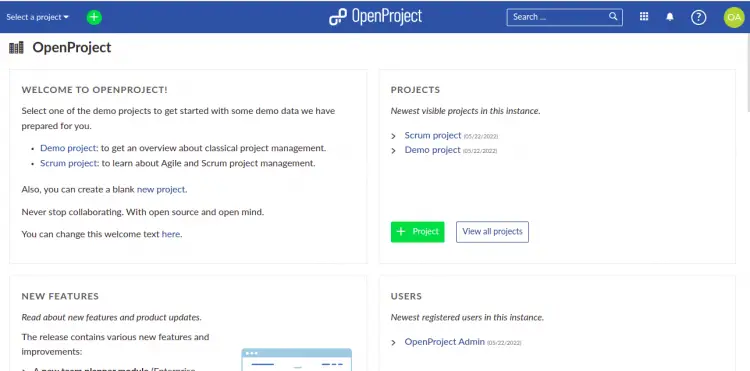
结论
恭喜!您已在 Ubuntu 22.04 服务器上成功安装 OpenProject。您现在可以在组织中部署 OpenProject 并开始从中央位置管理您的项目。