使用 Multipass 在 Linux 和 macOS 上运行 Ubuntu 虚拟机
本指南演示如何使用 Multipass 在 Linux 和 macOS 上运行 Ubuntu 虚拟机。但在我们深入探讨这个工具的关键之前。让我们先来了解一下这个工具是什么。
什么是多通道?
有许多虚拟化工具可用于部署虚拟机以进行测试和学习。其中包括 Virtualbox、VMware、LXD、KVM、Docker、LXC、Proxmox、Vagrant 等。我经常使用 Virtualbox 和 VMware 在 Linux 发行版上测试各种 Linux 应用程序。在本指南中,我们将采用另一种虚拟化工具,称为Multipass。该工具可以让普通用户、开发人员和系统管理员轻松创建和启动 Ubuntu 虚拟机。
Multipass 是由 Canonical 团队开发的轻量级虚拟机管理器,用于在本地计算机上创建和启动 ubuntu 实例。它被开发为在 macOS、Windows 和 GNU/Linux 系统上运行。 Multipass 在 Linux 上使用 KVM,在 macOS 上使用 Hyper kit,在 Windows 上使用 Hyper-V,以最小的开销运行虚拟机。
通过 Multipass,人们可以从本地计算机直接在虚拟机的 shell 中运行命令。此外,还可以挂载主机系统的目录并与虚拟机共享文件。
有了上述知识,我们现在就可以开始着手 Multipass 的安装了。
第 1 步:在 Linux 和 macOS 上安装 Multipass
1.在Linux上安装Multipass
在 Linux 上,Multipass 可作为快照包使用。它可以轻松安装在任何支持 snapd 的 Linux 发行版上。
在一些发行版中,例如 Zorin OS、Solus 3 和 Ubuntu 从 16.04 LTS snap 开始的版本都是作为预安装的应用程序提供的。您可以按如下方式安装 snapd:
###On Debian/Ubuntu
sudo apt install snapd

###On RHEL 7/CentOS 7
sudo yum -y install https://dl.fedoraproject.org/pub/epel/epel-release-latest-7.noarch.rpm
sudo yum -y upgrade
sudo yum -y install snapd

###On Rhel 8/Centos 8/Rocky Linux 8/Fedora
sudo dnf -y install https://dl.fedoraproject.org/pub/epel/epel-release-latest-8.noarch.rpm
sudo dnf -y upgrade
sudo dnf -y install snapd
然后启用 snapd,如下所示:
sudo systemctl enable --now snapd.socket
sudo ln -s /var/lib/snapd/snap /snap
安装并启动 snap 后,我们将使用以下命令在任何 Linux 发行版上安装 Multipass:
首先,更新和升级您的系统。然后在Linux上安装Multipass,如下所示
sudo snap install multipass如果上述命令因任何原因无法运行,请尝试使用以下命令安装 Multipass:
sudo snap install multipass --classic成功安装 Multipass 后,您将看到以下输出:
multipass 1.10.1 from Canonical✓ installed2. 在 macOS 上安装 Multipass
在 macOS 上,有多种方法可以在系统上安装 Multipass。
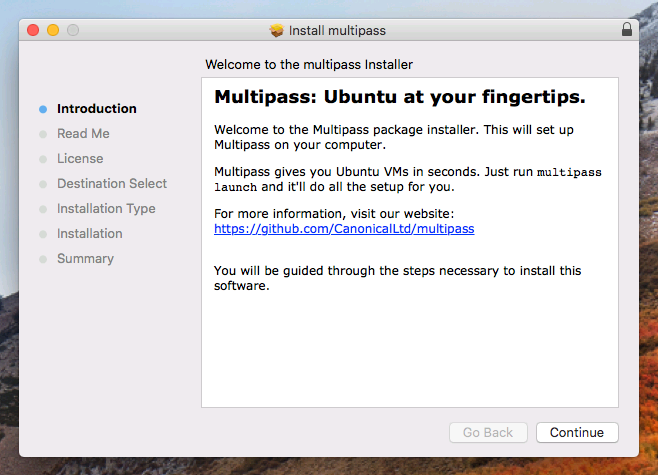
1. 使用多通道安装程序
从官方下载页面下载 Multipass 安装程序,然后安装。下载 .pkg 包后,通过激活将其安装在 macOS 系统上。使用管理员权限执行指定的步骤。
2. 使用酿造
借助brew,您可以使用以下命令轻松在macOS上安装Multipass:
brew install --cask multipass在 macOS 上,Multipass 支持 VirtualBox 作为虚拟化提供程序。如果您想使用 VirtualBox,请发出以下命令:
sudo multipass set local.driver=virtualbox使用命令验证您的多通道安装。
$ multipass version
multipass 1.10.1+mac
multipassd 1.10.1+mac
步骤 2:在 Linux 和 macOS 上使用 Multipass 创建并启动 Ubuntu VM
在您的系统上成功安装 Multipass 后,运行 Ubuntu VM 就变得非常简单。
要启动 Ubuntu 实例,请使用以下命令:
multipass launch --name test-instance或者使用:
multipass launch -n test-instance在上面的代码中,将 test-instance 替换为您所需的 Ubuntu 实例名称。
最新的最小 Ubuntu LTS 实例将被下载并自动启动,如下所示:

您现在可以使用以下命令列出可用的虚拟机:
multipass list示例输出:
Name                    State             IPv4             Image
test-instance           Running           10.14.155.56     Ubuntu 20.04 LTS
从上面的输出中,我们有一个名为 test-instance 的 Ubuntu 实例,运行 Ubuntu 20.04 LTS,并且还提供了 IP。
从本地系统为您的虚拟机执行命令。
Multipass 的惊人功能之一是它允许从本地计算机运行 Ubuntu 实例的命令。
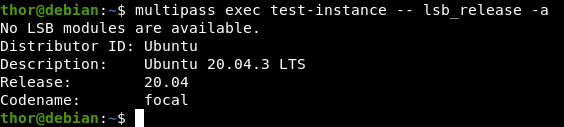
要查找正在运行的虚拟机的系统详细信息,请使用:
multipass exec test-instance -- lsb_release -a在代码中,测试实例是我们想要其详细信息的虚拟机的名称。
示例输出:
启动 Ubuntu VM 的 shell。
除了从本地系统的 shell 运行命令之外,您还可以启动 Ubuntu VM 的 shell 并直接在其上运行命令。使用以下命令启动 Ubuntu VM 的 Shell:
multipass shell test-instance示例输出:
Welcome to Ubuntu 20.04.3 LTS (GNU/Linux 5.4.0-81-generic x86_64)

 * Documentation:  https://help.ubuntu.com
 * Management:     https://landscape.canonical.com
 * Support:        https://ubuntu.com/advantage

  System information as of Mon Aug 30 14:32:29 EAT 2021

  System load:  0.08              Processes:             104
  Usage of /:   27.4% of 4.67GB   Users logged in:       0
  Memory usage: 18%               IPv4 address for ens4: 10.14.155.56
  Swap usage:   0%


1 update can be applied immediately.
To see these additional updates run: apt list --upgradable


Last login: Mon Aug 30 14:31:40 2021 from 10.14.155.1
To run a command as administrator (user "root"), use "sudo <command>".
See "man sudo_root" for details.

ubuntu@test-instance:~$
从 shell 中,您可以执行普通的 Ubuntu 命令,例如:
sudo apt update要从 shell 注销,请使用:
exit查找其他要启动的实例
正如我们之前所看到的,Multipass 会查找并下载适用于 VM 的 Ubuntu 的当前 LTS 版本。但您仍然可以使用以下命令找到要运行的其他可用版本:
$ multipass find
Image                       Aliases           Version          Description
snapcraft:core18            18.04             20201111         Snapcraft builder for Core 18
snapcraft:core20            20.04             20210921         Snapcraft builder for Core 20
snapcraft:core22            22.04             20220426         Snapcraft builder for Core 22
snapcraft:devel                               20220913         Snapcraft builder for the devel series
core                        core16            20200818         Ubuntu Core 16
core18                                        20211124         Ubuntu Core 18
18.04                       bionic            20220901         Ubuntu 18.04 LTS
20.04                       focal,lts         20220824         Ubuntu 20.04 LTS
22.04                       jammy             20220902         Ubuntu 22.04 LTS
daily:22.10                 devel,kinetic     20220910         Ubuntu 22.10
appliance:adguard-home                        20200812         Ubuntu AdGuard Home Appliance
appliance:mosquitto                           20200812         Ubuntu Mosquitto Appliance
appliance:nextcloud                           20200812         Ubuntu Nextcloud Appliance
appliance:openhab                             20200812         Ubuntu openHAB Home Appliance
appliance:plexmediaserver                     20200812         Ubuntu Plex Media Server Appliance
anbox-cloud-appliance                         latest           Anbox Cloud Appliance
charm-dev                                     latest           A development and testing environment for charmers
docker                                        latest           A Docker environment with Portainer and related tools
jellyfin                                      latest           Jellyfin is a Free Software Media System that puts you in control of managing and streaming your media.
minikube                                      latest           minikube is local Kubernetes
从输出来看,有多个 Ubuntu LTS 版本。您可以使用以下语法从列表中启动实例。
$ multipass launch --name test1-instance 22.04此命令将启动 Ubuntu 22.04 的实例。
创建具有 Custorm 规格的实例。
默认情况下,Multipass 将创建一个具有 5 GB 硬盘大小、1 个 CPU 和 1 GB RAM 的虚拟机。但是,可以通过为所需的 VM 进行自定义设置来更改此设置。这有助于创建满足所需规格和需求的虚拟机。
例如,在下面的代码中,我将演示如何创建一个具有 2 个 CPU、4 GB RAM 和 15 GB 存储空间的虚拟机。
multipass launch -c 2 -m 4G -d 15G -n test2-instance查看实例信息:
$ multipass info test2-instance
Name:           test2-instance
State:          Running
IPv4:           10.14.155.175
Release:        Ubuntu 20.04.3 LTS
Image hash:     97bb9f79af52 (Ubuntu 20.04 LTS)
Load:           0.47 0.31 0.12
Disk usage:     1.3G out of 14.4G
Memory usage:   149.0M out of 3.8G
Mounts:         --
请记住,允许的最低要求是:
- 中央处理器-1
- 内存 - 128 MB
- 硬盘 - 512 MB
使用自定义网络接口启动
列出可用网络:
$ multipass networks
Name     Type         Description
bridge0  bridge       Network bridge with en1, en2, en3, en4
en0      wifi         Wi-Fi (Wireless)
en1      thunderbolt  Thunderbolt 1
en2      thunderbolt  Thunderbolt 2
en3      thunderbolt  Thunderbolt 3
en4      thunderbolt  Thunderbolt 4
使用指定网络接口启动实例:
multipass launch -c 2 -m 4G -d 15G --network name=en0 -n test2-instance等待实例启动然后检查可用接口:
$ multipass shell test2-instance
ubuntu@test2-instance:~$ ip ad
1: lo: <LOOPBACK,UP,LOWER_UP> mtu 65536 qdisc noqueue state UNKNOWN group default qlen 1000
    link/loopback 00:00:00:00:00:00 brd 00:00:00:00:00:00
    inet 127.0.0.1/8 scope host lo
       valid_lft forever preferred_lft forever
    inet6 ::1/128 scope host
       valid_lft forever preferred_lft forever
2: enp0s3: <BROADCAST,MULTICAST,UP,LOWER_UP> mtu 1500 qdisc fq_codel state UP group default qlen 1000
    link/ether 52:54:00:7f:cb:cf brd ff:ff:ff:ff:ff:ff
    inet 10.0.2.15/24 brd 10.0.2.255 scope global dynamic enp0s3
       valid_lft 85884sec preferred_lft 85884sec
    inet6 fe80::5054:ff:fe7f:cbcf/64 scope link
       valid_lft forever preferred_lft forever
3: enp0s8: <BROADCAST,MULTICAST,UP,LOWER_UP> mtu 1500 qdisc fq_codel state UP group default qlen 1000
    link/ether 52:54:00:43:43:b4 brd ff:ff:ff:ff:ff:ff
    inet 192.168.100.164/24 brd 192.168.100.255 scope global dynamic enp0s8
       valid_lft 85890sec preferred_lft 85890sec
    inet6 fe80::5054:ff:fe43:43b4/64 scope link
       valid_lft forever preferred_lft forever
暂停正在运行的实例
要在 Multipass 上挂起实例,请运行以下命令:
multipass suspend test-instance验证实例是否已挂起:
$ multipass info test-instance
Name:           test-instance
State:          Suspended
IPv4:           --
Release:        --
Image hash:     97bb9f79af52 (Ubuntu 20.04 LTS)
Load:           --
Disk usage:     --
Memory usage:   --
Mounts: --命令multipass info test-instance通常用于获取有关实例的信息。
步骤 3:在 Multipass 上管理 Ubuntu VM。
您可以使用以下命令在 Multipass 上启动和停止 Ubuntu VM:
###Stop a VM
multipass stop test-instance

###Start a VM
multipass start test-instance
或者,您可以使用多通道托盘图标管理您的虚拟机。这是通过从主机系统上的应用程序菜单启动 Multipass GUI 来完成的。通过托盘图标,人们可以停止/启动、打开 shell、禁用和启用虚拟机的自动启动以及退出 Multipass。
删除虚拟机
完成虚拟机的预期任务后,如果不再需要该虚拟机,可以将其删除。首先,您需要停止虚拟机。
multipass stop test-instance然后将其删除,如下所示:
multipass delete test-instance
multipass purge
挂载和卸载本地目录
要挂载本地目录,请使用以下命令语法:
multipass mount <source> <target> [<target> ...]例子 :
$ multipass list
Name                    State             IPv4             Image
ubuntu-focal            Running           N/A              Ubuntu 20.04 LTS

$ multipass mount ~/Downloads ubuntu-focal
$ multipass info ubuntu-focal
Name:           ubuntu-focal
State:          Running
IPv4:           N/A
Release:        Ubuntu 20.04.3 LTS
Image hash:     10f8ae579fbf (Ubuntu 20.04 LTS)
Load:           0.00 0.01 0.05
Disk usage:     1.3G out of 19.2G
Memory usage:   164.0M out of 1.9G
Mounts:         /Users/jmutai/Downloads => /Users/jmutai/Downloads
                    UID map: 501:default
                    GID map: 20:default

$ multipass ssh ubuntu-focal
$ ubuntu@ubuntu-focal:~$ df -hT
Filesystem                Type        Size  Used Avail Use% Mounted on
udev                      devtmpfs    977M     0  977M   0% /dev
tmpfs                     tmpfs       199M  968K  198M   1% /run
/dev/sda1                 ext4         20G  1.3G   18G   7% /
tmpfs                     tmpfs       994M     0  994M   0% /dev/shm
tmpfs                     tmpfs       5.0M     0  5.0M   0% /run/lock
tmpfs                     tmpfs       994M     0  994M   0% /sys/fs/cgroup
/dev/loop0                squashfs     56M   56M     0 100% /snap/core18/2128
/dev/loop1                squashfs     71M   71M     0 100% /snap/lxd/21029
/dev/loop2                squashfs     33M   33M     0 100% /snap/snapd/12883
/dev/sda15                vfat        105M  5.2M  100M   5% /boot/efi
tmpfs                     tmpfs       199M     0  199M   0% /run/user/1000
/dev/loop3                squashfs    128K  128K     0 100% /snap/bare/5
/dev/loop4                squashfs    1.2M  1.2M     0 100% /snap/multipass-sshfs/145
:/Users/jmmutai/Downloads fuse.sshfs 1000G     0 1000G   0% /Users/jmutai/Downloads
要卸载,请使用以下命令:
$ multipass umount  ubuntu-focal
$ multipass info ubuntu-focal
Name:           ubuntu-focal
State:          Running
IPv4:           N/A
Release:        Ubuntu 20.04.3 LTS
Image hash:     10f8ae579fbf (Ubuntu 20.04 LTS)
Load:           0.00 0.00 0.04
Disk usage:     1.3G out of 19.2G
Memory usage:   159.8M out of 1.9G
Mounts:         --
如果您在使用 Multipass 时遇到困难,可以使用以下命令获取帮助:
$ multipass help
Usage: multipass [options] <command>
Create, control and connect to Ubuntu instances.

This is a command line utility for multipass, a
service that manages Ubuntu instances.

Options:
  -h, --help     Display this help
  -v, --verbose  Increase logging verbosity. Repeat the 'v' in the short option
                 for more detail. Maximum verbosity is obtained with 4 (or more)
                 v's, i.e. -vvvv.

Available commands:
  delete    Delete instances
  exec      Run a command on an instance
  find      Display available images to create instances from
  get       Get a configuration setting
  help      Display help about a command
  info      Display information about instances
  launch    Create and start an Ubuntu instance
  list      List all available instances
  mount     Mount a local directory in the instance
  networks  List available network interfaces
  purge     Purge all deleted instances permanently
  recover   Recover deleted instances
  restart   Restart instances
  set       Set a configuration setting
  shell     Open a shell on a running instance
  start     Start instances
  stop      Stop running instances
  suspend   Suspend running instances
  transfer  Transfer files between the host and instances
  umount    Unmount a directory from an instance
  version   Show version details
结论。
恭喜!这标志着本关于如何使用 Multipass 在 Linux 和 macOS 上运行 Ubuntu 虚拟机的指南的结束。我们已经看到使用 Multipass 创建和运行 Ubuntu 实例是多么容易。我希望这可以帮到你
查看更多:
- 在 Xen 上启用嵌套虚拟化 | XCP-ng 虚拟机
- 在 OpenNebula 上创建 Ubuntu 和 Debian 虚拟机
- 如何在 KVM 虚拟机上使用 Open vSwitch Bridge