在 Debian 10 上安装 ISPConfig 3 - Roundcube 插件
ispconfig3_roundcube 插件将您的 ISPConfig 邮件帐户设置集成到 Roundcube 中。在本教程中,我将带您完成安装它们的过程。
先决条件
- Roundcube 必须使用 apt 安装。如果不是,您可能需要更改本教程中使用的文件路径。
- 确保您的 ISPConfig 和 Roundcube 安装是最新的
添加远程用户
ISPConfig 3 插件使用 API 连接到您的系统。因此我们需要在控制面板中创建一个远程用户。
登录到您的面板,转到系统 -> 远程用户,然后单击“添加新的远程用户”。在表单中,为您的新用户提供名称和密码。我将使用 rc-example 和密码 examplepass。不要使用相同的凭据,而是创建您自己的凭据。我的示例面板将位于 https://panel.example.com:8080 并带有有效的 SSL 证书
为您的远程用户启用以下功能:
- Roundcube 插件函数
并为您的网络邮件服务器的 IPv4 和 IPv6 地址启用远程访问。
下载插件
运行以下命令:
cd /tmp
wget https://github.com/w2c/ispconfig3_roundcube/archive/master.zip
unzip master.zip
cd ./ispconfig3_roundcube-master
cp -r ./ispconfig3_* /usr/share/roundcube/plugins
ln -s /usr/share/roundcube/plugins/ispconfig* /var/lib/roundcube/plugins/
插件现在位于正确的文件夹中,带有来自 /var/lib/roundcube/plugins 的符号链接。下一步是将它们配置为使用我们的远程用户。运行此命令以复制示例配置并进行编辑:
cp /usr/share/roundcube/plugins/ispconfig3_account/config/config.inc.php.dist /usr/share/roundcube/plugins/ispconfig3_account/config/config.inc.php
nano /usr/share/roundcube/插件/ispconfig3_account/config/config.inc.php
你会看到这个配置文件:
$config['identity_limit'] = false;
$config['remote_soap_user'] = '{REMOTE USERNAME}';
$config['remote_soap_pass'] = '{REMOTE PASSWORD}';
$config['soap_url'] = 'https://{YOUR SERVER}:8080/remote/';
$config['soap_validate_cert'] = true;
我将其更改为:
$config['identity_limit'] = false;
$config['remote_soap_user'] = 'rc-example';
$config['remote_soap_pass'] = 'examplepass';
$config['soap_url'] = 'https://panel.example.com:8080/remote/';
$config['soap_validate_cert'] = true;
确保用您自己的凭据和面板地址替换带红色下划线的文本。如果您使用 https 但未安装受信任的 SSL 证书,请将 soap_validate_cert 更改为 false。
启用插件
要启用插件,请打开 roundcube 配置:
nano /etc/roundcube/config.inc.php并搜索这些行:
// List of active plugins (in plugins/ directory)
$config['plugins'] = array();
要启用插件,请在括号之间添加:
"jqueryui", "ispconfig3_account", "ispconfig3_autoreply", "ispconfig3_pass", "ispconfig3_spam", "ispconfig3_fetchmail", "ispconfig3_filter", "ispconfig3_forward", "ispconfig3_wblist"该行将如下所示:
// List of active plugins (in plugins/ directory)
$config['plugins'] = array("jqueryui", "ispconfig3_account", "ispconfig3_autoreply", "ispconfig3_pass", "ispconfig3_spam", "ispconfig3_fetchmail", "ispconfig3_filter", "ispconfig3_forward", "ispconfig3_wblist");
一些注意事项:
- jqueryui 插件必须放在其他插件的前面。
- 如果您不想使用插件,例如 fetchmail 插件,请忽略 ispconfig3_fetchmail。
- 如果您使用多个邮件服务器,请将 ispconfig3_autoselect 添加到列表中,并将
$config[default_host]留空。 ispconfig3_autoselect 将自动为登录的用户选择正确的服务器。您可以编辑其自己的配置文件以在 ispconfig3_autoselect/config/config.inc.php.dist 中启用 Roundcube 和外部邮件服务器之间的 tls/ssl 连接
保存配置文件后,一个新选项卡“帐户”将显示在网络邮件设置中:
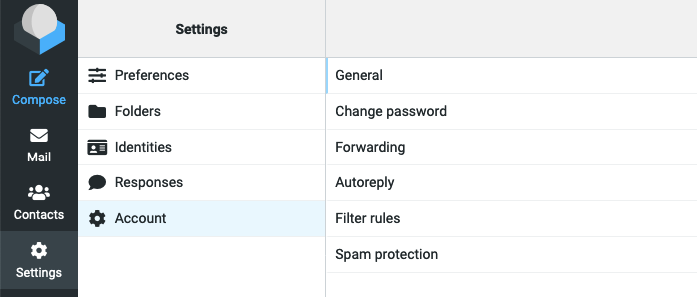
完成了!
如果您遇到任何问题,请查看 https://github.com/w2c/ispconfig3_roundcube/wiki/Troubleshooting---FAQ 上的故障排除常见问题解答
如果您有任何问题或意见,可以将其留在回复中或创建论坛帖子。