如何在Ubuntu 20.04上安装Pleroma社交网络平台
在此页
- 先决条件
- 第 1 步 - 配置防火墙
- 第 2 步 - 安装 PostgreSQL
- 第 3 步 - 安装 Nginx
- 第 4 步 - 安装 Pleroma
- 第 5 步 - 配置 Pleroma
- 第 6 步 - 使用 Lets Encrypt 安装 SSL
- 第 7 步 - 配置 Nginx
- 第 8 步 - 配置 Pleroma
- 创建管理员用户
- 更改设置
- 更新 Pleroma
- 备份 Pleroma
- 恢复Pleroma
Pleroma 是一个开源的联邦社交网络平台,兼容 Mastodon 和其他 ActivityPub 平台。它是 Fediverse 的一部分,Fediverse 是一个可以使用通用协议进行通信的实例联合网络。一个实例上的一个帐户可以与整个 Fediverse 网络对话。
本指南将向您展示如何通过将其安装在基于 Ubuntu 20.04 的服务器上来创建您自己的 Pleroma 实例。
先决条件
-
A server running Ubuntu 20.04.
-
A non-root sudo user.
-
Make sure everything is updated.
$ sudo apt update $ sudo apt upgrade -
Few packages and dependencies that you need before installing Pleroma.
$ sudo apt install wget curl gnupg2 ca-certificates lsb-release gnupg zip libncurses5 libmagic-dev -y
第 1 步 - 配置防火墙
第一步是配置防火墙。 Ubuntu 默认带有 ufw (Uncomplicated Firewall)。
检查防火墙是否正在运行。
$ sudo ufw status您应该得到以下输出。
Status: inactive允许 SSH 端口,以便防火墙在启用时不会中断当前连接。
$ sudo ufw allow OpenSSH也允许 HTTP 和 HTTPS 端口。
$ sudo ufw allow 80
$ sudo ufw allow 443
启用防火墙
$ sudo ufw enable
Command may disrupt existing ssh connections. Proceed with operation (y|n)? y
Firewall is active and enabled on system startup
再次检查防火墙的状态。
$ sudo ufw status您应该会看到类似的输出。
Status: active

To                         Action      From
--                         ------      ----
OpenSSH                    ALLOW       Anywhere
80                         ALLOW       Anywhere
443                        ALLOW       Anywhere
OpenSSH (v6)               ALLOW       Anywhere (v6)
80 (v6)                    ALLOW       Anywhere (v6)
443 (v6)                   ALLOW       Anywhere (v6)
第 2 步 - 安装 PostgreSQL
将官方 PostgreSQL 存储库添加到 Ubuntu 源列表。
$ sudo sh -c 'echo "deb http://apt.postgresql.org/pub/repos/apt $(lsb_release -cs)-pgdg main" > /etc/apt/sources.list.d/pgdg.list'添加存储库 GPG 密钥。
$ wget --quiet -O - https://www.postgresql.org/media/keys/ACCC4CF8.asc | sudo apt-key add -更新系统包列表。
$ sudo apt update第 3 步 - 安装 Nginx
Ubuntu 20.04 默认附带 Nginx 18 稳定版。
$ sudo apt install nginx第 4 步 - 安装 Pleroma
本指南从 OTP 版本安装 Pleroma。第一步是创建一个没有登录功能的 Pleroma 用户。它还将在
/opt/pleroma为其创建主目录。$ sudo adduser --system --shell /bin/false --home /opt/pleroma pleroma切换到 Pleroma 用户。但首先,我们需要切换到 root 用户。
$ sudo su
$ su pleroma -s $SHELL -l
将 Pleroma 下载到临时位置。
$ curl "https://git.pleroma.social/api/v4/projects/2/jobs/artifacts/stable/download?job=amd64" -o /tmp/pleroma_amd64.zip解压缩存档。
$ unzip /tmp/pleroma_amd64.zip -d /tmp/安装 Pleroma。
$ mv /tmp/release/* /opt/pleroma删除临时文件。
$ rm -rf /tmp/pleroma_amd64.zip /tmp/release切换到根用户。
$ exit为上传文件和公共文件创建目录。
$ mkdir -p /var/lib/pleroma/{uploads,static}为 Pleroma 配置创建目录。
$ mkdir -p /etc/pleroma将 Pleroma 目录的所有权更改为 Pleroma 用户。
$ chown -R pleroma /var/lib/pleroma /etc/pleroma第 5 步 - 配置 Pleroma
切换回 Pleroma 用户。
$ su pleroma -s /bin/bash -l运行以下命令为 Pleroma 实例生成配置文件。
$ ./bin/pleroma_ctl instance gen --output /etc/pleroma/config.exs --output-psql /tmp/setup_db.psql您将被问到几个关于设置 Pleroma 的问题。如果您收到一条警告,指出找不到配置文件,请忽略它。
:~$ ./bin/pleroma_ctl instance gen --output /etc/pleroma/config.exs --output-psql /tmp/setup_db.psql
!!! /etc/pleroma/config.exs not found! Please ensure it exists and that PLEROMA_CONFIG_PATH is unset or points to an existing file

What domain will your instance use? (e.g pleroma.soykaf.com) [] example.com

What is the name of your instance? (e.g. The Corndog Emporium) [nspeaks.com] Howtoforge Pleroma
What is your admin email address? []
What email address do you want to use for sending email notifications? [] <Press Enter>
Do you want search engines to index your site? (y/n) [y] y
Do you want to store the configuration in the database (allows controlling it from admin-fe)? (y/n) [n] n
What is the hostname of your database? [localhost] localhost
What is the name of your database? [pleroma] pleroma
What is the user used to connect to your database? [pleroma] pleroma
What is the password used to connect to your database? [autogenerated] yourpassword
Would you like to use RUM indices? [n] n
What port will the app listen to (leave it if you are using the default setup with nginx)? [4000] <Press Enter>
What ip will the app listen to (leave it if you are using the default setup with nginx)? [127.0.0.1] <Press Enter>
What directory should media uploads go in (when using the local uploader)? [/var/lib/pleroma/uploads] <Press Enter>
What directory should custom public files be read from (custom emojis, frontend bundle overrides, robots.txt, etc.)? [/var/lib/pleroma/static] <Press Enter>
Do you want to strip location (GPS) data from uploaded images? This requires exiftool, it was detected as not installed, please install it if you answer yes. (y/n) [n] n
Do you want to anonymize the filenames of uploads? (y/n) [n] n
Do you want to deduplicate uploaded files? (y/n) [n] y
Writing config to /etc/pleroma/config.exs.
Writing the postgres script to /tmp/setup_db.psql.
Writing /var/lib/pleroma/static/robots.txt.

 All files successfully written! Refer to the installation instructions for your platform for next steps.
您可以根据需要选择一组不同的选项。为您的数据库选择一个强密码。如果您想从管理面板配置您的实例,请为有关将配置存储在数据库中的问题选择
y。切换到安装 PostgreSQL 时创建的默认 PostgreSQL 用户。
$ exit
$ su postgres -s /bin/bash -l
使用 Pleroma 提供的 SQL 文件创建数据库。
$ psql -f /tmp/setup_db.psql切换回 Pleroma 用户。
$ exit
$ su pleroma -s /bin/bash -l
初始化我们刚刚创建的数据库。
$ ./bin/pleroma_ctl migrate退出到 Root 用户。
$ exit第 6 步 - 使用 Lets Encrypt 安装 SSL
要使用 Lets Encrypt 安装 SSL 证书,我们需要下载 Certbot 工具。
要安装 Certbot,我们将使用 Snapd 包安装程序。 Certbots 官方存储库已被弃用,Ubuntu 的 Certbot 软件包已有一年多的历史。 Snapd 始终带有最新稳定版本的 Certbot,您应该使用它。幸运的是,Ubuntu 20.04 预装了 Snapd。
确保您的 Snapd 版本是最新的。
$ snap install core
$ snap refresh core
删除所有旧版本的 Certbot。
$ apt remove certbot安装 Certbot。
$ snap install --classic certbot使用以下命令确保可以通过创建指向
/usr/bin目录的符号链接来运行 Certbot 命令。$ ln -s /snap/bin/certbot /usr/bin/certbot停止 Nginx 服务。
$ systemctl stop nginx生成 SSL 证书。
$ certbot certonly --standalone --preferred-challenges http -d example.com上面的命令会将证书下载到服务器上的
/etc/letsencrypt/live/example.com目录。为 Lets Encrypt 自动更新创建一个挑战网站根目录。
$ mkdir -p /var/lib/letsencrypt创建 Cron 作业以更新 SSL。它将每天运行以检查证书并在需要时更新。为此,首先,创建文件
/etc/cron.daily/certbot-renew并打开它进行编辑。$ nano /etc/cron.daily/certbot-renew粘贴以下代码。
#!/bin/sh
certbot renew --cert-name example.com --webroot -w /var/lib/letsencrypt/ --post-hook "systemctl reload nginx"
通过按 Ctrl + X 并在出现提示时输入 Y 来保存文件。
更改任务文件的权限以使其可执行。
$ chmod +x /etc/cron.daily/certbot-renew第 7 步 - 配置 Nginx
Pleroma 附带一个默认的 Nginx 配置文件。通过将它移动到
/etc/nginx/sites-available目录来安装它。$ mv /opt/pleroma/installation/pleroma.nginx /etc/nginx/sites-available/pleroma.conf将所有出现的
example.tld替换为您的域。$ sed -i 's/example\.tld/example.com/g' /etc/nginx/sites-available/pleroma.conf打开配置文件进行编辑。
$ nano /etc/nginx/sites-available/pleroma.conf取消注释
location ~ /\.well-known/acme-challenge块。配置文件的server块应如下所示。server { server_name example.com; listen 80; listen [::]:80; location ~ /\.well-known/acme-challenge { root /var/lib/letsencrypt/; } location / { return 301 https://$server_name$request_uri; } }通过按 Ctrl + X 并在出现提示时输入 Y 来保存文件。
通过创建符号链接启用 Pleroma Nginx 配置。
$ ln -s /etc/nginx/sites-available/pleroma.conf /etc/nginx/sites-enabled/pleroma.conf启用 Nginx 服务器以在引导时启动它。
$ systemctl enable nginx.启动 Nginx 服务器。
$ systemctl start nginx安装分发版中提供的 Pleroma systemd 服务单元文件。
$ mv /opt/pleroma/installation/pleroma.service /etc/systemd/system/pleroma.service启用并启动 Pleroma 服务。
$ systemctl enable pleroma
$ systemctl start pleroma
Pleroma 网站可能需要大约 30 秒才能可用。现在,您可以在网络浏览器中打开
https://example.com来访问 Pleroma。它应该如下所示。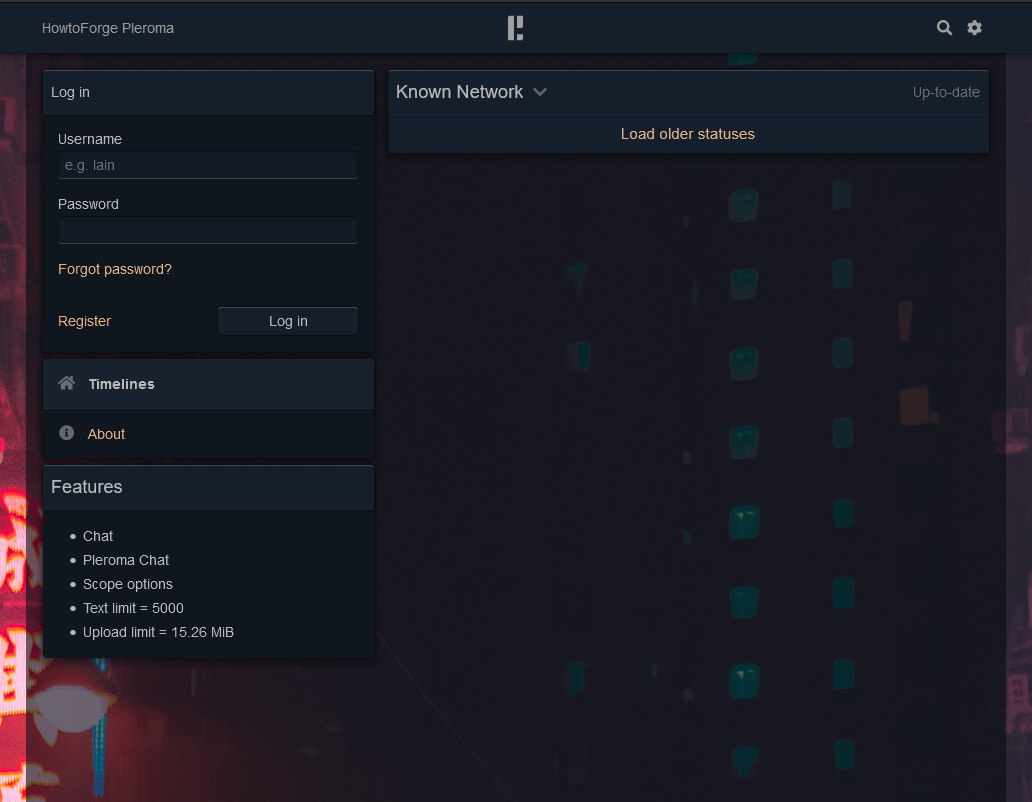
第 8 步 - 配置 Pleroma
创建管理员用户
您可以通过命令行创建管理用户。首先切换到 Pleroma 用户。
$ su pleroma -s /bin/bash -l创建管理员用户。将
example替换为您的用户名,将[email替换为您的电子邮件地址,并将password123替换为强密码。$ ./bin/pleroma_ctl user new example --password password123 --admin完成后切换回 root 用户。
$ exit更改设置
如果您选择否作为在数据库中存储配置的答案,这意味着您不能从 Pleroma 的管理面板更改设置。要更改设置,您需要修改
/etc/pleroma/config.exs文件。$ nano /etc/pleroma/config.exs完成文件编辑后,您还需要重新启动 Pleroma 服务。您可能需要等待一段时间才能恢复服务。
$ systemctl restart pleroma更新 Pleroma
要更新 Pleroma,第一步是下载新版本。运行以下命令下载新版本的 Pleroma。
$ su pleroma -s $SHELL -lc "./bin/pleroma_ctl update"停止 Pleroma 实例。
$ systemctl stop pleroma下一步是迁移数据库。
$ su pleroma -s $SHELL -lc "./bin/pleroma_ctl migrate"启动 Pleroma 实例。
$ systemctl start pleroma备份丰荣
停止 Pleroma 服务。
$ systemctl stop pleroma切换到 Pleromas 目录。
$ cd /opt/pleroma运行以下命令备份数据库。
$ sudo -Hu postgres pg_dump -d <pleroma_db> --format=custom -f </path/to/backup_location/pleroma.pgdump>复制文件
pleroma.pgdump、config/prod.secret.exs、config/setup_db.sql和uploads文件夹到您的备份目的地。再次启动 Pleroma 服务。
$ systemctl start pleroma恢复普雷若玛
要恢复 Pleroma,您需要重新安装 Pleroma 并确保 Pleroma 服务不工作。
然后将备份文件复制回其原始位置。
使用以下命令删除现有数据库和用户。
$ sudo -Hu postgres psql -c 'DROP DATABASE <pleroma_db>;';` `sudo -Hu postgres psql -c 'DROP USER <pleroma_db>;'使用备份的
setup_db.sql文件恢复数据库架构和 Pleroma Postgres 角色。$ sudo -Hu postgres psql -f config/setup_db.psql接下来,恢复 Pleroma 实例数据。
$ sudo -Hu postgres pg_restore -d <pleroma_db> -v -1 </path/to/backup_location/pleroma.pgdump>如果您要迁移到较新版本,如果还有任何迁移要执行,请迁移数据库。
$ su pleroma -s $SHELL -lc "./bin/pleroma_ctl migrate"重新启动 Pleroma 服务。
$ systemctl restart pleroma生成统计信息以便 Postgres 可以正确地计划查询。
$ sudo -Hu postgres vacuumdb --all --analyze-in-stages结论
我们关于在 Ubuntu 20.04 支持的服务器上安装 Pleroma 社交网络平台的教程到此结束。如果您有任何问题或反馈,请在下面的评论中发表。