如何在 Rocky Linux 上使用 LAMP 和免费的 Lets Encrypt SSL 安装 WordPress
在此页
- 先决条件
- 安装 Apache/Httpd Web 服务器
- 安装 PHP 包
- 安装和配置 MariaDB 服务器
- 为 WordPress 创建数据库和用户
- 下载 WordPress
- 设置WordPress
- 在 Rocky Linux 上启用 httpd mod_ssl
- 在 Rocky Linux 上生成 SSL Letsencrypt
- 为 WordPress 设置虚拟主机
- 安装 WordPress
- 结论
WordPress 是目前最流行的内容管理系统 (CMS) 之一,被数百万人使用。 WordPress 项目始于 2003 年,作为 CMS \b2/cafelog\ 的一个分支,带有 GPLv2 许可证,并成为免费和开源软件。
目前,互联网上超过 34% 的网站都在使用 WordPress。 WordPress 如此受欢迎的原因之一是因为它简单、易于使用且灵活。凭借成百上千的插件,WordPress 可以以不同的方式使用,例如简单的博客引擎、电子商务网站、简单的公司简介、在线论坛社区等。
在本指南中,您将学习如何在 Rocky Linux 8.4 上安装 WordPress CMS。您将在 LAMP 堆栈(Linux、Apache2/httpd、MySQL/MariaDB 和 PHP)下安装 WordPress。
先决条件
- 一台 Rocky Linux 服务器。确保所有软件包都更新到最新版本。
- 具有根权限的用户。该用户将通过 sudo 命令获得 root 权限。
安装 Apache/Httpd Web 服务器
首先,您将在 Rocky Linux 服务器上安装 Apache 或 httpd Web 服务器。
1. 执行下面的 dnf 命令来安装 httpd 网络服务器。
sudo dnf install httpd输入 \y\ 并按 \Enter\ 确认并安装 httpd 包。
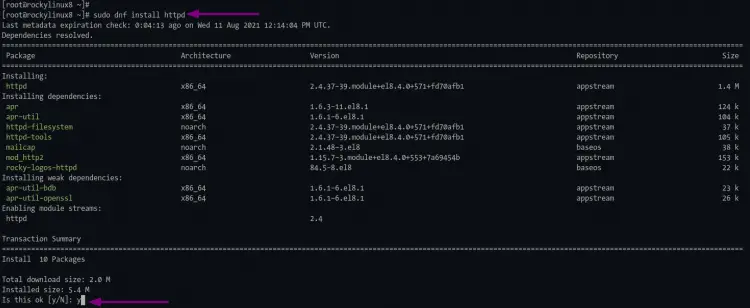
2. 如果安装完成,使用以下命令启用并启动httpd服务。
sudo systemctl enable httpd
sudo systemctl start httpd
\systemctl enable\ 命令将使该服务在每次启动时启动。
3. 之后,运行以下命令来验证httpd 服务。
sudo systemctl status httpd你会得到如下类似的结果。
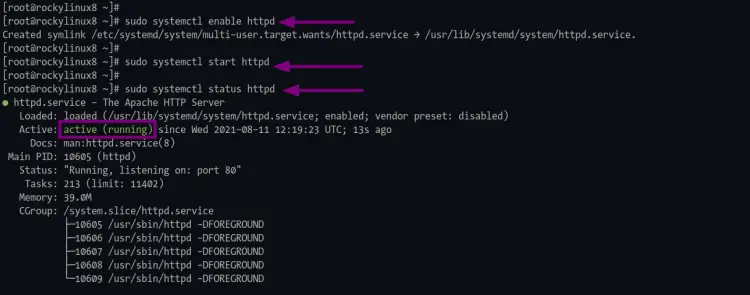
如顶部屏幕截图所示,httpd 处于活动状态并正在运行。
安装 PHP 包
至于现在,WordPress CMS 需要 PHP 7.4 或更高版本才能安装。现在您将从 remi 存储库安装 PHP 7.4。
1.执行以下命令添加epel和remi Repository
sudo dnf install https://dl.fedoraproject.org/pub/epel/epel-release-latest-8.noarch.rpm
sudo dnf install https://rpms.remirepo.net/enterprise/remi-release-8.rpm
输入 \y\ 并按 \Enter\ 添加 epel 和 remi 存储库。
安装完成后,使用以下命令验证 epel 和 Remi 存储库。
sudo dnf repolist您将在存储库列表中看到 epel 和 remi 存储库。

2. 接下来,重置默认的存储库模块 PHP。然后从 remi 存储库启用 PHP 7.4 模块。
执行以下命令重置默认的 php 模块存储库。
sudo dnf module reset php在此过程中,键入“y”并按“Enter”以添加 gpg 密钥 remi 存储库。

之后,执行下面的命令以启用 remi 存储库中的 php 模块。
sudo dnf module enable php:remi-7.4输入 \y\ 确认并按 \Enter\ 继续。现在您已准备好为 WordPress 安装安装 PHP 和所有扩展。

3. 执行以下命令安装带有一些必要扩展的php。
sudo dnf install php php-common php-mysqlnd php-gd php-imagick php-bcmath安装完成后,进入下一步。
安装和配置 MariaDB 服务器
在此阶段,您将安装 MariaDB 数据库服务器,保护 MariaDB 部署,并为 WordPress 创建新的数据库和用户。
1. 要安装 MariaDB 数据库服务器,请运行以下命令。
sudo dnf install mariadb mariadb-server等待 mariadb 安装。
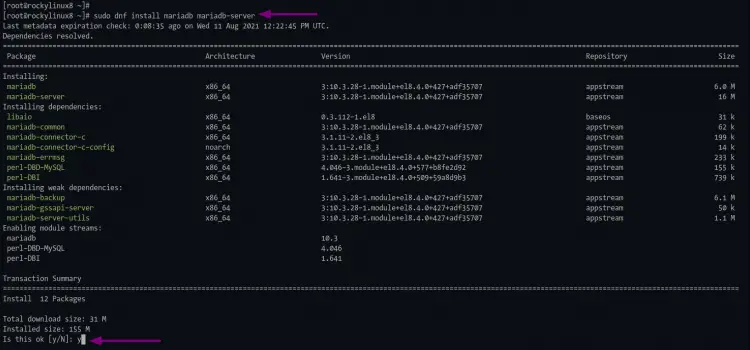
2. 安装完成后,使用以下命令启用并启动 MariaDB 服务。
sudo systemctl enable mariadb
sudo systemctl start mariadb
4. mariadb 将处于活动状态并正在运行,执行以下命令来验证 MariaDB 服务。
sudo systemctl status mariadb如果 mariadb 服务正在运行,您将获得类似如下的输出。
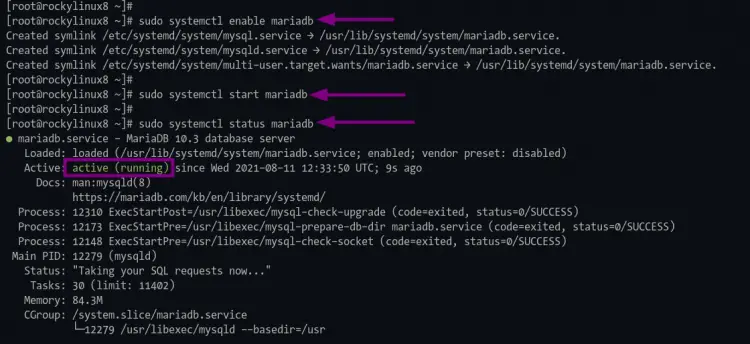
5. 接下来,您需要通过为 MariaDB 设置根密码并删除一些默认配置来保护您的 MariaDB 部署。为此,您可以使用命令行工具 mysql_secure_installation,它包含在默认的 MariaDB 安装中。
执行下面的“mysql_secure_installation”命令。
mysql_secure_installation首先,系统会要求您设置 mariadb root 密码。
输入您的 mariadb 根密码并重复,然后按“Enter”继续。
Setting the root password ensures that nobody can log into the MariaDB
root user without the proper authorisation.

Set root password? [Y/n] Y
New password:
Re-enter new password:
Password updated successfully!
Reloading privilege tables..
 ... Success!
现在键入“Y”并按“Enter”以从 mariadb 服务器中删除默认的匿名用户。
By default, a MariaDB installation has an anonymous user, allowing anyone
to log into MariaDB without having to have a user account created for
them.  This is intended only for testing, and to make the installation
go a bit smoother.  You should remove them before moving into a
production environment.

Remove anonymous users? [Y/n] Y
 ... Success!
之后,禁用默认用户root的远程登录。输入 \Y\ 并按 \Enter\ 继续。
Normally, root should only be allowed to connect from 'localhost'.  This
ensures that someone cannot guess at the root password from the network.

Disallow root login remotely? [Y/n] Y
 ... Success!
再次键入 \Y\ 以删除默认数据库 \test\ 并按 \Enter\。
By default, MariaDB comes with a database named 'test' that anyone can
access.  This is also intended only for testing, and should be removed
before moving into a production environment.

Remove test database and access to it? [Y/n] Y
 - Dropping test database...
 ... Success!
 - Removing privileges on test database...
 ... Success!
最后,再次键入 \Y\ 以重新加载所有表权限以应用新配置。
Reloading the privilege tables will ensure that all changes made so far
will take effect immediately.

Reload privilege tables now? [Y/n] Y
 ... Success!
现在该过程已完成,您将看到以下输出。
Cleaning up...

All done!  If you've completed all of the above steps, your MariaDB
installation should now be secure.

Thanks for using MariaDB!
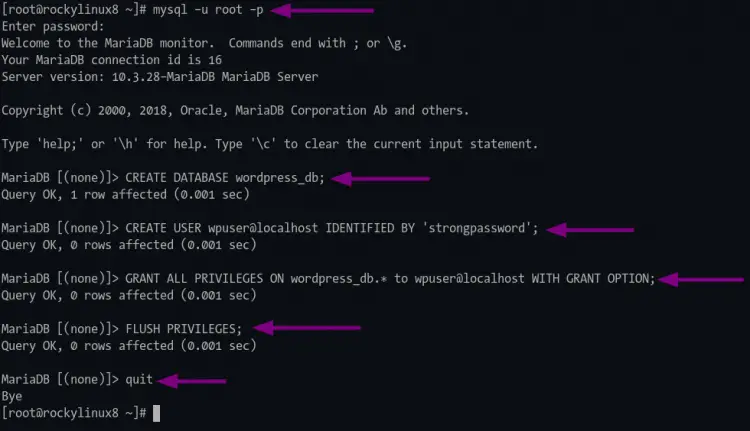
为 WordPress 创建数据库和用户
1. 使用下面的 mysql 命令登录到 mariadb shell。
mysql -u root -p2. 现在执行以下 mysql 查询来创建一个新数据库 \wordpress_db\。
CREATE DATABASE wordpress_db;3. 执行以下查询创建一个新的数据库用户\wpuser\。用您的强密码更改 \strongpassword\。
CREATE USER IDENTIFIED BY 'strongpassword';4. 允许用户\wpuser\ 使用以下查询访问和写入\wordpress_db\。
GRANT ALL PRIVILEGES ON wordpress_db.* to ;5. 现在重新加载所有表的权限以应用新的数据库配置。
FLUSH PRIVILEGES;然后您可以键入“quit”并按“Enter”退出 mariadb shell。
下载WordPress
1. 将工作目录更改为\/var/www\ 并使用如下wget 命令下载WordPress 源代码。
cd /var/www/
wget https://wordpress.org/latest.tar.gz
2.解压WordPress源码\latest.tar.gz\,你会得到一个新目录\wordpress\,然后将\wordpress\目录的所有者更改为\apache\用户。
tar -xzvf latest.tar.gz
sudo chown -R apache:apache wordpress/
现在您已准备好配置 WordPress 安装。
设置WordPress
在此阶段,您将编辑 WordPress 配置“wp-config.php”,设置数据库详细信息,并添加身份验证密钥和盐(用于额外的安全保护)。
1. 首先,将工作目录更改为\/var/www/wordpress\。
cd /var/www/wordpress/2. 将示例配置\wp-config-sample.php\ 复制到\wp-config.php\,然后使用nano 编辑器编辑配置文件。
cp wp-config-sample.php wp-config.php
nano wp-config.php
3. 使用您的数据库信息更改数据库详细信息(DB_NAME、DB_USER 和 DB_PASSWORD)。
// ** MySQL settings - You can get this info from your web host ** //
/** The name of the database for WordPress */
define( 'DB_NAME', 'wordpress_db' );

/** MySQL database username */
define( 'DB_USER', 'wpuser' );

/** MySQL database password */
define( 'DB_PASSWORD', 'strongpassword' );

/** MySQL hostname */
define( 'DB_HOST', 'localhost' );

/** Database charset to use in creating database tables. */
define( 'DB_CHARSET', 'utf8' );

/** The database collate type. Don't change this if in doubt. */
define( 'DB_COLLATE', '' );
4. 访问此链接以生成身份验证密钥和盐,然后将配置粘贴到您的“wp-config.php”文件中,如下所示。
/**#@+
 * Authentication unique keys and salts.
 *
 * Change these to different unique phrases! You can generate these using
 * the {@link https://api.wordpress.org/secret-key/1.1/salt/ WordPress.org secret-key service}.
 *
 * You can change these at any point in time to invalidate all existing cookies.
 * This will force all users to have to log in again.
 *
 * @since 2.6.0
 */
define('AUTH_KEY',         'v$4/xyGF7t!^(-Xr~lUKT,1oBxOpxzXPAs)kPE_C%Oc^~^%JN]C-y(k>~Wj+JZRM');
define('SECURE_AUTH_KEY',  'y<|#/jfYs,Y_l;{[`2uNp9SMNH8zNGK[eb&RYqb-+bd<a,Fi<9z9rj2_#=R(5O&s');
define('LOGGED_IN_KEY',    '&U8Z{I~,xV%D>FDq+Qx{@hmv:~G/<+_8fPvQ(m%oR.A)%ZPtp``sZWK! !G6C%UYPrKU{xQJD.<bd45');
/**#@-*/
按 \Ctrl+x\ 并输入 \y\ 保存并退出。
在 Rocky Linux 上启用 httpd mod_ssl
对于本教程,您将安装 WordPress 并使用来自 Letsencrypt 的 SSL 进行保护。所以你需要在 Rocky Linux 上为 httpd 服务器启用 mod_ssl。
1. 使用下面的 dnf 命令安装包 \mod_ssl\。
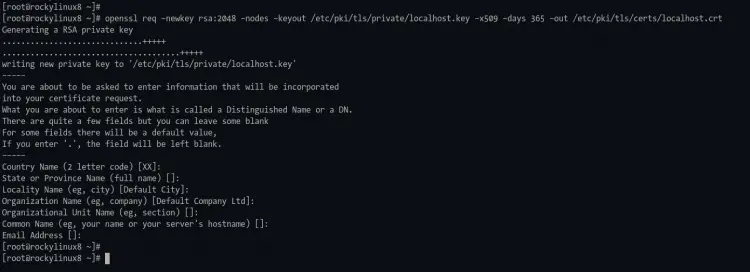
sudo dnf install mod_ssl mod_http22. 之后,使用下面的 openssl 命令为本地主机生成默认 SSL。
openssl req -newkey rsa:2048 -nodes -keyout /etc/pki/tls/private/localhost.key -x509 -days 365 -out /etc/pki/tls/certs/localhost.crt您可以直接按 Enter 回答所有问题,因为此证书将仅用于本地主机,而不是 WordPress 域名。
3. 现在执行以下命令以确保 mod_ssl 在 httpd Web 服务器上可用。
apachectl -M | grep ssl如果您得到诸如 \ssl\ 之类的输出,则说明 mod_ssl 已启用。否则,您将得到空白输出。

在 Rocky Linux 上生成 SSL Letsencrypt
在此阶段,您将安装 cerbot 工具并为 WordPress 安装生成 SSL 证书。您将使用 webroot 插件生成 SSL Letsencrypts。
1、执行以下命令安装生成SSL Letsencrypt的certbot工具。
sudo dnf install certbot等待安装过程。
2. 安装完成后,使用以下命令为letsencrypt 授权创建一个新目录。
sudo mkdir -p /var/lib/letsencrypt/.well-known
sudo chgrp apache /var/lib/letsencrypt
sudo chmod g+s /var/lib/letsencrypt
3. 接下来,将工作目录更改为\/etc/httpd/conf.d/\ 并使用nano 编辑器创建一个新配置\well-known.conf\。
cd /etc/httpd/conf.d/
nano well-known.conf
添加以下配置。
Alias /.well-known/acme-challenge/ "/var/lib/letsencrypt/.well-known/acme-challenge/"
<Directory "/var/lib/letsencrypt/">
    AllowOverride None
    Options MultiViews Indexes SymLinksIfOwnerMatch IncludesNoExec
    Require method GET POST OPTIONS
</Directory>
按 \Ctrl+x\ 并输入 \y\ 保存并退出。
4. 现在执行以下命令来验证 httpd 配置并重新启动 httpd 服务。
apachectl configtest
sudo systemctl restart httpd
如果没有错误,您就可以使用 webroot 插件生成 SSL Letsencrypt。

5. 在生成SSL Letsencrypt 之前,请确保您的域名已解析为服务器IP 地址。之后,您可以通过运行下面的 certbot 命令,使用 webroot 插件生成 SSL Letsencrypt。另外,将电子邮件地址和域名更改为您自己的。
sudo certbot certonly --agree-tos --email www.domain.com该过程完成后,您的 SSL 证书将在 \/etc/letsencrypt/live/domain.com/\ 目录中可用。
为 WordPress 设置虚拟主机
在此步骤中,您将为 WordPress 添加一个新的 apache/httpd 虚拟主机配置。
1. 将工作目录更改为 \/etc/httpd/conf.d\ 并使用 nano 编辑器创建新配置 \wordpress.conf\。
cd /etc/httpd/conf.d/
nano wordpress.conf
将详细域名和 SSL 路径目录更改为您自己的并将配置粘贴到 \wordpress.conf\ 文件中。
# httpd port 80
<VirtualHost *:80>
  ServerName domain.com
  ServerAlias www.domain.com

  # automatic redirect http to https
  Redirect permanent / https://domain.com/
</VirtualHost>

# httpd port 443/ssl
<VirtualHost *:443>
  ServerName domain.com
  ServerAlias www.domain.com

  # WordPress path directory
  DocumentRoot /var/www/wordpress

  Protocols h2 http:/1.1

  <If "%{HTTP_HOST} == 'www.domain.com'">
    Redirect permanent / https://domain.com/
  </If>

  ErrorLog /var/log/httpd/domain.com-error.log
  CustomLog /var/log/httpd/domain.com-access.log combined

  SSLEngine On
  SSLCertificateFile /etc/letsencrypt/live/domain.com/fullchain.pem
  SSLCertificateKeyFile /etc/letsencrypt/live/domain.com/privkey.pem

  SSLCipherSuite EECDH+AESGCM:EDH+AESGCM:AES256+EECDH:AES256+EDH
  SSLProtocol All -SSLv2 -SSLv3 -TLSv1 -TLSv1.1
  SSLCompression off

  <Directory /var/www/wordpress/>
       Options FollowSymlinks
       AllowOverride All
       Require all granted
  </Directory>

  <Directory /var/www/wordpress/>
       RewriteEngine on
       RewriteBase /
       RewriteCond %{REQUEST_FILENAME} !-f
       RewriteRule ^(.*) index.php [PT,L]
  </Directory>
</VirtualHost>
按 \Ctrl+x\ 并键入 \Y\ 以保存配置并退出。
3.接下来,执行以下命令来验证httpd配置。
sudo apachectl configtest如果没有错误,请使用以下命令重新启动 httpd 服务。
sudo systemctl restart httpd现在您已准备好通过 Web 浏览器安装 WordPress。

安装 WordPress
如果所有相关的服务器配置都已完成,您可以使用 Web 浏览器访问您的 WordPress 安装。
1. 打开您的网络浏览器并输入您的 WordPress 安装的 URL 地址。
现在您将被重定向到安全的 HTTPS 连接,您将获得如下页面。
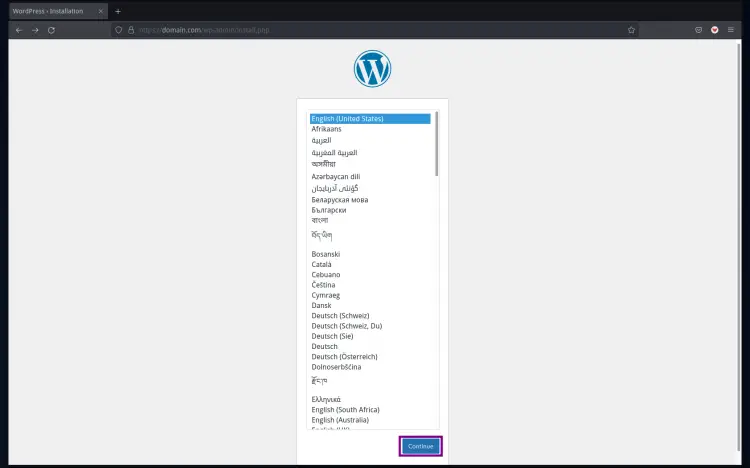
选择您的 WordPress 安装语言,默认为“英语(美国)”,然后单击“继续”。
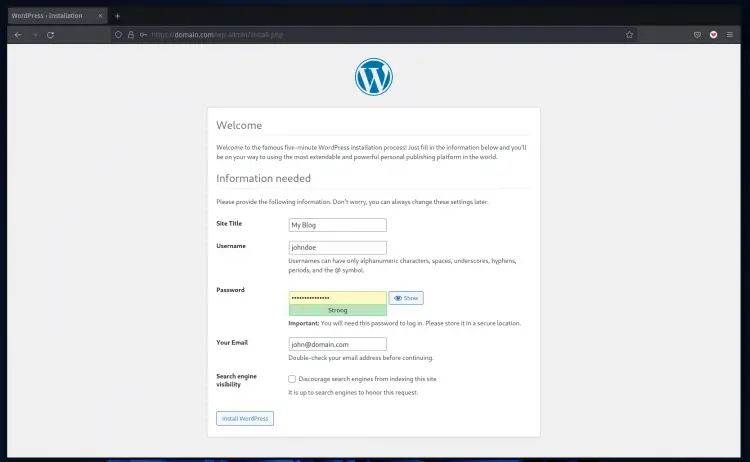
2. 现在键入您的“网站标题”并为您的 WordPress 安装键入新的用户名、电子邮件和密码。
然后单击“安装 WordPress”按钮开始安装。
3、安装完成后,你会得到如下页面。
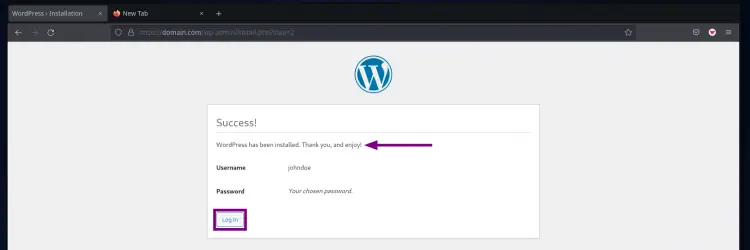
单击登录按钮继续。
4. 现在您将被重定向到 WordPress 登录页面。
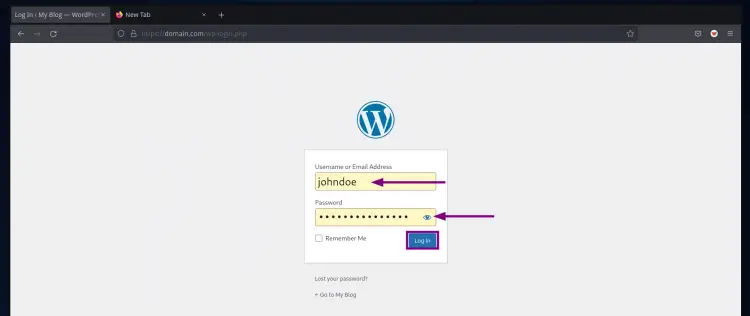
输入您的用户名和密码,然后单击“登录”。
5. 您将获得默认的 WordPress 索引页面。
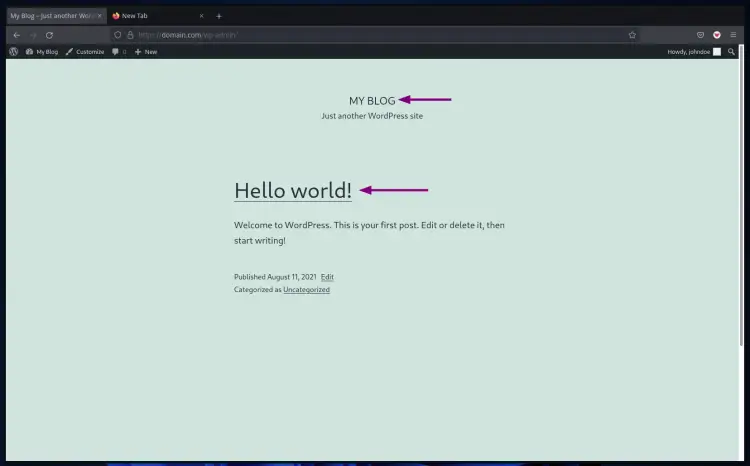
6. 将光标移动到菜单“我的博客”,然后单击“仪表板”或“主题”,您将看到如下所示的 WordPress 管理仪表板。
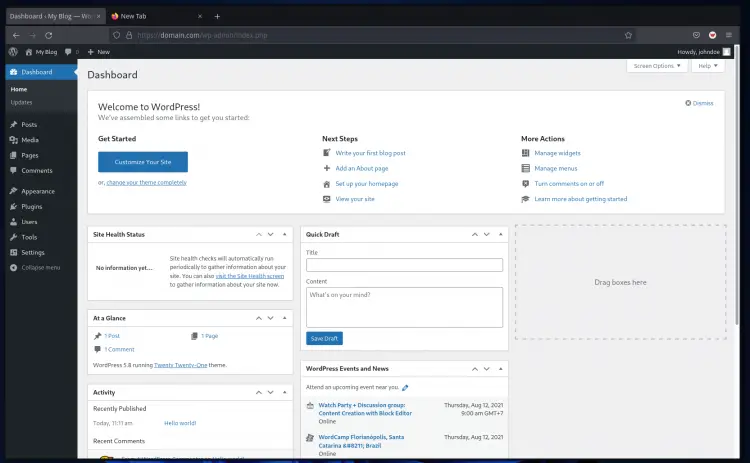
7. 要安装 WordPress 插件,请将光标移动到“插件”菜单并单击“添加新”,然后您将被重定向到“插件”页面。

选择您要安装的插件并点击“立即安装”,然后您可以点击“激活”按钮激活插件。
结论
恭喜!您已经在 Rocky Linux 服务器上成功安装了带有 LAMP Stack 的 WordPress CMS。以下是您在本教程中学到的内容:
- 安装 LAMP 堆栈
- 保护 MariaDB 部署
- 从 mysql/mariadb shell 创建 mysql 数据库和用户
- 为 certbot webroot 插件设置 apache/httpd 网络服务器
- 生成 SSL Letsencrypt
- 最后一个是 WordPress 安装
下一步,您可以选择或购买主题并将其安装在您的 WordPress 上。
