使用 WordOps 在 Linux 上管理 WordPress 网站 |
欢迎阅读本指南,了解如何使用 WordOps 在 Linux 上安装和管理 WordPress 网站。 WordPress 是一个基于 PHP 的免费开源内容管理系统,由 Matt Mullenweg 和 Mike Little 于 2003 年开发。这个简单而广泛的 CMS 用于创建功能强大且有吸引力的网站,无需任何编程知识。
安装 WordPress 有多种方法,如以下指南所示:
- 在 Arch Linux/Manjaro 上设置 WordPress 网站
- 在 Ubuntu/Debian 上使用 Nginx 安装 WordPress
- 如何在 Ubuntu 上设置 WordPress 多站点
WordOps 是一款可简化 WordPress 安装和网站管理的工具,具有以下功能:
- 易于安装:一步式自动化安装程序,可从 EasyEngine v3 支持迁移
- 强大:优化的 Nginx 配置,支持多个缓存后端
- 最新:PHP 7.2、7.3、7.4、8.0 和 8.1 – MariaDB 10.5 和 Redis 6.0
- SSL 支持:域、子域和通配符 让我们通过 DNS API 支持加密 SSL 证书
- 自定义 Nginx 构建:Nginx 1.18.0 – TLS v1.3 Cloudflare HTTP/2 HPACK 和 Brotli 支持
- 快速部署:快速且自动化的 WordPress、Nginx、PHP、MySQL 和 Redis 安装
- 用户友好:带有服务器状态/监控和工具演示的 WordOps 仪表板
- 提供监控:使用 ngx_vts_module 实时监控 Nginx 虚拟主机流量,并使用 Netdata 监控服务器
系统要求
WordOps 可以安装在以下系统上:
- Ubuntu 20.04 LTS(焦点)
- Ubuntu 18.04 LTS(仿生)
它还与以下系统兼容。
- Debian 9 (Stretch) 和 Debian 10 (Buster)
- Raspbian 9(拉伸)和 Raspbian 10(巴斯特)
1.在Linux上安装WordOps
可以使用以下命令安装 WordOps:
wget -qO wo wops.cc && sudo bash wo 示例输出:
Welcome to WordOps install/update script v3.14.1

Installing wo dependencies	[OK]
Installing WordOps	[OK]
Running post-install steps	[OK]
WordOps (wo) require an username & and an email address to configure Git (used to save server configurations)
Your informations will ONLY be stored locally
Enter your name: admin
Enter your email: [email
Synchronizing wo database, please wait...
WordOps (wo) installed successfully

To enable bash-completion, just use the command:
bash -l

To install WordOps recommended stacks, you can use the command:
wo stack install

To create a first WordPress site, you can use the command:
wo site create site.tld --wp

WordOps Documentation : https://docs.wordops.net
WordOps Community Forum : https://community.wordops.net
WordOps Community Chat : https://chat.wordops.net

Give WordOps a GitHub star : https://github.com/WordOps/WordOps/
2. 使用 WordOps 安装 WordPress。
使用 WordOps 创建 WordPress 网站非常简单。以下命令可用于在您的域名上创建 WordPress 网站。
sudo wo site create domain_name --wp创建站点时,您可以使用以下标志指定 PHP 版本、Redis 缓存、缓存启用程序等。
# install wordpress with latest PHP 8.0 without any page caching
sudo wo site create example.com --wp

#install wordpress with PHP 8.1  without any page caching
sudo wo site create example.com --wp  --php81

# install wordpress + nginx fastcgi_cache
sudo wo site create example.com --wpfc

# install wordpress + nginx redis_cache
sudo wo site create example.com --wpredis

# install wordpress with WP-Rocket plugin
sudo wo site create example.com --wprocket

# install wordpress with Cache-enabler plugin
sudo wo site create example.com --wpce

# install wordpress with wp-super-cache plugin
sudo wo site create example.com --wpsc
要创建具有子目录的多站点的 WordPress 站点,请将 --wpsubdir 标志添加到上述命令中。例如,要使用 wp-super-cache 插件安装 wpmu-subdirectory,命令将为:
wo site create example.com --wpsubdir --wpsc 此外,您还可以使用 --wpsubdomain 标志创建带有子域的 WordPress 多站点,例如:
wo site create example.com --wpsubdomain 在本指南中,我将演示如何使用 PHP8.0 在 wordpress.example.com 上创建 WordPress 网站。
命令将是;
sudo wo site create wordpress.example.com --wp命令执行输出示例:
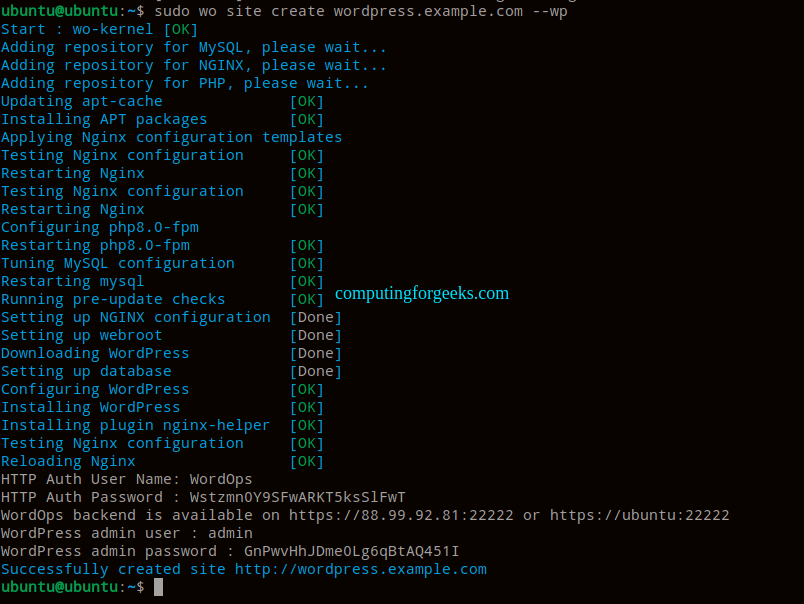
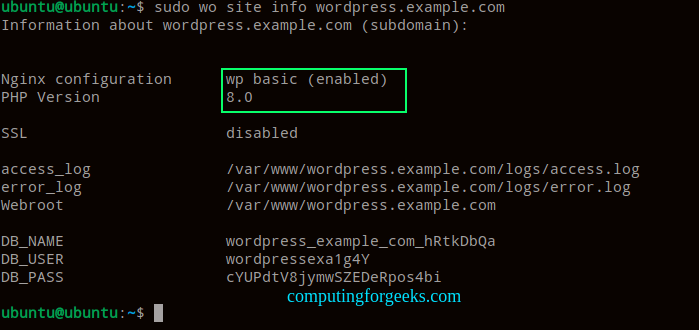
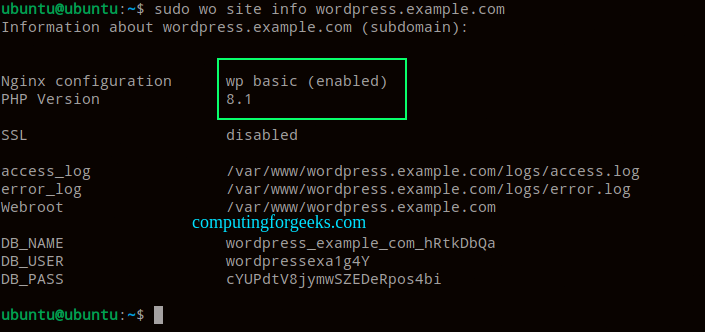
此命令安装并配置 Nginx、MySQL 数据库、PHP 和 WordPress。完成后,查看有关您网站的信息:
sudo wo site info wordpress.example.com示例输出:
3. 访问 WordPress 网站
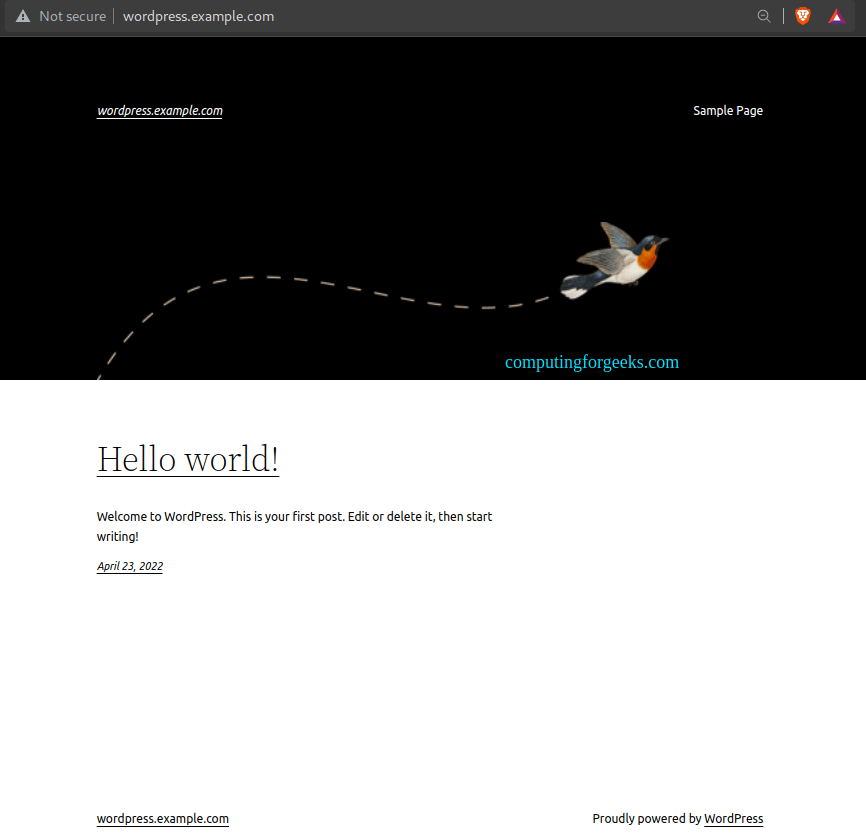
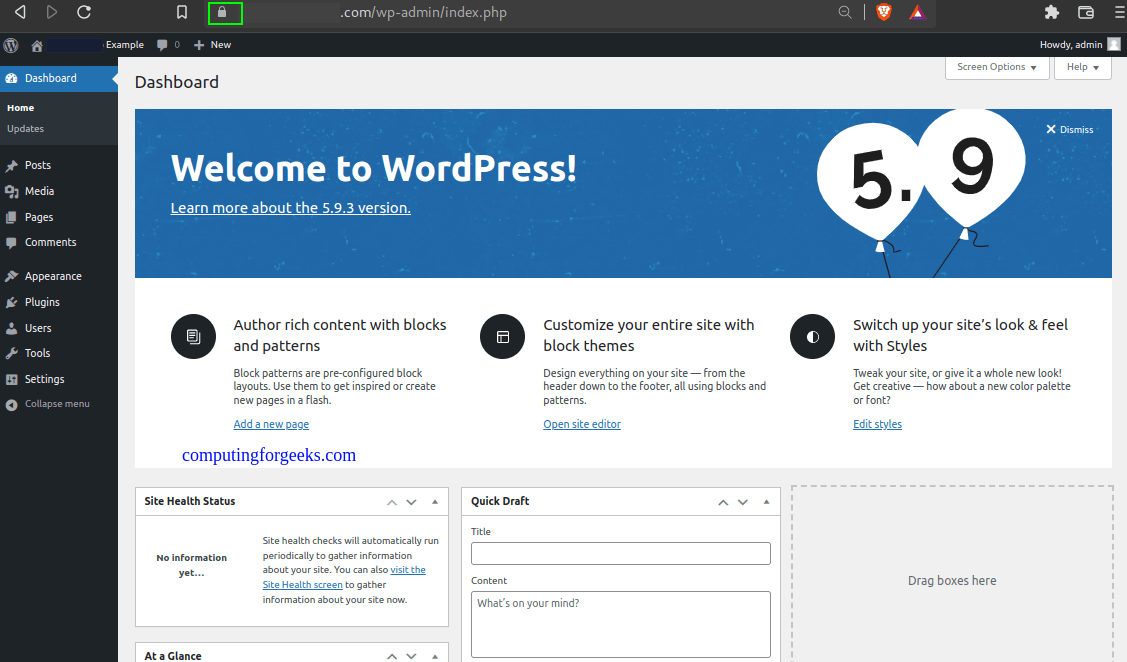
使用 URL http://domain_name 访问 WordPress 站点
使用 URL http://domain_name/wp-admin 访问 WordPress 管理控制台
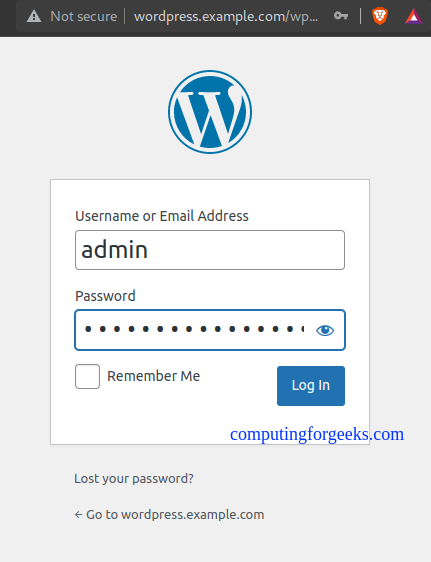
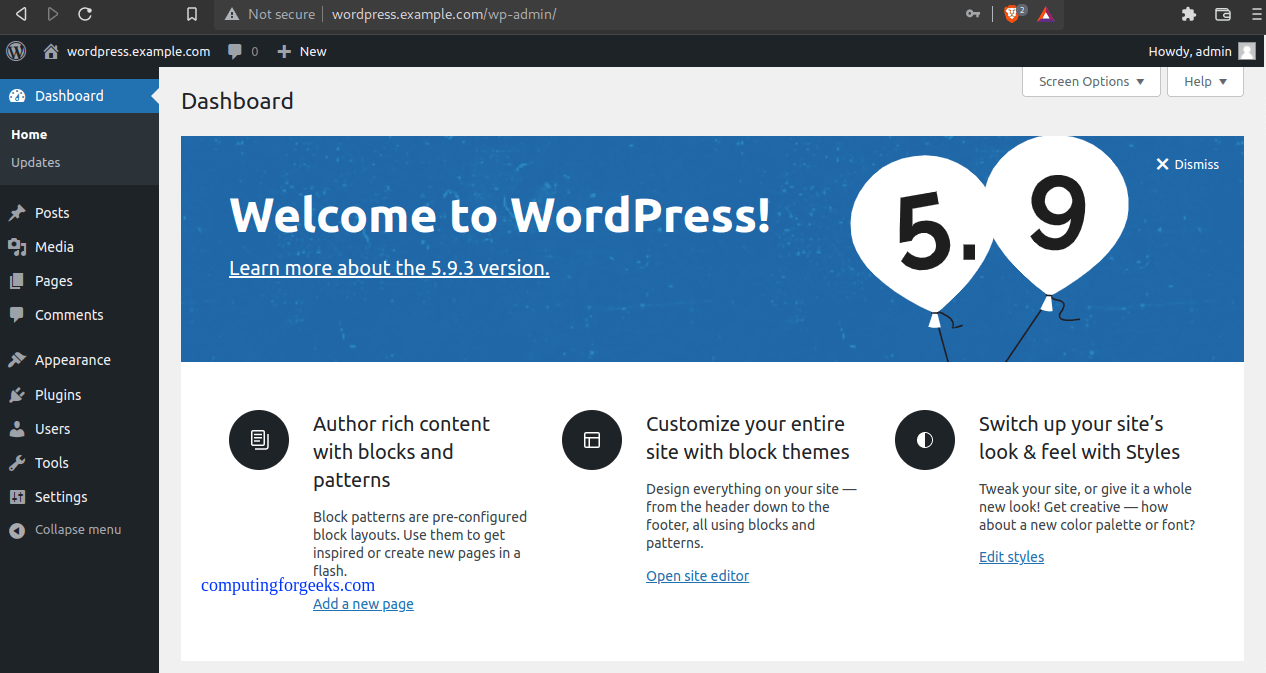
在此页面上,使用安装期间提供的创建凭据登录。身份验证成功后,您应该会看到如下所示的 WordPress 管理仪表板。
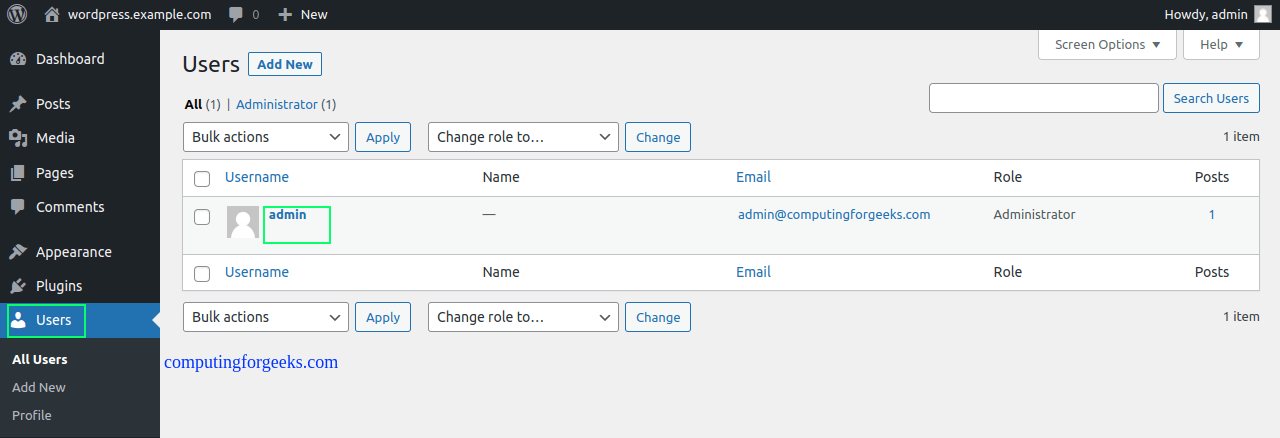
到达此处后,更改管理员用户的默认密码,以创建您自己的密码。导航到用户选项卡,然后单击管理员用户的编辑。
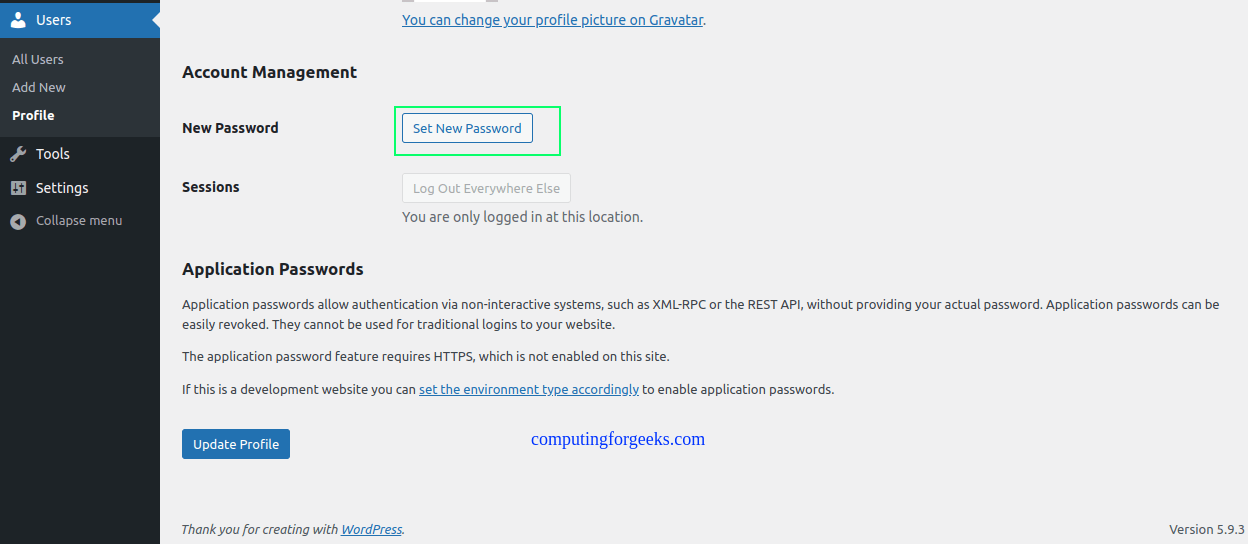
设置首选密码并保存更改。
这就对了!您已使用 WordOps 在 Linux 上成功设置了 WordPress 网站。
4. 使用 WordOps 在 Linux 上管理 WordPress 网站
您可以使用 WordOps 轻松对 WordPress 网站进行其他配置/管理选项。您可以进行的配置是:
PHP 版本之间切换
借助 WordOps,您可以在创建的 WordPress 网站上轻松切换 PHP 版本。可能的命令是:
# Switch to PHP 7.2
sudo wo site update example.com --php72
# switch to PHP 7.3
sudo wo site update example.com --php73
# switch to PHP 7.4
sudo wo site update example.com --php74
# switch to PHP 8.0
sudo wo site update example.com --php80
# switch to PHP 8.1
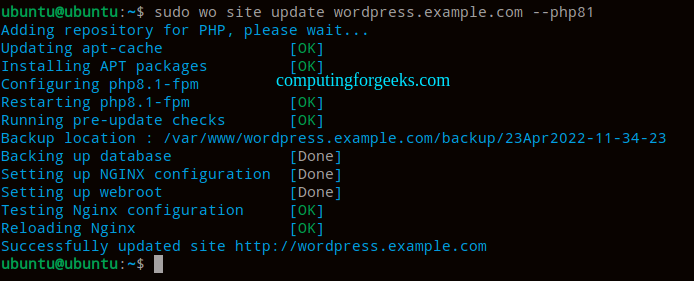
sudo wo site update example.com --php81 例如,将我们创建的站点切换到 PHP 8.1,我们将使用以下命令:
sudo wo site update wordpress.example.com --php81 示例输出:
如果您收到错误“糟糕,出了问题!!”,请使用以下命令查看日志:
$ tail /var/log/wo/wordops.log
E: Could not get lock /var/lib/dpkg/lock-frontend. It is held by process 32655 (unattended-upgr)
E: Unable to acquire the dpkg frontend lock (/var/lib/dpkg/lock-frontend), is another process using it?
2022-04-23 11:33:23,782 (INFO) wo : Oops Something went wrong!!
终止进程,然后继续更新 PHP 版本
sudo kill -9 32655
sudo wo site update wordpress.example.com --php81
升级成功后,使用以下命令验证新的 PHP 版本:
sudo wo site info wordpress.example.com示例输出:
使用 Let's Encrypt 保护 WordPress
您可以使用 WordOps 通过 Let’s Encrypt SSL 证书来保护创建的网站。通常,-le 标志用于为您的域名颁发 Let’s Encrypt SSL 证书。
这里可能的命令是:
# Install wordpress & letsencrypt
wo site create example.com --wp -le

# Install wordpress & letsencrypt subdomain
wo site create sub.example.com --wp -le

# Install wordpress & letsencrypt with HSTS
wo site create example.com --wp --letsencrypt --hsts

# Install wordpress & wildcard SSL certificate with Cloudflare DNS API
wo site create example.com --wp -le=wildcard --dns=dns_cf
您还可以通过安装所需的软件包并按照以下步骤手动颁发 Let's Encrypt 证书:
sudo apt install certbot python3-certbot-nginx
sudo certbot --nginx
示例输出:
Saving debug log to /var/log/letsencrypt/letsencrypt.log
Plugins selected: Authenticator nginx, Installer nginx
Enter email address (used for urgent renewal and security notices) (Enter 'c' to
cancel): [email

- - - - - - - - - - - - - - - - - - - - - - - - - - - - - - - - - - - - - - - -
Please read the Terms of Service at
https://letsencrypt.org/documents/LE-SA-v1.2-November-15-2017.pdf. You must
agree in order to register with the ACME server at
https://acme-v02.api.letsencrypt.org/directory
- - - - - - - - - - - - - - - - - - - - - - - - - - - - - - - - - - - - - - - -
(A)gree/(C)ancel: a

- - - - - - - - - - - - - - - - - - - - - - - - - - - - - - - - - - - - - - - -
Would you be willing to share your email address with the Electronic Frontier
Foundation, a founding partner of the Let's Encrypt project and the non-profit
organization that develops Certbot? We'd like to send you email about our work
encrypting the web, EFF news, campaigns, and ways to support digital freedom.
- - - - - - - - - - - - - - - - - - - - - - - - - - - - - - - - - - - - - - - -
(Y)es/(N)o: y

Which names would you like to activate HTTPS for?
- - - - - - - - - - - - - - - - - - - - - - - - - - - - - - - - - - - - - - - -
1: wordpress.example.com
2: www.wordpress.example.com
- - - - - - - - - - - - - - - - - - - - - - - - - - - - - - - - - - - - - - - -
Select the appropriate numbers separated by commas and/or spaces, or leave input
blank to select all options shown (Enter 'c' to cancel): 1

Requesting a certificate for wordpress.example.com
Performing the following challenges:
http-01 challenge for wordpress.example.com
Waiting for verification...
Cleaning up challenges
...
Please choose whether or not to redirect HTTP traffic to HTTPS, removing HTTP access.
- - - - - - - - - - - - - - - - - - - - - - - - - - - - - - - - - - - - - - - -
1: No redirect - Make no further changes to the webserver configuration.
2: Redirect - Make all requests redirect to secure HTTPS access. Choose this for
new sites, or if you're confident your site works on HTTPS. You can undo this
change by editing your web server's configuration.
- - - - - - - - - - - - - - - - - - - - - - - - - - - - - - - - - - - - - - - -
Select the appropriate number [1-2] then [enter] (press 'c' to cancel): 2
....
Successfully received certificate.
Certificate is saved at: a2enmod ssl
/etc/letsencrypt/live/wordpress.example.com/fullchain.pem
Key is saved at:         /etc/letsencrypt/live/wordpress.example.com/privkey.pem
This certificate expires on 2022-07-18.
These files will be updated when the certificate renews.
Certbot has set up a scheduled task to automatically renew this certificate in the background.

- - - - - - - - - - - - - - - - - - - - - - - - - - - - - - - - - - - - - - - -
If you like Certbot, please consider supporting our work by:
 * Donating to ISRG / Let's Encrypt:   https://letsencrypt.org/donate
 * Donating to EFF:                    https://eff.org/donate-le
- - - - - - - - - - - - - - - - - - - - - - - - - - - - - - -
生成 SSL 证书后,继续通过 HTTPS 访问该网站
使用以下命令将 WordOps 更新到最新版本:
wo update结论
我们已经成功地了解了如何使用 WordOps 在 Linux 上安装和管理 WordPress 网站。我们都同意,WordOps 可以轻松安装和管理 WordPress 网站。我希望这很重要。
查看更多: