如何在 Ubuntu 22.04|20.04|18.04 上设置 Bolt CMS |
Bolt是一个基于PHP的轻量级内容管理系统。它从一开始就在 Silex microftamework 上构建,这使得开始处理小型应用程序变得容易。 Bolt 为在 WordPress 上寻找现代 PHP 系统的开发人员提供了一个很好的选择。在这篇博文中,我们将在 Ubuntu 20.04|18.04 上安装带有 MySQL 的 Bolt CMS。
Bolt CMS 的炫酷功能
- 使用 Silex 构建的简洁架构,非常容易学习
- 表单和数据库的标准组件
- 目的明确,不试图解决所有问题
第1步:更新Ubuntu系统
安装前首先更新和升级您的服务器
sudo apt -y update
sudo apt -y upgrade
还可以使用以下命令设置您的时区
sudo dpkg-reconfigure tzdata更新后重新启动系统
sudo reboot第2步:安装所需的包
安装 Bolt 需要以下软件包,运行以下命令来安装它们:
sudo apt install -y curl wget vim git unzip socat bash-completion apt-transport-https在 Ubuntu 上安装 PHP
在这里,我们将安装 PHP 7.x 和一些必需的模块。
sudo apt install -y php php-cli php-fpm php-common php-mbstring php-zip php-pgsql php-sqlite3 php-curl php-gd php-mysql php-intl php-json php-opcache php-xml在 Ubuntu 上安装 Nginx
运行以下命令在 Ubuntu 20.04 服务器计算机上安装 Nginx。
sudo apt install nginx使用以下命令启动并启用 Nginx:
sudo systemctl start nginx
sudo systemctl enable nginx
安装 MySQL 并为 Bolt 创建数据库
运行以下命令安装 MySQL 数据库服务器:
sudo apt -y install mysql-server
sudo systemctl start mysql
sudo systemctl enable mysql
安全的 mysql 安装
$ sudo mysql_secure_istallation
Would you like to setup VALIDATE PASSWORD plugin? N
New password: your_secure_password
Re-enter new password: your_secure_password
Remove anonymous users? [Y/n] Y
Disallow root login remotely? [Y/n] Y
Remove test database and access to it? [Y/n] Y
Reload privilege tables now? [Y/n] Y
连接mysql为Bolt创建数据库
sudo mysql -u root -p 输入上面创建的 root 密码。连接后,运行以下命令创建数据库和数据库用户。
CREATE DATABASE bolt;
CREATE USER 'bolt'@'localhost' IDENTIFIED BY 'mypassword';
GRANT ALL ON bolt.* TO 'bolt'@'localhost';
mysql> FLUSH PRIVILEGES;
mysql> exit
步骤 3:为 Bolt CMS 配置 Nginx
在 nginx 路径中创建一个名为 Bolt.conf 的文件,如图所示。
sudo vim /etc/nginx/sites-available/bolt.conf将以下内容添加到创建的文件中
server {
   listen 80;
   listen [::]:80;
   root /var/www/bolt;
   index  index.php index.html index.htm;
   server_name  bolt.example.com;

   location / {
   try_files           $uri $uri/ /index.php?$query_string;
   }

   location ~ [^/]\.php(/|$) {
   try_files            /index.php =404;
   fastcgi_split_path_info  ^(.+\.php)(/.+)$;
   fastcgi_index            index.php;
   fastcgi_pass             unix:/var/run/php/php-fpm.sock;
   include                  fastcgi_params;
   fastcgi_param   PATH_INFO       $fastcgi_path_info;
   fastcgi_param SCRIPT_FILENAME $document_root$fastcgi_script_name;
   }

  location = /bolt {
   try_files                $uri /index.php?$query_string;

  }
  location ^~ /bolt/ {
   try_files                 $uri /index.php?$query_string;
  }

}
通过创建 simlink 来启用创建的网站,如下所示:
sudo ln -s /etc/nginx/sites-available/bolt.conf /etc/nginx/sites-enabled/bolt.conf检查nginx配置并重启nginx
$ sudo nginx -t
nginx: the configuration file /etc/nginx/nginx.conf syntax is ok
nginx: configuration file /etc/nginx/nginx.conf test is successful

$ sudo systemctl restart nginx
第 4 步:在 Ubuntu 上下载 Bolt CMS
更改到您的根目录
cd /var/www/现在使用以下命令从 github 下载最新版本的 Bolt CMS:
sudo git clone https://github.com/bolt/bolt.git下载后,您应该会看到一个名为“bolt”的目录。切换到目录并安装bolt
cd bolt
sudo composer install
设置 Bolt 权限
Bolt 目录应该属于 nginx。
chown -R www-data:www-data /var/www/bolt
chmod -R 755 /var/www/bolt
配置螺栓配置文件
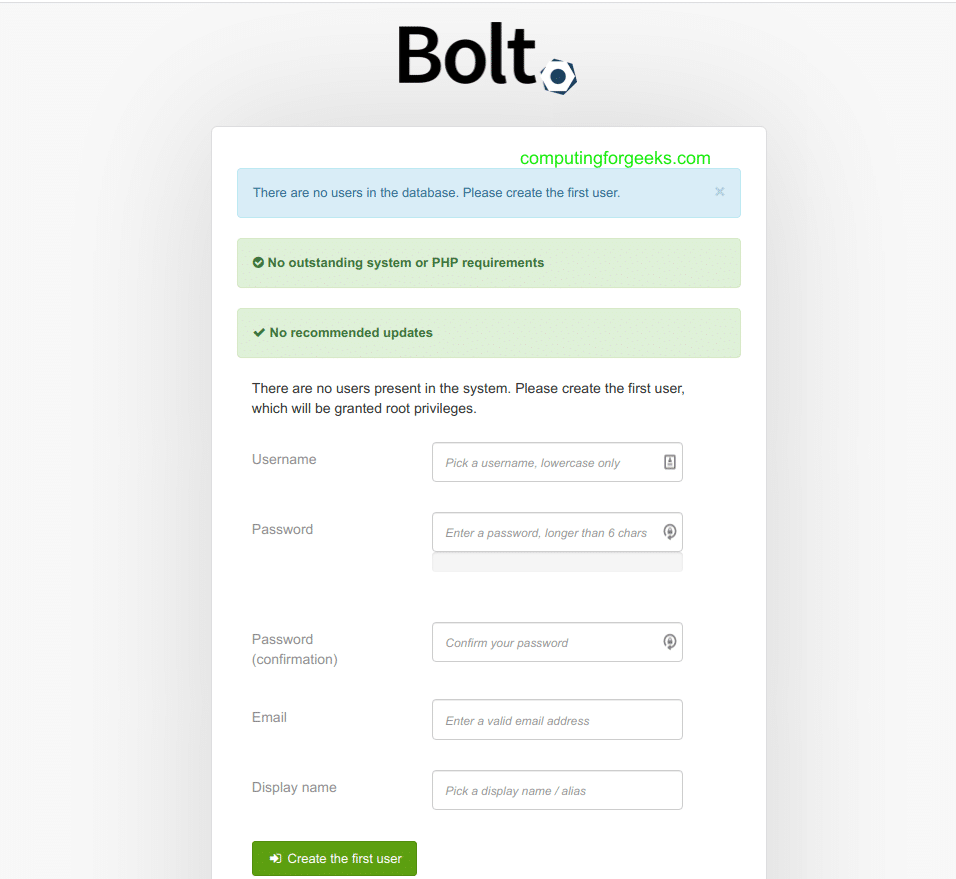
sudo cp app/config/config.yml.dist app/config/config.yml现在从浏览器打开 Bolt 以继续安装:http://bolt.example.com/。您应该得到如下页面。满足创建用户的要求。
提交用户设置后,您应该会进入如图所示的页面
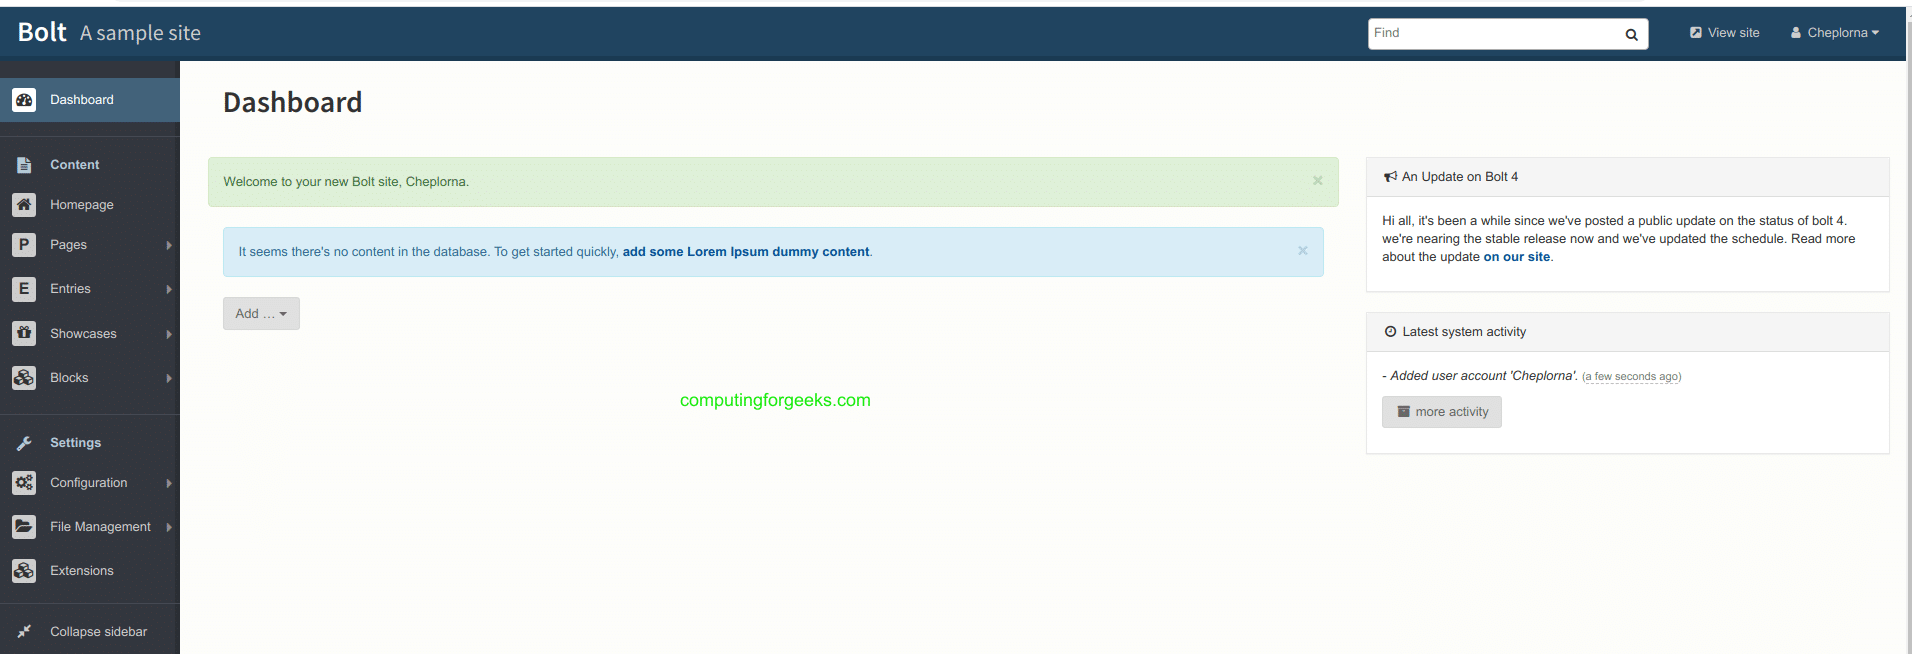
您应该完成安装。要访问 Bolt CMS 管理员,请将 Bolt 附加到您的网址:http://bolt.example.com/bolt。享受使用 Bolt CMS 的乐趣!请记住,下面有更多有趣的指南!
- 使用 Drush 命令行 shell 管理 Drupal CMS
- 在 CentOS 上安装和配置 October CMS
- 在 Ubuntu/Debian 上安装 October CMS
- 在 CentOS 上安装和配置 Drupal CMS
- 如何在 Ubuntu 上安装 Ghost CMS