如何在 CentOS/RHEL 7/8 上设置 Consul 集群
本教程将引导您完成在 CentOS/RHEL 7/8 上安装和配置 Consul Cluster 的步骤。 Consul 是一个开源、分布式且高度可用的解决方案,用于服务发现、配置和分段功能。 Consul 提供了一个简单的内置代理,但支持第三方代理集成,例如 Envoy。
在我们之前的指南中,我们介绍了在 Ubuntu 上安装三节点 Consul 集群。
Consul 的主要功能(来源:Consul 网站)
- 服务发现:客户端注册服务,其他应用程序可以使用Consul通过DNS或HTTP发现服务。
- 安全服务通信:Consul 可以为服务生成和分发 TLS 证书,以建立相互的 TLS 连接。
- KV 存储:Consul 的分层键/值存储可用于动态配置、协调、领导者选举、功能标记等。它有一个简单易用的 HTTP API。
- 健康检查:Consul 客户端对服务(如果正常)和本地节点(例如资源利用率)进行健康检查。此信息有助于监控集群运行状况以及将流量路由远离不运行状况的节点。
- 多数据中心:Consul 支持开箱即用的多个数据中心。
领事架构
每个向 Consul 提供服务的节点都运行一个 Consul 代理,该代理负责对节点上的服务以及节点本身进行健康检查。 Consul 代理与存储和复制数据的一台或多台 Consul 服务器通信。领事服务器自己选举一个领导者。
需要发现其他服务或节点的基础设施系统可以查询任何 Consul 服务器或任何 Consul 代理。代理自动将查询转发到服务器。
虽然 Consul 可以在一台服务器上运行,但建议生产环境使用 3 到 5 台 Consul 服务器,以避免出现可能导致数据完全丢失的故障情况。
CentOS 7 上的 Consul 集群设置
我的设置基于以下 CentOS 7 服务器。
设置服务器主机名,例如:
# Server 1
$ sudo hostnamectl set-hostname consul-01.example.com --static
# Server 2
$ sudo hostnamectl set-hostname consul-02.example.com --static
# Server 2
$ sudo hostnamectl set-hostname consul-03.example.com --static
然后将 SELinux 置于 Permissive 模式。
sudo setenforce 0
sudo sed -i 's/^SELINUX=.*/SELINUX=permissive/g' /etc/selinux/config
步骤1:在CentOS 7上安装Consul
我们需要在所有三个节点上安装 Consul。您可能需要在发布页面上查看最新版本。
sudo yum install -y wget unzip
export VER="1.6.2"
wget https://releases.hashicorp.com/consul/${VER}/consul_${VER}_linux_amd64.zip
提取文件
unzip consul_${VER}_linux_amd64.zip将提取的 consul 二进制文件移至 /usr/local/bin 目录
sudo mv consul /usr/local/bin/要验证 Consul 是否已正确安装,请在您的系统上运行 consul -v。
$ consul -v
Consul v1.6.2
Protocol 2 spoken by default, understands 2 to 3 (agent will automatically use protocol >2 when speaking to compatible agents)
要打印 consul 帮助页面,请使用 --help 选项。
$ consul  --help
 Usage: consul [--version] [--help]
 Available commands are:
     acl            Interact with Consul's ACLs
     agent          Runs a Consul agent
     catalog        Interact with the catalog
     connect        Interact with Consul Connect
     debug          Records a debugging archive for operators
     event          Fire a new event
     exec           Executes a command on Consul nodes
     force-leave    Forces a member of the cluster to enter the "left" state
     info           Provides debugging information for operators.
     intention      Interact with Connect service intentions
     join           Tell Consul agent to join cluster
     keygen         Generates a new encryption key
     keyring        Manages gossip layer encryption keys
     kv             Interact with the key-value store
     leave          Gracefully leaves the Consul cluster and shuts down
     lock           Execute a command holding a lock
     maint          Controls node or service maintenance mode
     members        Lists the members of a Consul cluster
     monitor        Stream logs from a Consul agent
     operator       Provides cluster-level tools for Consul operators
     reload         Triggers the agent to reload configuration files
     rtt            Estimates network round trip time between nodes
     services       Interact with services
     snapshot       Saves, restores and inspects snapshots of Consul server state
     tls            Builtin helpers for creating CAs and certificates
     validate       Validate config files/directories
     version        Prints the Consul version
     watch          Watch for changes in Consul
启用 bash 补全:
consul -autocomplete-install
complete -C /usr/local/bin/consul consul
第 2 步:引导并启动 Consul 集群
Consul bootstrapping 是在三个节点上一一完成的。如果您想进行单节点 Consul 设置,则可以跳过其他两个。
在所有Consul集群节点上运行
1. 创建consul系统用户/组
sudo groupadd --system consul
sudo useradd -s /sbin/nologin --system -g consul consul
2. 创建 consul 数据和配置目录并将所有权设置为 consul 用户
sudo mkdir -p /var/lib/consul /etc/consul.d
sudo chown -R consul:consul /var/lib/consul /etc/consul.d
sudo chmod -R 775 /var/lib/consul /etc/consul.d
设置 DNS 或编辑 /etc/hosts 文件以配置所有服务器的主机名(在所有节点上设置)。
$ sudo vi /etc/hosts

# Consul Cluster Servers
192.168.10.10 consul-01.example.com consul-01
192.168.10.11 consul-02.example.com consul-02
192.168.10.12 consul-03.example.com consul-03
将 example.com 替换为主机名设置中使用的实际域名。
Bootstrap Consul 第一个节点 – consul-01
对于单个节点Consul:
对于单服务器 Consul 设置,请在 /etc/systemd/system/consul.service 中创建一个包含以下内容的系统服务文件。
# Consul systemd service unit file
[Unit]
Description=Consul Service Discovery Agent
Documentation=https://www.consul.io/
After=network-online.target
Wants=network-online.target

[Service]
Type=simple
User=consul
Group=consul
ExecStart=/usr/local/bin/consul agent -server -ui \
	-advertise=192.168.10.10 \
	-bind=192.168.10.10 \
	-data-dir=/var/lib/consul \
	-node=consul-01 \
	-config-dir=/etc/consul.d

ExecReload=/bin/kill -HUP $MAINPID
KillSignal=SIGINT
TimeoutStopSec=5
Restart=on-failure
SyslogIdentifier=consul

[Install]
WantedBy=multi-user.target
在哪里 :
- 192.168.10.10 是Consul节点的IP地址
- -server 选项:将代理切换到服务器模式。
- -advertise:设置要使用的广告地址。
- -ui:启用内置静态 Web UI 服务器
- -node:此节点的名称。在集群中必须是唯一的。
- -data-dir:用于存储代理状态的数据目录的路径
对于三节点集群:
创建一个 systemd 服务文件 /etc/systemd/system/consul.service 并添加:
# Consul systemd service unit file
[Unit]
Description=Consul Service Discovery Agent
Documentation=https://www.consul.io/
After=network-online.target
Wants=network-online.target

[Service]
Type=simple
User=consul
Group=consul
ExecStart=/usr/local/bin/consul agent \
	-node=consul-01 \
	-config-dir=/etc/consul.d

ExecReload=/bin/kill -HUP $MAINPID
KillSignal=SIGINT
TimeoutStopSec=5
Restart=on-failure
SyslogIdentifier=consul

[Install]
WantedBy=multi-user.target
生成领事秘密
# consul keygen
pzDVYxESgPSkPhBFudHU5w==
然后在 /etc/consul.d/config.json 中为节点创建一个 json 配置文件
{
     "advertise_addr": "192.168.10.10",
     "bind_addr": "192.168.10.10",
     "bootstrap_expect": 3,
     "client_addr": "0.0.0.0",
     "datacenter": "DC1",
     "data_dir": "/var/lib/consul",
     "domain": "consul",
     "enable_script_checks": true,
     "dns_config": {
         "enable_truncate": true,
         "only_passing": true
     },
     "enable_syslog": true,
     "encrypt": "pzDVYxESgPSkPhBFudHU5w==",
     "leave_on_terminate": true,
     "log_level": "INFO",
     "rejoin_after_leave": true,
     "retry_join": [
         "consul-01",
         "consul-02",
         "consul-03"
     ],
     "server": true,
     "start_join": [
         "consul-01",
         "consul-02",
         "consul-03"
     ],
     "ui": true
 }
将所有出现的 192.168.10.10 替换为此节点的正确 IP 地址,并将 加密 值替换为您生成的密钥。
验证领事配置。
# consul validate /etc/consul.d/config.json
Configuration is valid!
您需要配置 DNS 或主机文件,短 DNS 名称(consul-01、consul-02 和consul-03)才能正常工作。
Bootstrap Consul第二个和第三个节点
领事节点2
创建Consul systemd服务:
$ sudo vi /etc/systemd/system/consul.service

[Unit]
Description=Consul Service Discovery Agent
Documentation=https://www.consul.io/
After=network-online.target
Wants=network-online.target

[Service]
Type=simple
User=consul
Group=consul
ExecStart=/usr/local/bin/consul agent \
	-node=consul-02 \
	-config-dir=/etc/consul.d

ExecReload=/bin/kill -HUP $MAINPID
KillSignal=SIGINT
TimeoutStopSec=5
Restart=on-failure
SyslogIdentifier=consul

[Install]
WantedBy=multi-user.target
创建Consul json配置文件:
$ sudo vi  /etc/consul.d/config.json
{
     "advertise_addr": "192.168.10.11",
     "bind_addr": "192.168.10.11",
     "bootstrap_expect": 3,
     "client_addr": "0.0.0.0",
     "datacenter": "DC1",
     "data_dir": "/var/lib/consul",
     "domain": "consul",
     "enable_script_checks": true,
     "dns_config": {
         "enable_truncate": true,
         "only_passing": true
     },
     "enable_syslog": true,
     "encrypt": "pzDVYxESgPSkPhBFudHU5w==",
     "leave_on_terminate": true,
     "log_level": "INFO",
     "rejoin_after_leave": true,
     "retry_join": [
         "consul-01",
         "consul-02",
         "consul-03"
     ],
     "server": true,
     "start_join": [
         "consul-01",
         "consul-02",
         "consul-03"
     ],
     "ui": true
}
领事节点3
创建Consul systemd服务:
$ sudo vi /etc/systemd/system/consul.service

[Unit]
Description=Consul Service Discovery Agent
Documentation=https://www.consul.io/
After=network-online.target
Wants=network-online.target

[Service]
Type=simple
User=consul
Group=consul
ExecStart=/usr/local/bin/consul agent \
	-node=consul-03 \
	-config-dir=/etc/consul.d

ExecReload=/bin/kill -HUP $MAINPID
KillSignal=SIGINT
TimeoutStopSec=5
Restart=on-failure
SyslogIdentifier=consul

[Install]
WantedBy=multi-user.target
创建Consul json配置文件:
$ sudo vi  /etc/consul.d/config.json
{
     "advertise_addr": "192.168.10.12",
     "bind_addr": "192.168.10.12",
     "bootstrap_expect": 3,
     "client_addr": "0.0.0.0",
     "datacenter": "DC1",
     "data_dir": "/var/lib/consul",
     "domain": "consul",
     "enable_script_checks": true,
     "dns_config": {
         "enable_truncate": true,
         "only_passing": true
     },
     "enable_syslog": true,
     "encrypt": "pzDVYxESgPSkPhBFudHU5w==",
     "leave_on_terminate": true,
     "log_level": "INFO",
     "rejoin_after_leave": true,
     "retry_join": [
         "consul-01",
         "consul-02",
         "consul-03"
     ],
     "server": true,
     "start_join": [
         "consul-01",
         "consul-02",
         "consul-03"
     ],
     "ui": true
}
启动领事服务
允许防火墙上的 consul 端口。
sudo firewall-cmd  --add-port={8300,8301,8302,8400,8500,8600}/tcp --permanent
sudo firewall-cmd  --add-port={8301,8302,8600}/udp --permanent
sudo firewall-cmd --reload
有关更多详细信息,请参阅领事端口。
在所有节点上启动consul服务
sudo systemctl start consul启用该服务在启动时启动
sudo systemctl enable consul可以通过以下方式检查服务状态:
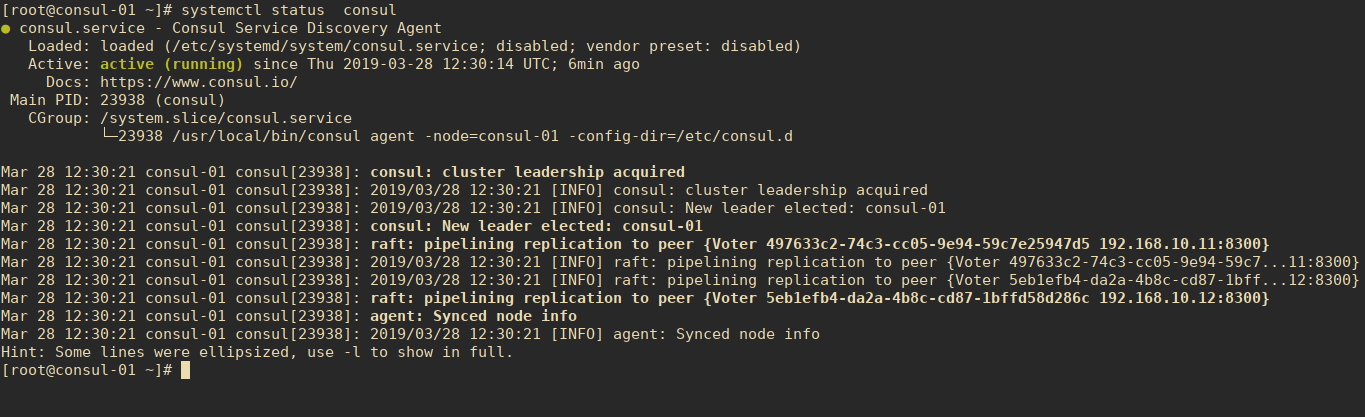
查看Consul集群成员:
# consul members

Node       Address             Status  Type    Build  Protocol  DC   Segment
consul-01  192.168.10.10:8301  alive   server  1.6.1  2         dc1  <all>
consul-02  192.168.10.11:8301  alive   server  1.6.1  2         dc1  <all>
consul-03  192.168.10.12:8301  alive   server  1.6.1  2         dc1  <all>
输出显示集群中每个节点的地址、健康状态、集群中的角色以及 consul 版本。您可以通过提供 -detailed 标志来获取其他元数据。
# consul members -detailed访问领事用户界面
您可以使用 URL http:// 访问 Consul 内置 Web 界面
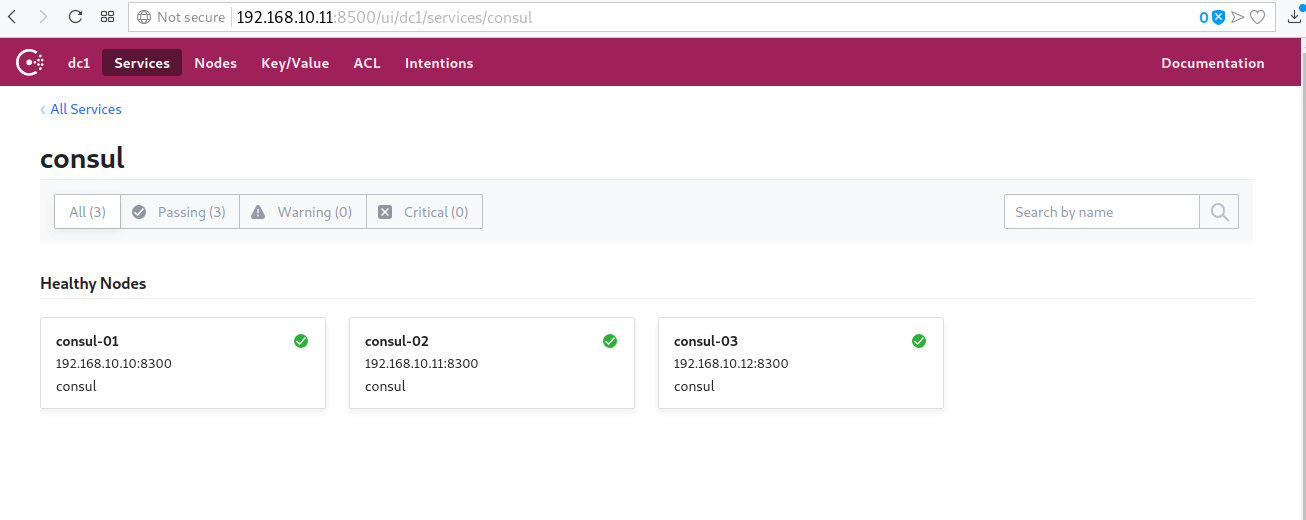
恭喜!您已在 CentOS/RHEL 7/8 上成功安装了三节点 Consul 集群。检查 Consul 文档以获取使用指南。
以下是有关 Consul 产品的其他指南。
在 Ubuntu/CentOS/Debian 上安装和配置 Hashicorp Vault 服务器
如何使用 Terraform 在 KVM 上配置虚拟机
如何在 Ubuntu 18.04/Ubuntu 16.04 LTS 上设置 Consul 集群
在 Windows 10/Windows Server 2019 上安装 Terraform
如何在 Ubuntu 18.04/CentOS 7 上安装 Terraform