在 Ubuntu 18.04 和 CentOS 7 上安装 MariaDB 10.6
本指南旨在帮助您在 CentOS 7 上运行 MariaDB 10.6/在 Ubuntu 18.04 服务器上安装 MariaDB 10.6?。截至撰写本文时,MariaDB 的最新稳定版本是 10.6。 CentOS 7 上安装的 MariaDB 默认版本是 5.5,Ubuntu 18.04 上安装的 MariaDB 默认版本是 10.1。这些版本可在操作系统上游存储库中找到。
在安装 MariaDB 10.6 之前,您可能需要卸载当前版本的 MariaDB 服务器。如果升级的话可以忽略这个。在 Ubuntu 上,运行:
sudo apt-get remove mariadb-server对于 CentOS 7,运行:
sudo yum remove mariadb-server在 Ubuntu 18.04 上安装 MariaDB 10.6
要在 Ubuntu 18.04 上安装 MariaDB 10.6,您需要将 MariaDB 存储库添加到系统中。
第 1 步:安装 software-properties-common(如果缺少):
安装 software-properties-common 软件包,它提供了 add-apt-repository 命令:
sudo apt-get install software-properties-common步骤 2:导入 MariaDB gpg 密钥:
运行以下命令将存储库密钥添加到系统
sudo apt-get install software-properties-common
sudo apt-key adv --fetch-keys 'https://mariadb.org/mariadb_release_signing_key.asc'
第三步:添加apt存储库
导入 PGP 密钥后,继续将存储库 URL 添加到您的 Ubuntu 18.04 服务器:
sudo add-apt-repository 'deb [arch=amd64,arm64,ppc64el] https://mariadb.mirror.liquidtelecom.com/repo/10.6/ubuntu bionic main'第四步:安装MariaDB
最后一步是MariaDB Server的安装:
sudo apt update
sudo apt install mariadb-server mariadb-client
系统将提示您提供 MariaDB root 密码。输入要设置的密码。
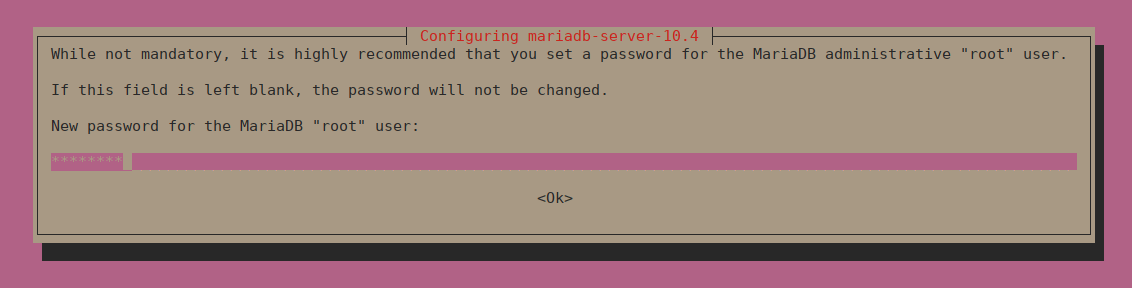
确认密码:
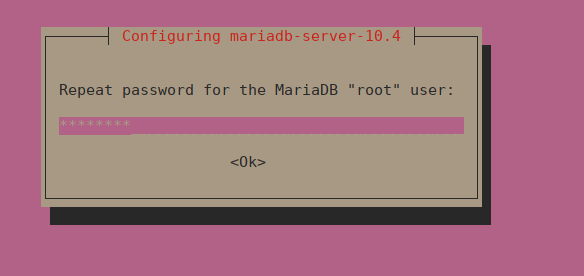
按<确定> 确认新密码并安装 MariaDB。请务必记下提供的密码。
如果系统未提示您设置 root 密码,请运行:
$ sudo mariadb-secure-installation

NOTE: RUNNING ALL PARTS OF THIS SCRIPT IS RECOMMENDED FOR ALL MariaDB
      SERVERS IN PRODUCTION USE!  PLEASE READ EACH STEP CAREFULLY!

In order to log into MariaDB to secure it, we'll need the current
password for the root user.  If you've just installed MariaDB, and
you haven't set the root password yet, the password will be blank,
so you should just press enter here.

Enter current password for root (enter for none):
OK, successfully used password, moving on...

Setting the root password ensures that nobody can log into the MariaDB
root user without the proper authorisation.

Set root password? [Y/n] y
New password:
Re-enter new password:
Password updated successfully!
Reloading privilege tables..
 ... Success!


By default, a MariaDB installation has an anonymous user, allowing anyone
to log into MariaDB without having to have a user account created for
them.  This is intended only for testing, and to make the installation
go a bit smoother.  You should remove them before moving into a
production environment.

Remove anonymous users? [Y/n] y
 ... Success!

Normally, root should only be allowed to connect from 'localhost'.  This
ensures that someone cannot guess at the root password from the network.

Disallow root login remotely? [Y/n] y
 ... Success!

By default, MariaDB comes with a database named 'test' that anyone can
access.  This is also intended only for testing, and should be removed
before moving into a production environment.

Remove test database and access to it? [Y/n] y
 - Dropping test database...
 ... Success!
 - Removing privileges on test database...
 ... Success!

Reloading the privilege tables will ensure that all changes made so far
will take effect immediately.

Reload privilege tables now? [Y/n] y
 ... Success!

Cleaning up...

All done!  If you've completed all of the above steps, your MariaDB
installation should now be secure.

Thanks for using MariaDB!
确认MariaDB版本:
$ mysql -u root -p
Enter password:
Welcome to the MariaDB monitor. Commands end with ; or \g.
Your MariaDB connection id is 49
Server version: 10.4.6-MariaDB-1:10.4.6+maria~bionic-log mariadb.org binary distribution

Copyright (c) 2000, 2018, Oracle, MariaDB Corporation Ab and others.

Type 'help;' or '\h' for help. Type '\c' to clear the current input statement.

MariaDB [(none)]>
使用以下命令检查版本:
MariaDB [(none)]> SELECT VERSION();
+------------------------------------------+
| version()                                |
+------------------------------------------+
| 10.4.6-MariaDB-1:10.4.6+maria~bionic-log |
+------------------------------------------+
1 row in set (0.000 sec)
以下是其他 Linux 发行版上的安装链接:
CentOS 8/RHEL 8:如何在 CentOS 8/RHEL 8 上安装 MariaDB 10.4
Debian 10:在 Debian 10 上安装 MariaDB
对于 Debian 9/Debian,请使用如何在 Debian 9/Debian 8 上安装 MariaDB 10.4
对于 Ubuntu 16.04,请使用如何在 Ubuntu 16.04 LTS (Xenial) 上安装 MariaDB 10.4
第5步:安装桌面数据库管理工具
如果您不喜欢使用 MySQL 命令行,那么请考虑安装数据库工具来帮助您。请查看下面我们的指南:
- 在 Ubuntu/Debian 上安装和配置 DBeaver
- 在 Fedora 和 CentOS 上安装和配置 DBeaver
对于 phpMyAdmin,请使用下面的指南:
如何在 Ubuntu/Debian、CentOS、Fedora 上安装最新的 phpMyAdmin
在 CentOS 7 上安装 MariaDB 10.6
将 MariaDB YUM 存储库添加到 CentOS 7 服务器:
cat <<EOF | sudo tee /etc/yum.repos.d/MariaDB.repo
[mariadb]
name = MariaDB
baseurl = http://yum.mariadb.org/10.6/centos7-amd64
gpgkey=https://yum.mariadb.org/RPM-GPG-KEY-MariaDB
gpgcheck=1
EOF
要安装其他版本的 MariaDB(例如 10.5 或 10.4 ),请将 10.6 替换为 baseurl 上的其他版本。
清理 yum 缓存索引:
sudo yum makecache fast在 CentOS 7 上安装 MariaDB 10.6:
sudo yum -y install MariaDB-server MariaDB-client有关已安装软件包的更多详细信息可以从以下位置查看:
$ rpm -qi MariaDB-server
Name        : MariaDB-server
Version     : 10.6.4
Release     : 1.el7.centos
Architecture: x86_64
Install Date: Wed Sep 29 19:28:29 2021
Group       : Applications/Databases
Size        : 125824191
License     : GPLv2
Signature   : DSA/SHA1, Wed Aug  4 18:58:00 2021, Key ID cbcb082a1bb943db
Source RPM  : MariaDB-server-10.6.4-1.el7.centos.src.rpm
Build Date  : Tue Aug  3 16:18:17 2021
Build Host  : centos74-amd64
Relocations : (not relocatable)
Vendor      : MariaDB Foundation
URL         : http://mariadb.org
Summary     : MariaDB: a very fast and robust SQL database server
Description :
MariaDB: a very fast and robust SQL database server

It is GPL v2 licensed, which means you can use the it free of charge under the
conditions of the GNU General Public License Version 2 (http://www.gnu.org/licenses/).

MariaDB documentation can be found at https://mariadb.com/kb
MariaDB bug reports should be submitted through https://jira.mariadb.org
启动并启用 MariaDB 服务:
sudo systemctl enable --now mariadb通过运行mysql_secure_installation 来保护 MariaDB。
$ sudo mariadb-secure-installation

NOTE: RUNNING ALL PARTS OF THIS SCRIPT IS RECOMMENDED FOR ALL MariaDB
      SERVERS IN PRODUCTION USE!  PLEASE READ EACH STEP CAREFULLY!

In order to log into MariaDB to secure it, we'll need the current
password for the root user.  If you've just installed MariaDB, and
you haven't set the root password yet, the password will be blank,
so you should just press enter here.

Enter current password for root (enter for none):
OK, successfully used password, moving on...

Setting the root password ensures that nobody can log into the MariaDB
root user without the proper authorisation.

Set root password? [Y/n] y
New password:
Re-enter new password:
Password updated successfully!
Reloading privilege tables..
 ... Success!


By default, a MariaDB installation has an anonymous user, allowing anyone
to log into MariaDB without having to have a user account created for
them.  This is intended only for testing, and to make the installation
go a bit smoother.  You should remove them before moving into a
production environment.

Remove anonymous users? [Y/n] y
 ... Success!

Normally, root should only be allowed to connect from 'localhost'.  This
ensures that someone cannot guess at the root password from the network.

Disallow root login remotely? [Y/n] y
 ... Success!

By default, MariaDB comes with a database named 'test' that anyone can
access.  This is also intended only for testing, and should be removed
before moving into a production environment.

Remove test database and access to it? [Y/n] y
 - Dropping test database...
 ... Success!
 - Removing privileges on test database...
 ... Success!

Reloading the privilege tables will ensure that all changes made so far
will take effect immediately.

Reload privilege tables now? [Y/n] y
 ... Success!

Cleaning up...

All done!  If you've completed all of the above steps, your MariaDB
installation should now be secure.

Thanks for using MariaDB!
登录并查看MariaDB版本:
# mysql -u root -p
Enter password:
Welcome to the MariaDB monitor.  Commands end with ; or \g.
Your MariaDB connection id is 3
Server version: 10.6.4-MariaDB MariaDB Server

Copyright (c) 2000, 2018, Oracle, MariaDB Corporation Ab and others.

Type 'help;' or '\h' for help. Type '\c' to clear the current input statement.

MariaDB [(none)]> SELECT VERSION();
+----------------+
| VERSION()      |
+----------------+
| 10.6.4-MariaDB |
+----------------+
1 row in set (0.000 sec)

MariaDB [(none)]> \q
Bye
您还可以使用以下命令检查版本:
# mysql -V
mysql  Ver 15.1 Distrib 10.6.4-MariaDB, for Linux (x86_64) using readline 5.1
MySQL学习课程:
您现在应该在 Ubuntu 18.04/CentOS 7 上运行 MariaDB 10.6。如果您想使用 MySQL 方式。查看我们之前的指南:
如何在 Ubuntu 18.04/16.04 上安装 MySQL 8.0
在 CentOS 7/CentOS 6 上安装 MySQL 服务器。
MySQL 值得阅读的书籍:
Murach 的 MySQL(第三版)
SQL 快速入门指南:使用 SQL 管理、分析和操作数据的简化初学者指南
SQL:一日之内学习 SQL(使用 MySQL)并学好它。 SQL 初学者与实践项目。 (通过实践项目快速学习编码)
SQL:一日之内学习 SQL(使用 MySQL)并学好它。 SQL 初学者与实践项目。 (通过实践项目手册 5 快速学习编码)