CentOS 7 上的 Zimbra 多服务器安装
本指南旨在帮助您在 CentOS 7 上执行 Zimbra 多服务器安装。Zimbra 被评为最佳开源邮件协作套件。只能与Exchange等商业电子邮件产品配套。
单服务器 Zimbra 的安装是一个简单的过程,但获得多服务器设置是一个涉及许多移动部件的过程,需要按以下顺序执行。
- 安装 LDAP 服务器 – 多主复制 (MMR) 或复制
- 安装 Zimbra 邮箱服务器
- 安装 MTA 服务器
- 安装代理服务器
我的设置将具有以下服务器:
- 2 台 LDAP 服务器 – 具有多主复制 (MMR)
- 2台邮箱服务器
- 2 个 MTA 服务器
- 2 台代理服务器 – 带 keepalived 和 VIP
因此,此设置的服务器总数为 7。主机名使用以下格式
- LDAP 服务器 – ldap-01.domain.com 和 ldap-02.domain.com
- 邮箱服务器 – mx-01.domain.com 和 mx-02.domain.com
- 2 个 MTA 服务器 – mta-01.domain.com 和 mta-02.domain.com
- 2 台代理服务器 – proxy-01.domain.com 和 proxy-02.domain.com。 mail.domain.com 上的 VIP
如果您严格遵循本指南,则可能需要将 domain.com 替换为您的有效域名。或者修改它以适合您的环境。
实验室环境搭建与安装
以下步骤将涵盖操作系统设置和各种 Zimbra 服务的安装。
步骤1:在所有服务器上安装CentOS 7
第一步是在所有目标服务器上安装 CentOS 7,并通过运行以下命令将软件包更新到最新版本:
sudo yum -y update步骤 2:安装 Zimbra 先决条件包并设置主机名
安装 Zimbra 安装所需的所有软件包并在所有服务器上设置主机名。可以通过运行以下命令来安装这些软件包:
sudo yum -y install perl-core unzip libaio nmap-ncat sysstat openssh-clients使用以下命令设置主机名:
$ sudo hostnamectl set-hostname <hostname>例如
sudo hostnamectl set-hostname ldap-01.domain.com步骤 3:使用主机名和 IP 地址修改 /etc/hosts
现在您已在每台服务器上设置了正确的主机名,请编辑主机文件以包含 IP 地址和主机名。您可以使用 echo 命令来执行此操作:
$ sudo vim /etc/hosts
192.168.1.20 mta-01.domain.com
在您拥有的所有服务器上执行此操作
第 4 步:在所有服务器上本地下载最新的 Zimbra 版本
将 Zimbra 压缩包下载到每台服务器并解压,为安装过程做好准备。对于本次安装,我使用 Zimbra 8.8。
wget https://files.zimbra.com/downloads/8.8.15_GA/zcs-8.8.15_GA_3869.RHEL7_64.20190918004220.tgz
tar xvf zcs-8.8.15_GA_3869.RHEL7_64.20190918004220.tgz
我喜欢保留文件和目录的全名,因为它有助于以后进行升级。如果下载相同版本的 Zimbra,您应该有一个名为 zcs-8.8.8_GA_2009.RHEL7_64.20180322150747/ 的目录。
步骤 4:安装 Zimbra LDAP 服务器 1 (ldap-01.domain.com)
我们将从 LDAP 服务器上首次安装 Zimbra 开始。我们将为另一个 LDAP 服务器配置多主复制。
cd zcs-8.8.15_GA_3869.RHEL7_64.20190918004220开始安装过程:
sudo ./install.sh填写信息如下:
Do you agree with the terms of the software license agreement? [N] y
Use Zimbra's package repository [Y] y

Select the packages to install
Install zimbra-ldap [Y] y

Install zimbra-logger [Y] n

Install zimbra-mta [Y] n

Install zimbra-dnscache [N] n

Install zimbra-snmp [Y] y

Install zimbra-store [Y] n

Install zimbra-apache [Y] n

Install zimbra-spell [Y] n

Install zimbra-memcached [Y] n

Install zimbra-proxy [Y] n

Install zimbra-chat [N] n

Install zimbra-drive [N] n
Checking required space for zimbra-core

Installing:
    zimbra-core
    zimbra-ldap
    zimbra-snmp

The system will be modified.  Continue? [N] Y
现在应该开始下载软件包了。我的配置如下:
Common configuration

   1) Hostname:                                ldap-01.domain.com
   2) Ldap master host:                        ldap-01.domain.com
   3) Ldap port:                               389
   4) Ldap Admin password:                     set
   5) Store ephemeral attributes outside Ldap: no
   6) Secure interprocess communications:      yes
   7) TimeZone:                                UTC
   8) IP Mode:                                 ipv4
   9) Default SSL digest:                      sha256

Ldap configuration

   1) Status:                                  Enabled
   2) Create Domain:                           yes
   3) Domain to create:                        mail.domain.com
   4) Ldap root password:                      set
   5) Ldap replication password:               set
   6) Ldap postfix password:                   set
   7) Ldap amavis password:                    set
   8) Ldap nginx password:                     set
   9) Ldap Bes Searcher password:              set
仔细检查要创建的 Ldap 主主机、主机名和域的设置。一旦您对设置感到满意,请按a开始安装和配置过程。
*** CONFIGURATION COMPLETE - press 'a' to apply
Select from menu, or press 'a' to apply config (? - help) a
Save configuration data to a file? [Yes]
Save config in file: [/opt/zimbra/config.31786]
Saving config in /opt/zimbra/config.31786...done.
The system will be modified - continue? [No] Yes
安装完成后,提取后续所有步骤所需的密码凭据:
ldap_amavis_password = 4Y9WzugHAz
ldap_bes_searcher_password = 4Y9WzugHAz
ldap_nginx_password = 4Y9WzugHAz
ldap_postfix_password = 4Y9WzugHAz
ldap_replication_password = 4Y9WzugHAz
ldap_root_password = 4Y9WzugHAz
zimbra_ldap_password = 4Y9WzugHAz
步骤 5:在 ldap-01 服务器上启用 LDAP MMR
由于我们将两台 LDAP 服务器设置为主服务器,因此我们需要在刚刚安装的第一台主服务器上启用此功能。
在现有单节点主服务器上启用多主服务器复制:
[root@ldap-01 ~]# su - zimbra
[zimbra@ldap-01 ~]$ ./libexec/zmldapenable-mmr -s 1 -m ldap://ldap-02.domain.com:389/
[zimbra@ldap-01 ~]$ ./libexec/zmldapenable-mmr -r 101 -m ldap://dap-02.domain.com:389/
[zimbra@ldap-01 ~]$ /opt/zimbra/libexec/zmldapmmrtool -q
Master Server ID: 1
Master replication agreement: 1
rid: 100 URI: ldap://ldap-02.domain.com:389/ TLS: critical
Master replication agreement: 2
rid: 101 URI: ldap://ldap-02.domain.com:389/ TLS: critical
[zimbra@ldap-01 ~]$
在 Ldap Server 2 上,像第一次一样安装 Zimbra,但其配置应如下所示:
Common configuration

   1) Hostname:                                ldap-02.domain.com
   2) Ldap master host:                        ldap-01.domain.com
   3) Ldap port:                               389
   4) Ldap Admin password:                     set
   5) Store ephemeral attributes outside Ldap: no
   6) Secure interprocess communications:      yes
   7) TimeZone:                                UTC
   8) IP Mode:                                 ipv4
   9) Default SSL digest:                      sha256


Ldap configuration

   1) Status:                                  Enabled
   2) Create Domain:                           yes
   3) Domain to create:                        mail.domain.com
   4) Ldap replication type:                   mmr
   5) Ldap Server ID:                          2
   6) Ldap root password:                      set
   7) Ldap replication password:               set
   8) Ldap postfix password:                   set
   9) Ldap amavis password:                    set
  10) Ldap nginx password:                     set
  11) Ldap Bes Searcher password:              set
应配置以下内容:
- LDAP 管理员密码
- LDAP 复制密码
- LDAP 复制类型:mmr
- 所有其他密码
请参阅步骤 4了解如何获取所需的所有密码。
第 6 步:安装 Zimbra 邮箱服务器
现在通过运行安装程序安装两个邮箱服务器。
sudo ./install.sh要安装的软件包是:
Do you agree with the terms of the software license agreement? [N] y
Use Zimbra's package repository [Y] y

Select the packages to install
Install zimbra-ldap [Y] n

Install zimbra-logger [Y] y

Install zimbra-mta [Y] n

Install zimbra-dnscache [N] n

Install zimbra-snmp [Y] y

Install zimbra-store [Y] y

Install zimbra-apache [Y] y

Install zimbra-spell [Y] y

Install zimbra-memcached [Y] n

Install zimbra-proxy [Y] n

Install zimbra-chat [N] n

Install zimbra-drive [N] n
Install zimbra-imapd (BETA - for evaluation only) [N] n
Checking required space for zimbra-core

Installing:
    zimbra-core
    zimbra-logger
    zimbra-snmp
    zimbra-store
    zimbra-apache
    zimbra-spell
    zimbra-convertd
    zimbra-archiving
    zimbra-drive

The system will be modified.  Continue? [N] Y
请注意,您只需在一台服务器上安装记录器。对于我来说,记录器安装在 mx-01 上。配置如下所示:
Common configuration

   1) Hostname:                                mx-01.domain.com
   2) Ldap master host:                        ldap-01.domain.com
   3) Ldap port:                               389
   4) Ldap Admin password:                     set
   5) LDAP Base DN:                            cn=zimbra
   6) Store ephemeral attributes outside Ldap: yes
   7) Value for zimbraEphemeralBackendURL:     ldap://default
   8) Secure interprocess communications:      yes
   9) TimeZone:                                UTC
  10) IP Mode:                                 ipv4
11) Default SSL digest: sha256 在通用配置下,设置:
- 主机名:mx-01.domain.com
- LDAP 主主机:ldap-01.domain.com
- LDAP 管理员密码:
在zimbra-store下确保配置以下项目:
- 管理员密码:
- SMTP 主机:
- 配置与邮件代理一起使用:TRUE
- 配置与网络代理一起使用:TRUE
- 安装 UI(zimbra、zimbraAdmin Web 应用程序):是
- 安装邮件存储(服务网络应用程序):是
您可以修改您认为必要的任何其他设置并开始安装过程。对于其他邮箱服务器,重复相同的步骤,但不要安装记录器,它将在mx-01上运行。
第 7 步:安装 Zimbra MTA 服务器
下一阶段是安装 MTA 服务器。您的套餐选择应如下所示:
Select the packages to install

Install zimbra-ldap [Y] n
Install zimbra-logger [Y] n
Install zimbra-mta [Y] y
Install zimbra-dnscache [Y] y
Install zimbra-snmp [Y] y
Install zimbra-store [Y] n
Install zimbra-apache [Y] n
Install zimbra-spell [Y] n
Install zimbra-memcached [Y] n
Install zimbra-proxy [Y] n
Install zimbra-chat [N] n
Install zimbra-drive [N] n

Checking required space for zimbra-core

Installing:
    zimbra-core
    zimbra-mta
    zimbra-snmp
    zimbra-dnscache

The system will be modified.  Continue? [N] y
在配置窗口中,确保设置以下内容:
在1) 通用配置下,设置:
- 主机名:
- LDAP主控主机:
- LDAP 管理员密码:
 1) Hostname:                                mta-01.domain.com
 2) Ldap master host:                        ldap-01.domain.com
 3) Ldap port:                               389
 4) Ldap Admin password:                     set
 5) LDAP Base DN:                            cn=zimbra
 6) Store ephemeral attributes outside Ldap: yes
 7) Value for zimbraEphemeralBackendURL:     ldap://default
 8) Secure interprocess communications:      yes
 9) TimeZone:                                UTC
10) IP Mode:                                 ipv4
11) Default SSL digest: sha256 在2)zimbra-mta设置下
- 为postfix ldap用户绑定密码:
- amavis ldap用户绑定密码:
请参阅步骤 4了解如何获取它们。
Mta configuration

   1) Status:                                  Enabled
   2) Enable Spamassassin:                     yes
   3) Enable Clam AV:                          yes
   4) Enable OpenDKIM:                         yes
   5) Notification address for AV alerts:      [email
   6) Bind password for postfix ldap user:     set
7) Bind password for amavis ldap user: set 在zimbra-dnscache下配置主 DNS IP 地址,以空格分隔:
DNS Cache configuration

   1) Status:                                  Enabled
   2) Master DNS IP address(es):               8.8.4.4 1.1.1.1  8.8.8.8
   3) Enable DNS lookups over TCP:             yes
   4) Enable DNS lookups over UDP:             yes
5) Only allow TCP to communicate with Master DNS: no 完成后,保存设置并输入a开始 Zimbra MTA 设置。
第 7 步:安装 Zimbra 代理服务器
要安装 Zimbra 代理服务器,您需要在安装过程中选择以下软件包:
Select the packages to install

Install zimbra-ldap [Y] n

Install zimbra-logger [Y] n

Install zimbra-mta [Y] n

Install zimbra-dnscache [N] n

Install zimbra-snmp [Y] y

Install zimbra-store [Y] n

Install zimbra-apache [Y] n

Install zimbra-spell [Y] n

Install zimbra-memcached [Y] y

Install zimbra-proxy [Y] y

Install zimbra-chat [N] n

Install zimbra-drive [N] n
Checking required space for zimbra-core

Installing:
    zimbra-core
    zimbra-snmp
    zimbra-memcached
    zimbra-proxy

The system will be modified.  Continue? [N] y
填写所有必填信息:
Common configuration

   1) Hostname:                                proxy-01.domain.com
   2) Ldap master host:                        ldap-01.domain.com
   3) Ldap port:                               389
   4) Ldap Admin password:                     set
   5) LDAP Base DN:                            cn=zimbra
   6) Store ephemeral attributes outside Ldap: yes
   7) Value for zimbraEphemeralBackendURL:     ldap://default
   8) Secure interprocess communications:      yes
   9) TimeZone:                                UTC
  10) IP Mode:                                 ipv4
  11) Default SSL digest:                      sha256

Proxy configuration

   1) Status:                                  Enabled
   2) Enable POP/IMAP Proxy:                   TRUE
   3) Enable strict server name enforcement?   TRUE
   4) IMAP server port:                        7143
   5) IMAP server SSL port:                    7993
   6) IMAP proxy port:                         143
   7) IMAP SSL proxy port:                     993
   8) POP server port:                         7110
   9) POP server SSL port:                     7995
  10) POP proxy port:                          110
  11) POP SSL proxy port:                      995
  12) Bind password for nginx ldap user:       set
  13) Enable HTTP[S] Proxy:                    TRUE
  14) Web server HTTP port:                    8080
  15) Web server HTTPS port:                   8443
  16) HTTP proxy port:                         80
  17) HTTPS proxy port:                        443
18) Proxy server mode: redirect 对于代理服务器模式,您可以根据您的要求选择http、https、两者、重定向或混合。就我而言,我使用重定向。
安装所有 Zimbra 代理服务器后,以 Zimbra 用户身份在代理服务器上运行以下命令,在端口 9071 上启用代理控制台:
$ sudo  su - zimbra
$ /opt/zimbra/libexec/zmproxyconfig -e -w -C -H `zmhostname`- 这将在代理服务器上启用管理控制台代理端口 9071。
- 确保邮箱服务器的管理控制台配置在端口 7071(默认)上。
更改后需要重新启动代理服务:
$ zmproxyctl restart该服务应该绑定到端口 9071,您可以使用 ss 命令确认这一点:
$ ss -tunelp | grep 9071要通过代理访问管理控制台,URL 应为 https://proxy-0x.domain.com:9071/
步骤 8:配置 Zimbra 记录器服务
如前所述,我们的记录器服务将在邮箱服务器 1 (mx-01.domain.com) 上运行。 为此,我们需要首先在此服务器上安装并配置 rsyslog 服务。
取消注释/etc/rsyslog.conf上的以下行
$ModLoad imudp
$UDPServerRun 514
另外,在 $UDPServerRun 514 之后添加此行:
SYSLOGD_options="-r -m 0"然后设置 Zimbra syslog 并重新启动 rsyslog 服务:
$ /opt/zimbra/libexec/zmfixperms -e -v
$ /opt/zimbra/libexec/zmsyslogsetup

updateSyslog: Updating /etc/rsyslog.conf...done.

$ sudo systemctl restart rsyslog.service
$ sudo su - zimbra
$ /opt/zimbra/libexec/zmloggerinit

Stopping logswatch...done.
Starting logswatch...done.
$ /opt/zimbra/bin/zmupdateauthkeys
使用以下命令验证 LogHostname。 (应设置为所有服务器上记录器监控主机的名称)
$ sudo su - zimbra
$ zmprov gacf | grep zimbraLogHostname
zimbraLogHostname: mx-01.domain.com
如果不同,请使用以下命令将其更改为记录器监控主机。
$ zmprov mcf zimbraLogHostname <Logger monitor Hostname>配置每个 Zimbra 服务器以记录到新设置的记录器服务器。
$ sudo /opt/zimbra/libexec/zmfixperms -e -v
$ sudo su - zimbra
/opt/zimbra/bin/zmupdateauthkeys ; exit

$ /opt/zimbra/libexec/zmsyslogsetup
$ sudo systemctl restart rsyslog
$ sudo su - zimbra -c "zmcontrol restart"
步骤 9:使用 Keepalived 配置 Zimbra 代理 HA
由于我们有两个 Zimbra 代理服务器,因此我们需要确保代理服务器具有 HA。我的代理设置是:
- 2 个代理服务器 – proxy-01.domain.com 和 proxy-02.domain.com
- 两者都将使用 mail.domain.com 提供服务
目标解图为
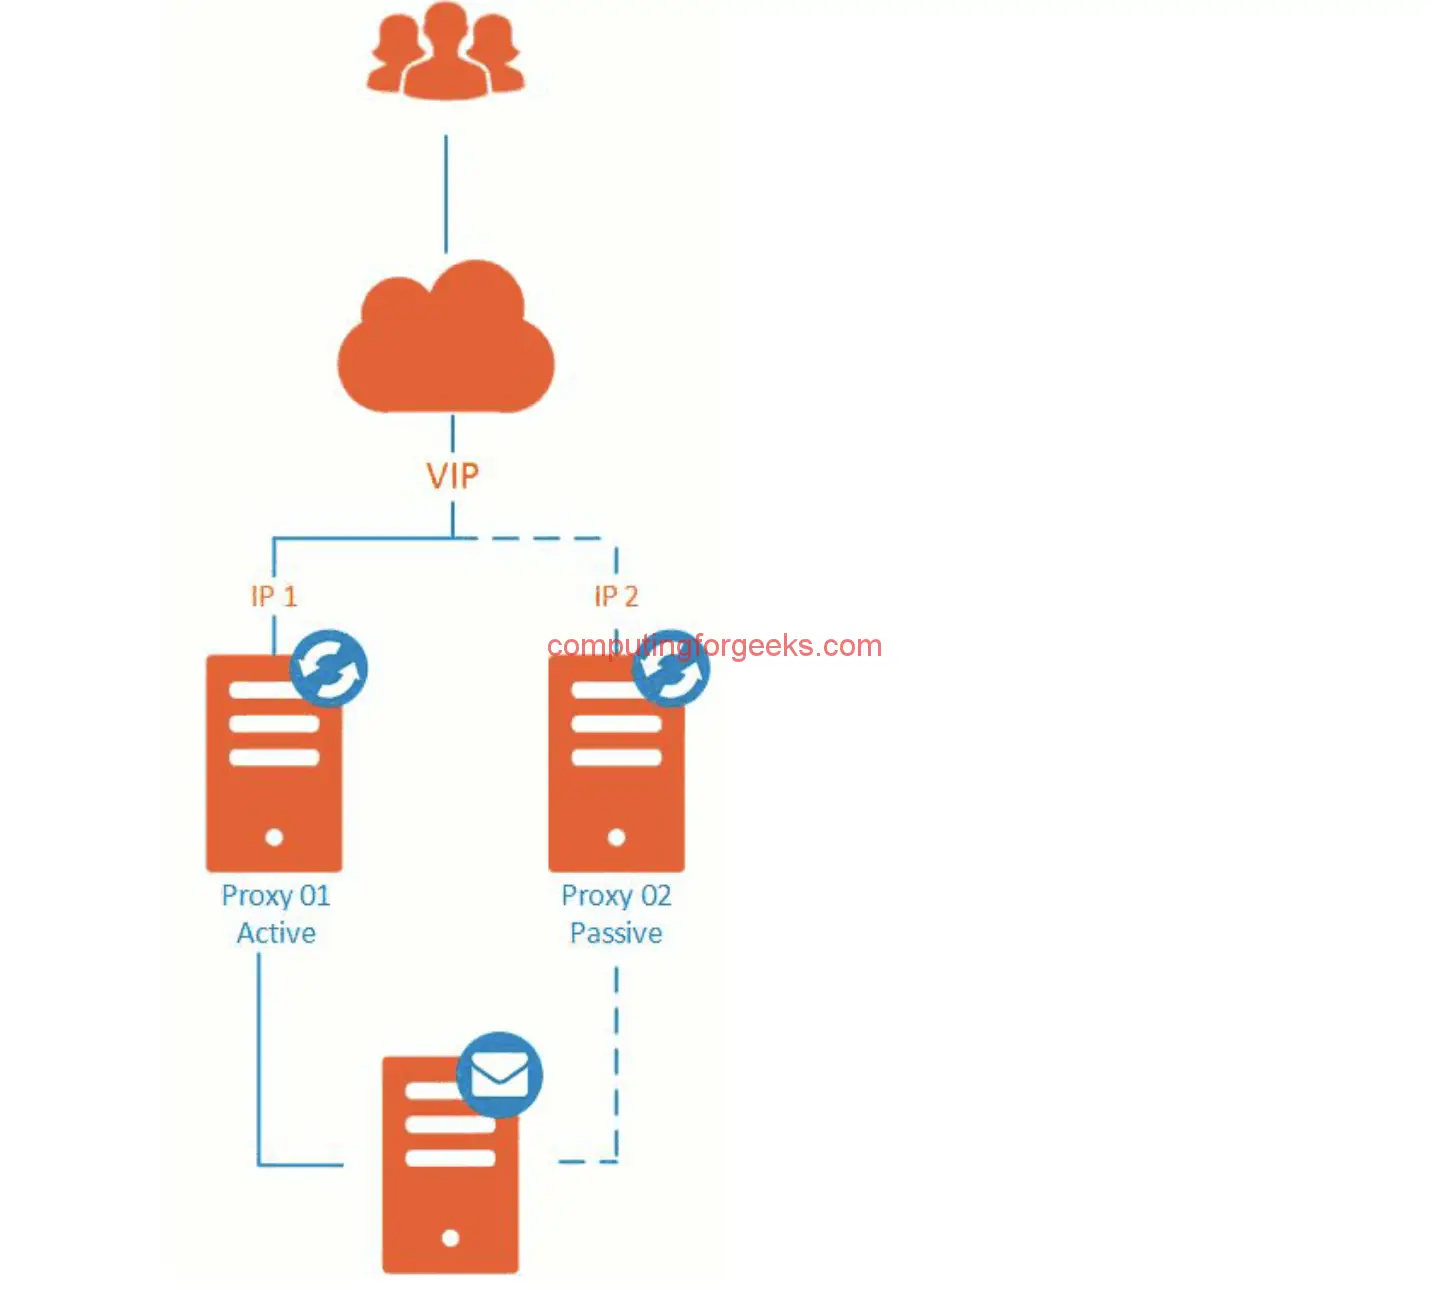
简而言之,它的工作原理如下:
- 代理大师作为 VIP
- 代理主机不可用
- VIP 被传递到将处理服务的备份服务器
我将配置 proxy-01 作为主服务器,并将 proxy-02 配置为备份服务器。
在两台服务器上安装 Keepalived。
sudo yum -y install keepalived在主服务器 (proxy-01) 上配置 Keepalived
$ sudo vim /etc/keepalived/keepalived.conf
vrrp_script chk_zimbra_nginx {
  script "killall -0 nginx" # check the zimbra nginx process  interval 2 # every 2 seconds
  weight 2 # add 2 points if OK}vrrp_instance VI_1 {
  interface eth0 # interface to monitor
  state MASTER # MASTER on proxy-01, BACKUP on proxy-02
  virtual_router_id 51
  priority 101 # 101 on proxy-01, 100 on proxy-02
  virtual_ipaddress {
   192.168.1.23/24
  }
  track_script {
    chk_zimbra_nginx
  }
}
在备份服务器 (proxy-01) 上配置 Keepalived
$ sudo vim /etc/keepalived/keepalived.conf
vrrp_script chk_zimbra_nginx {
  script "killall -0 nginx" # check the zimbra nginx process
  interval 2 # every 2 seconds
  weight 2 # add 2 points if OK
}

vrrp_instance VI_1 {
  interface eth0 # interface to monitor
  state BACKUP # MASTER on proxy-01, BACKUP on proxy-02
  virtual_router_id 51
  priority 100 # 101 on proxy-01, 100 on proxy-02
  virtual_ipaddress {
    192.168.1.23/24
  }
  track_script {
    chk_zimbra_nginx
  }
}
启用IP转发并配置firewalld:
Keepalived 需要配置 IP 转发并添加一些防火墙规则才能使 VRRP 数据包通过。
启用IP转发:
echo "net.ipv4.ip_forward = 1" | sudo tee -a /etc/sysctl.conf
sudo sysctl -p
添加防火墙规则,以允许在 Keepalived 将控制的每个网络接口上使用多播 IP 地址 224.0.0.18 和 VRRP 协议 (112) 进行 VRRP 通信,例如:
sudo firewall-cmd --direct --permanent --add-rule ipv4 filter INPUT 0 --in-interface eth0 --destination 224.0.0.18 --protocol vrrp -j ACCEPT

sudo firewall-cmd --direct --permanent --add-rule ipv4 filter OUTPUT 0 --out-interface eth0 --destination 224.0.0.18 --protocol vrrp -j ACCEPT

sudo firewall-cmd --reload
在每台服务器上启用并启动 keepalived 服务:
sudo systemctl enable keepalived
sudo systemctl start keepalived
如果更改 Keepalived 配置,请重新加载 keepalived 服务:
sudo systemctl reload keepalived您可以通过终止主服务器上的 nginx 进程来测试 keepalived 功能,并查看虚拟 IP 是否会切换到备份服务器:
$ sudo killall nginx
$ ip add > Run on Backup server to check IP address configuration
第10步:重置管理员密码并访问Web UI
重置管理员密码:
$ sudo su - zimbra
$ zmprov sp [email  strongpassword
通过直接访问代理服务器或指向代理服务器的主机名来访问 Web UI。可通过端口 9071 访问管理信息中心。
您可以使用以下方法为代理服务器配置防火墙规则:
sudo firewall-cmd --add-service={http,https,smtp,smtps,imap,imaps,pop3,pop3s} --permanent
sudo firewall-cmd --add-port=11211/tcp --permanent
sudo firewall-cmd --add-port=9071/tcp --permanent
sudo firewall-cmd --reload
要限制来自特定 IP 地址的访问或管理界面,请改用firewalld 丰富规则:
sudo firewall-cmd --permanent --add-rich-rule="rule family=ipv4 source address=source-ip-address/32 \
destination address=dest-ip-address/32 port port=9071 protocol=tcp accept"
请记住将 source-ip-address 替换为源 IP 地址,将 dest-ip-address 替换为代理服务器目标 IP 地址。
您现在应该准备好滚动、重置管理员密码并登录管理仪表板,开始对 Zimbra 安装进行更改和进一步配置。另外,请阅读我们之前关于使用 ufw(适用于 Ubuntu)和 Firewalld(适用于 CentOS)进行 Zimbra 防火墙配置的指南。