如何在 Ubuntu 20.04 上安装 MySQL 5.7
在今天的指南中,我们将了解如何在 Ubuntu 20.04 (Focal Fossa) 服务器上安装 MySQL 5.7。 MySQL 是最常用的数据库管理系统之一。它使用关系数据库的概念并具有客户端/服务器体系结构。它可以安装在各种操作系统上,包括 Windows、CentOS 和 Debian 等。
以下步骤描述了如何在 Ubuntu 20.04 上安装和配置 MySQL 5.7。首先添加带有 MySQL 软件包的 APT 存储库,然后深入到实际的软件包安装和配置。
步骤1:添加MySQL APT存储库
Ubuntu 已经附带了默认的 MySQL 软件包存储库。为了添加或安装最新的存储库,我们将安装包存储库。使用以下命令下载存储库:
sudo apt update
sudo apt install wget -y
wget https://dev.mysql.com/get/mysql-apt-config_0.8.12-1_all.deb
下载后,通过运行以下命令安装存储库:
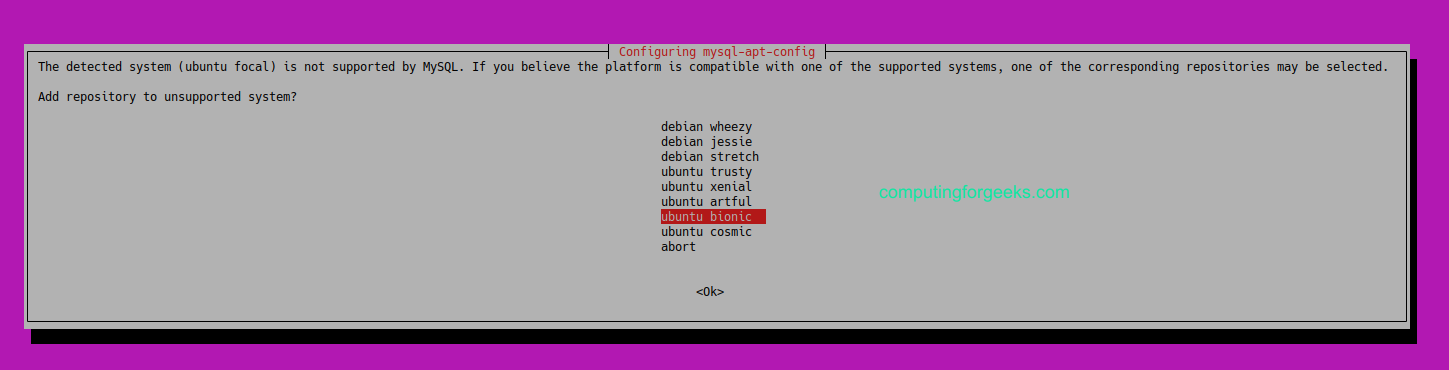
sudo dpkg -i mysql-apt-config_0.8.12-1_all.deb在提示中,选择Ubuntu Bionic,然后单击确定
下一个提示显示默认选择的 MySQL 8.0。选择第一个选项,然后单击确定

在下一个提示中,选择 MySQL 5.7 服务器,然后单击确定。

接下来的提示默认选择MySQL5.7。选择最后一个选项确定并点击确定

第 2 步:更新 MySQL 存储库
运行以下命令来更新您的系统软件包
sudo apt-get update现在使用apt-cache搜索MySQL 5,7,如下所示:
$ sudo apt-cache policy mysql-server
mysql-server:
  Installed: (none)
  Candidate: 8.0.26-0ubuntu0.20.04.2
  Version table:
     8.0.26-0ubuntu0.20.04.2 500
        500 http://mirrors.linux教程/ubuntu focal-updates/main amd64 Packages
        500 http://security.ubuntu.com/ubuntu focal-security/main amd64 Packages
     8.0.19-0ubuntu5 500
        500 http://mirrors.linux教程/ubuntu focal/main amd64 Packages
     5.7.35-1ubuntu18.04 500
500 http://repo.mysql.com/apt/ubuntu bionic/mysql-5.7 amd64 Packages如您所见,MySQl 5.7.31-1ubuntu18.04出现在列表中。
步骤3:在Ubuntu 20.04上安装MySQL 5.7
在我们的系统中找到 MySQL 5.7 后,我们将使用以下命令安装 MySQL 5.7 客户端、MySQL 5.7 服务器:
sudo apt install -f mysql-client=5.7* mysql-community-server=5.7* mysql-server=5.7*按y键开始在 Ubuntu 20.04 Linux 上安装 MySQL 5.7。
Reading package lists... Done
Building dependency tree
Reading state information... Done
Selected version '5.7.35-1ubuntu18.04' (MySQL:repo.mysql.com [amd64]) for 'mysql-client'
Selected version '5.7.35-1ubuntu18.04' (MySQL:repo.mysql.com [amd64]) for 'mysql-community-server'
Selected version '5.7.35-1ubuntu18.04' (MySQL:repo.mysql.com [amd64]) for 'mysql-server'
The following additional packages will be installed:
  libmecab2 libtinfo5 mysql-common mysql-community-client
The following NEW packages will be installed:
  libmecab2 libtinfo5 mysql-client mysql-common mysql-community-client mysql-community-server mysql-server
0 upgraded, 7 newly installed, 0 to remove and 90 not upgraded.
Need to get 51.6 MB of archives.
After this operation, 315 MB of additional disk space will be used.
Do you want to continue? [Y/n] y
出现提示时输入并重新输入 root 密码

步骤 4:安全安装 MySQL 5.7
运行以下命令以保护 MySQL
sudo mysql_secure_installation按输入。当提示输入密码时,请提供上面设置的 root 密码。
请回答以下提示:
Enter current password for root (enter for none): <Enter password>
VALIDATE PASSWORD PLUGIN can be used to test passwords
and improve security. It checks the strength of password
and allows the users to set only those passwords which are
secure enough. Would you like to setup VALIDATE PASSWORD plugin?

Press y|Y for Yes, any other key for No: Y

There are three levels of password validation policy:

LOW    Length >= 8
MEDIUM Length >= 8, numeric, mixed case, and special characters
STRONG Length >= 8, numeric, mixed case, special characters and dictionary

Please enter 0 = LOW, 1 = MEDIUM and 2 = STRONG: 1
Using existing password for root.
Estimated strength of the password: 25
Change the password for root ? ((Press y|Y for Yes, any other key for No) : d
Remove anonymous users? [Y/n] Y
Disallow root login remotely? [Y/n] Y
Remove test database and access to it? [Y/n] Y
Reload privilege tables now? [Y/n] Y
Thanks for using MariaDB!
步骤5:检查MySQL 5.7版本
要确认安装的版本,首先使用设置的 root 密码连接到 MySQL。
$ mysql -u root -p
Enter password:
Welcome to the MySQL monitor.  Commands end with ; or \g.
Your MySQL connection id is 6
Server version: 5.7.35 MySQL Community Server (GPL)

Copyright (c) 2000, 2021, Oracle and/or its affiliates.

Oracle is a registered trademark of Oracle Corporation and/or its
affiliates. Other names may be trademarks of their respective
owners.

Type 'help;' or '\h' for help. Type '\c' to clear the current input statement.

mysql>
运行以下命令来显示版本
$ SELECT VERSION();
+-----------+
| VERSION() |
+-----------+
| 5.7.35    |
+-----------+
1 row in set (0.00 sec)
第6步:创建MySQL用户(可选,仅测试)
在仍连接到 MySQL 的情况下,运行以下命令来创建用户:
CREATE USER 'user'@'%' IDENTIFIED BY 'MyStrongPass.';
GRANT ALL PRIVILEGES ON * . * TO 'user'@'%';
FLUSH PRIVILEGES;
exit
第7步:启用MySQL远程访问(可选)
默认情况下,MySQL 远程访问处于禁用状态。要启用它,我们需要编辑 mysqld.cnf 文件,如下所示:
sudo vim /etc/mysql/mysql.conf.d/mysqld.cnf查找行‘bind_address’并进行如下更改:
# By default we only accept connections from localhost
#bind-address   = 127.0.0.1
bind-address   = 0.0.0.0
保存文件并重启mysql
sudo systemctl restart mysql允许通过防火墙进行远程连接
sudo ufw allow from <remote_IP_address> to any port 3306
sudo ufw enable
要从远程计算机访问数据库,请运行以下命令:
$ mysql -u user -h database_server_ip -p您已在 Ubuntu 20.04 上成功安装 MySQL 5.7。
最佳 MySQL Udemy 视频课程:
- 终极 MySQL 训练营:从 SQL 初学者到专家
- SQL – 用于数据分析和商业智能的 MySQL
- MySQL、SQL 和存储过程(从初级到高级)
- SQL 初学者:使用 MySQL 和数据库设计学习 SQL
- 完整的 MySQL 开发人员课程
- MySQL 数据库管理:初级 SQL 数据库设计
- 学习 MySQL 数据库设计
查看下面更多有趣的 Linux 指南: