在 Linux 上创建计时器
展示如何创建符合 POSIX 标准的间隔计时器的教程。
某些事件的计时是开发人员的常见任务。定时器的常见场景是看门狗、任务的循环执行或在特定时间安排事件。在本文中,我将展示如何使用timer_create(...) 创建符合 POSIX 标准的间隔计时器。
您可以从 GitHub 下载以下示例的源代码。
准备Qt Creator
我使用 Qt Creator 作为本示例的 IDE。要在 Qt Creator 中运行和调试示例代码,请克隆 GitHub 存储库,打开 Qt Creator,然后转到文件 -> 打开文件或项目...,然后选择 CMakeLists.txt :
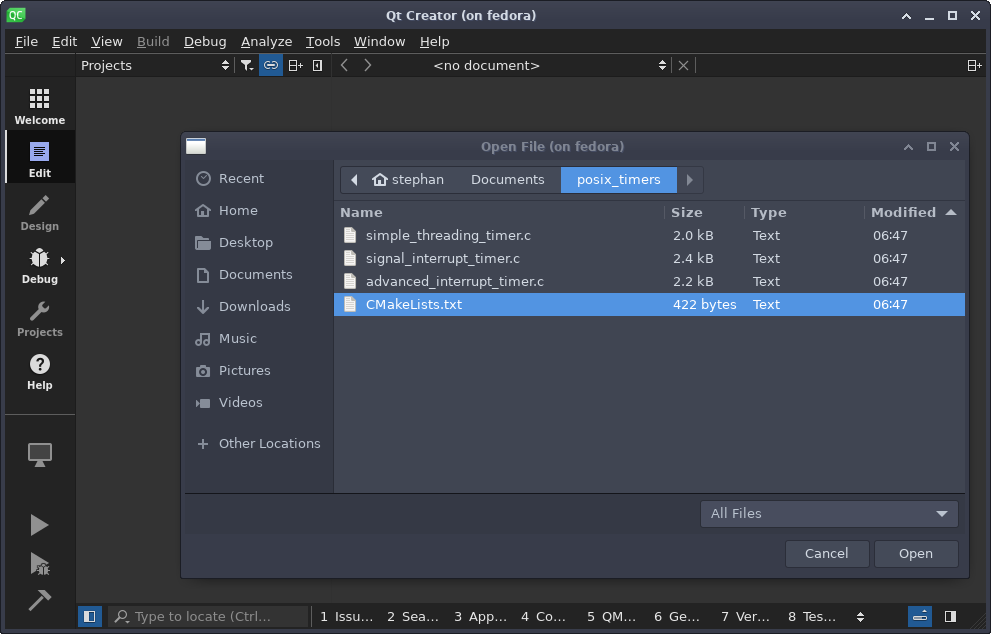
在 Qt Creator 中打开项目 (CC-BY-SA 4.0)
选择工具链后,单击配置项目。该项目包含三个独立的示例(我们将在本文中仅介绍其中两个)。使用绿色标记的菜单,在每个示例的配置之间切换,并为每个示例激活在终端中运行(请参见下面的黄色标记)。可以通过左下角的调试按钮选择当前活动的构建和调试示例(请参见下面的橙色标记):
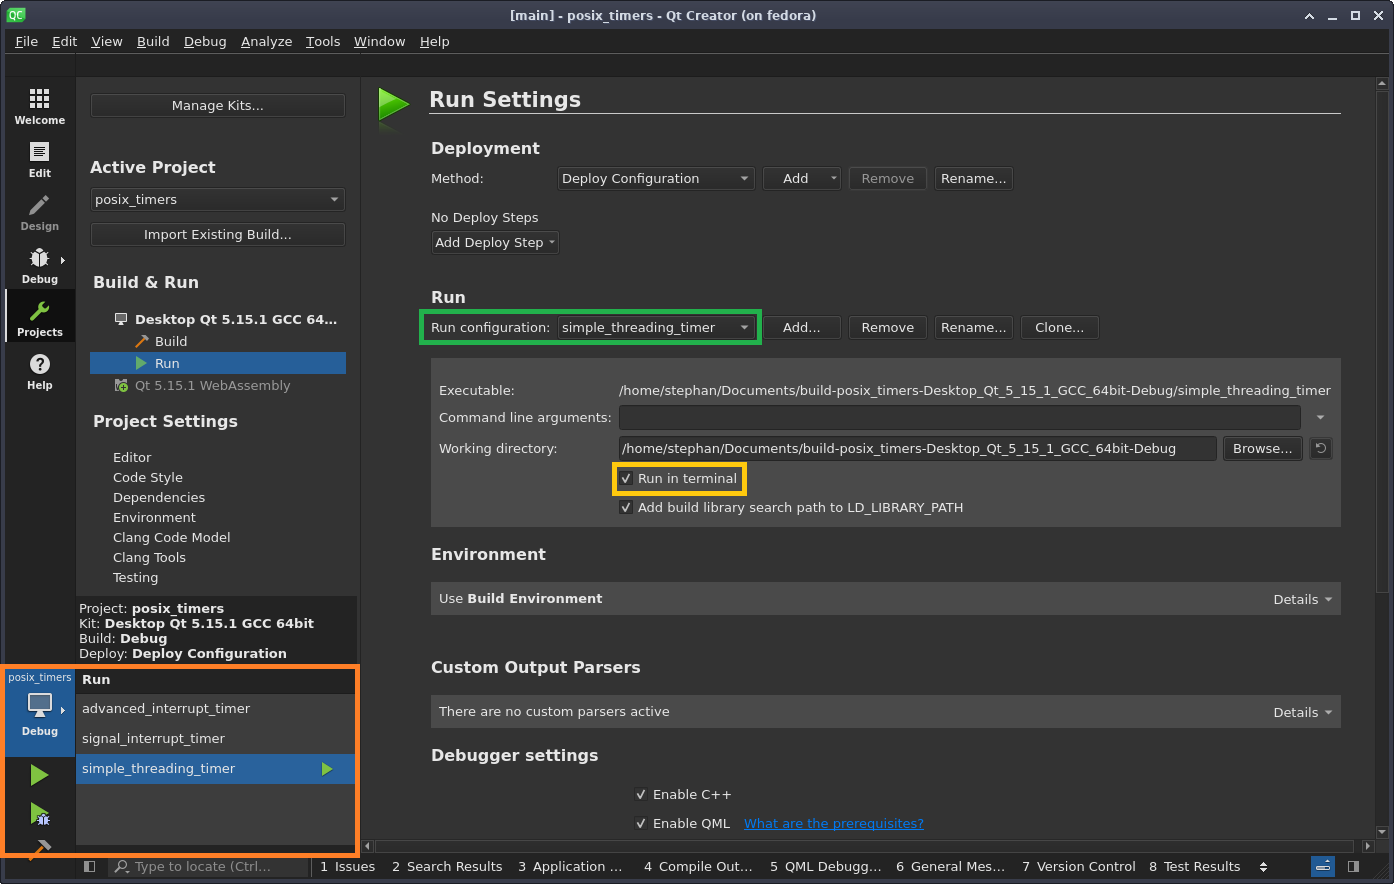
项目配置(CC-BY-SA 4.0)
线程定时器
让我们看一下 simple_threading_timer.c 示例。这是最简单的一个:它显示了如何创建间隔计时器,该计时器在到期时调用函数expired。每次到期时,都会创建一个新线程,在该线程中调用函数expiration。
#include <stdio.h>
#include <stdlib.h>
#include <time.h>
#include <signal.h>
#include <unistd.h>
#include <string.h>
#include <errno.h>

void expired(union sigval timer_data);

pid_t gettid(void);

struct t_eventData{
    int myData;
};

int main()
{
    int res = 0;
    timer_t timerId = 0;

    struct t_eventData eventData = { .myData = 0 };


    /*  sigevent specifies behaviour on expiration  */
    struct sigevent sev = { 0 };

    /* specify start delay and interval
     * it_value and it_interval must not be zero */

    struct itimerspec its = {   .it_value.tv_sec  = 1,
                                .it_value.tv_nsec = 0,
                                .it_interval.tv_sec  = 1,
                                .it_interval.tv_nsec = 0
                            };

    printf("Simple Threading Timer - thread-id: %d\n", gettid());

    sev.sigev_notify = SIGEV_THREAD;
    sev.sigev_notify_function = &expired;
    sev.sigev_value.sival_ptr = &eventData;


    /* create timer */
    res = timer_create(CLOCK_REALTIME, &sev, &timerId);


    if (res != 0){
        fprintf(stderr, "Error timer_create: %s\n", strerror(errno));
        exit(-1);
    }

    /* start timer */
    res = timer_settime(timerId, 0, &its, NULL);

    if (res != 0){
        fprintf(stderr, "Error timer_settime: %s\n", strerror(errno));
        exit(-1);
    }

    printf("Press ETNER Key to Exit\n");
    while(getchar()!='\n'){}
    return 0;
}


void expired(union sigval timer_data){
    struct t_eventData *data = timer_data.sival_ptr;
    printf("Timer fired %d - thread-id: %d\n", ++data->myData, gettid());
}
这种方法的优点是代码占用空间小且调试简单。缺点是由于在到期时创建新线程而产生额外开销,因此导致行为的确定性较差。
中断信号定时器
过期定时器通知的另一种可能性是基于内核信号。内核不会在每次定时器到期时创建一个新线程,而是向进程发送信号,进程被中断,并调用相应的信号处理程序。
由于接收到信号时的默认操作是终止进程(请参阅信号手册页),因此我们必须提前准备好 Qt Creator,以便可以进行正确的调试。
当被调试者收到信号时 Qt Creator 的默认行为是:
- 中断执行并切换到调试器上下文。
- 显示一个弹出窗口,通知用户已接收到信号。
这两种操作都不需要,因为信号的接收是我们应用程序的一部分。
Qt Creator 在后台使用 GDB。为了防止GDB在进程收到信号时停止执行,请进入工具 -> 选项,选择调试器,然后导航到局部变量和表达式。将以下表达式添加到调试助手自定义:
handle SIG34 nostop pass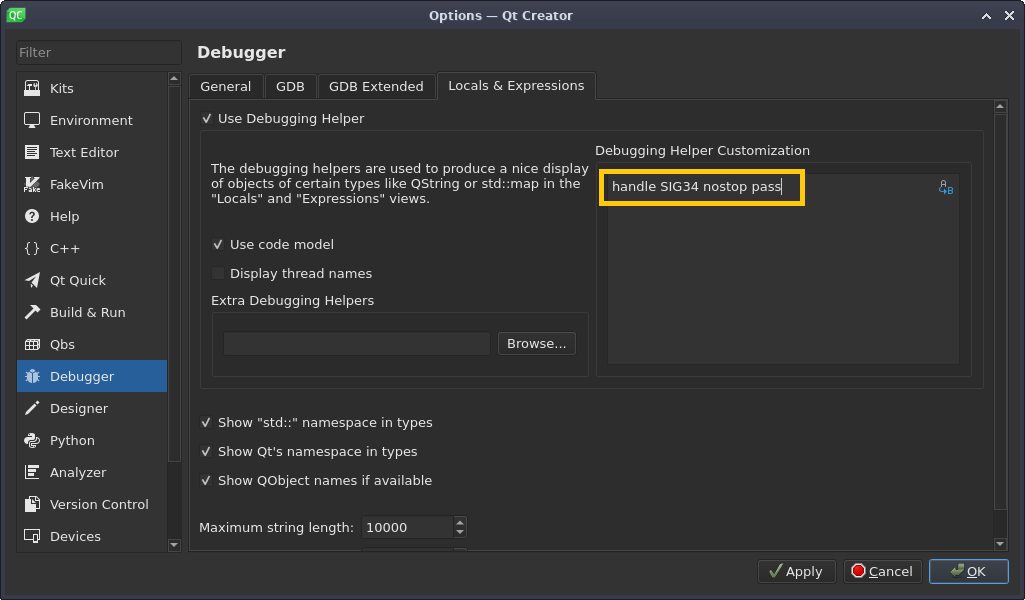
Sig 34 因错误而无法停止 (CC-BY-SA 4.0)
您可以在 GDB 文档中找到有关 GDB 信号处理的更多信息。
接下来,当我们在信号处理程序中停止时,我们要抑制每次收到信号时通知我们的弹出窗口:

Signal 34弹出框(CC-BY-SA 4.0)
为此,请导航到选项卡 GDB 并取消选中标记的复选框:
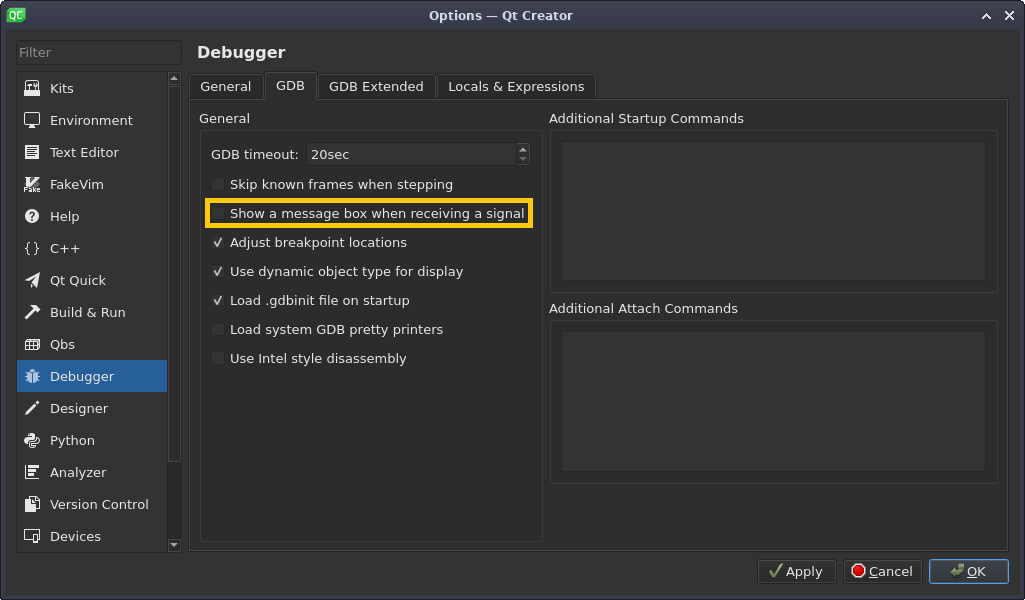
定时器信号窗口(CC-BY-SA 4.0)
现在您可以正确调试signal_interrupt_timer。信号定时器的实际实现有点复杂:
#include <stdio.h>
#include <stdlib.h>
#include <signal.h>
#include <unistd.h>
#include <signal.h>
#include <time.h>
#include <unistd.h>
#include <errno.h>
#include <string.h>

#define UNUSED(x) (void)(x)

static void handler(int sig, siginfo_t *si, void *uc);
pid_t gettid(void);

struct t_eventData{
    int myData;
};

int main()
{
    int res = 0;
    timer_t timerId = 0;


    struct sigevent sev = { 0 };
    struct t_eventData eventData = { .myData = 0 };

    /* specifies the action when receiving a signal */
    struct sigaction sa = { 0 };

    /* specify start delay and interval */
    struct itimerspec its = {   .it_value.tv_sec  = 1,
                                .it_value.tv_nsec = 0,
                                .it_interval.tv_sec  = 1,
                                .it_interval.tv_nsec = 0
                            };

    printf("Signal Interrupt Timer - thread-id: %d\n", gettid());

    sev.sigev_notify = SIGEV_SIGNAL; // Linux-specific
    sev.sigev_signo = SIGRTMIN;
    sev.sigev_value.sival_ptr = &eventData;

    /* create timer */
    res = timer_create(CLOCK_REALTIME, &sev, &timerId);

    if ( res != 0){
        fprintf(stderr, "Error timer_create: %s\n", strerror(errno));
        exit(-1);
    }

    /* specifz signal and handler */
    sa.sa_flags = SA_SIGINFO;
    sa.sa_sigaction = handler;

    /* Initialize signal */
    sigemptyset(&sa.sa_mask);

    printf("Establishing handler for signal %d\n", SIGRTMIN);

    /* Register signal handler */
    if (sigaction(SIGRTMIN, &sa, NULL) == -1){
        fprintf(stderr, "Error sigaction: %s\n", strerror(errno));
        exit(-1);
    }

    /* start timer */
    res = timer_settime(timerId, 0, &its, NULL);

    if ( res != 0){
        fprintf(stderr, "Error timer_settime: %s\n", strerror(errno));
        exit(-1);
    }

    printf("Press ENTER to Exit\n");
    while(getchar()!='\n'){}
    return 0;
}


static void
handler(int sig, siginfo_t *si, void *uc)
{
    UNUSED(sig);
    UNUSED(uc);
    struct t_eventData *data = (struct t_eventData *) si->_sifields._rt.si_sigval.sival_ptr;
    printf("Timer fired %d - thread-id: %d\n", ++data->myData, gettid());
}
与线程定时器相反,我们必须初始化信号并注册信号处理程序。这种方法的性能更高,因为它不会导致创建额外的线程。因此,信号处理程序的执行也更具确定性。缺点显然是需要额外的配置工作才能正确调试。
概括
本文中描述的两种方法都是定时器的接近内核实现。即使timer_create(...)函数是POSIX规范的一部分,由于数据结构的微小差异,也不可能在FreeBSD系统上编译示例代码。除了这个缺点之外,这样的实现还为您提供了对通用计时应用程序的细粒度控制。